Send Attachments from OneDrive in Outlook Web App – Tutorial
Send Attachments from OneDrive in Outlook Web App: Video
This video lesson, titled “Sending Attachments from OneDrive,” shows you how to send attachments from OneDrive in Outlook Web App. This video lesson on how to send attachments from OneDrive in Outlook Web App is from our complete Outlook Web App training, titled “Mastering Outlook on the Web Made Easy v.2016.”
Send Attachments from OneDrive in Outlook Web App: Overview
Sometimes you will need to send attachments from OneDrive in Outlook Web App. Any time you want to send a person an electronic copy of a file, you send it as an attachment. For example, if you had to send a copy of your budget to your manager, you could simply insert a copy of the workbook into the message as an attachment. Assuming that the manager also had the software necessary to read your spreadsheet file, they would then receive the file and open it to view the information that you sent.
A unique feature of the Outlook Web App allows you to attach a “link” to a file saved in your OneDrive cloud storage. This allows the recipient to access your file on the cloud server without having to first download the file. This option saves space in the email message and does not require the recipient to have the program to interact with the file on their personal computer. This also allows multiple people to work on the same file in real time.
To send attachments from OneDrive in Outlook Web App, click “New” to create a new email message or open a message in your “Drafts” folder. At the top of the message pane, click “Attach” to open the file attachments pane.
The contents of your OneDrive will be listed and any folders you created to store files in will be included with the default “Recent,” “My files” and “Shared with me” folders. If you are a member of any “Groups,” the files that are shared will be listed under “Groups” and will act the same as an attachment from a OneDrive folder.
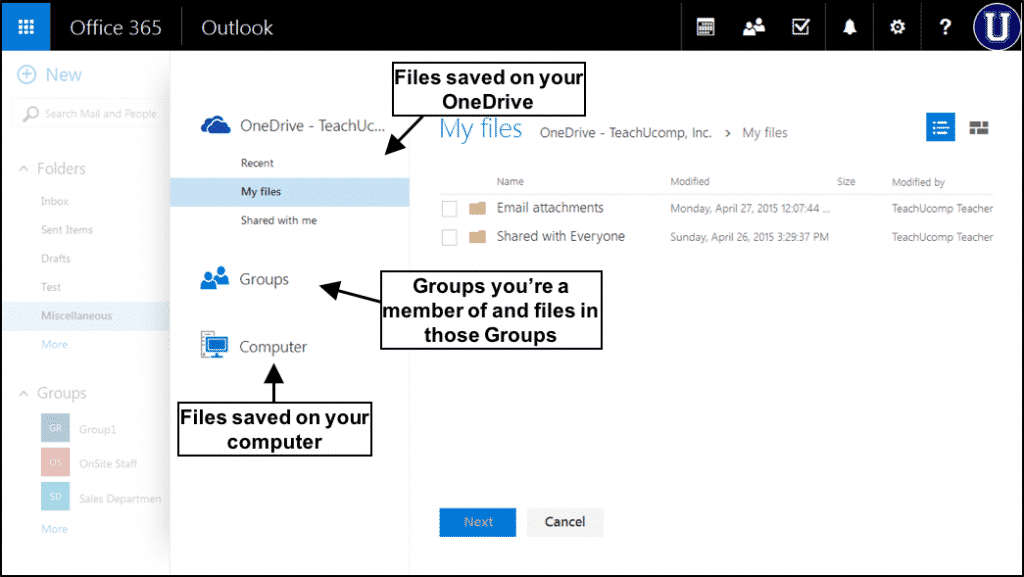
Send Attachments from OneDrive in Outlook Web App – Tutorial: A picture of a user attaching a file from OneDrive to an email message using the Outlook Web App.
Click the folder that contains the OneDrive file you want to attach as a link to your email message. When the name of the file is displayed in the pane on the right of the screen, check the checkbox next to the file and click “Next” at the bottom of the pane. You will be given the choice to “Share with OneDrive” or “Send as attachment.”
Choose “Share with OneDrive” to continue the process. This option will create a link to the file saved on your OneDrive cloud storage account. This will allow the recipient to view and edit the file without having to download it. This saves space on your email message and allows changes to be made to the file without having to pass it back and forth.
Anyone who receives a link to a OneDrive file can access, view, and possibly make changes to the file, depending on the settings you choose. This is an extremely helpful option when you have multiple email recipients that need to work on the same file.
After being returned to the email message, the link will display in a small box below the “Subject” line of your message. Clicking the “X” will remove the link from the email message.
Clicking the downward facing arrow in the attachment box will open up options for your attached link. If you would like to change how recipients interact with your OneDrive file, choose “Change permissions.” Clicking “Change permissions” opens a small pane that allows you to choose whether they “Can edit” or “Can view.” “Can edit” allows recipients to make and save changes to the document either in Word Online or within their desktop version of Word. “Can view” allows recipients to only view the file. They will not be allowed to make changes. The final option is an “Apply to all attached files” checkbox. This allows you to make one selection to change the permissions for all files attached to this email message. Choose your options and click “OK” to save the changes and close the box. Click “Cancel” to not make any changes and close the box.
The final two options, contained in an attached link, are “View” and “Open in new tab.” “View” is used to open and view the file in the currently opened window and “Open in new tab” is used to open and display the file in a new tab of your web browser.
Send Attachments from OneDrive in Outlook Web App: Instructions
- To send attachments from OneDrive in Outlook Web App within a message, click “Attach” at the top of the message pane to open the file attachment pane.
- Choose the folder the file is contained in under “OneDrive” or “Groups” and check the checkbox for that file or files.
- Click “Next” and choose “Share with OneDrive” to attach a link to the file.
- Choose “Send as attachment” to attach a copy of the file to the email.
- All attachments will appear as a box below the “Subject” line in the email message pane.
- To remove an attachment from the message, click the “X” in the right corner of the attachment box.
- To view the attachment, click the downward facing arrow in the attachment box and click “View.” This works for attached files and linked files.
- If the file type works with a program in Office 365, the file will open in a new pane and you will be able to edit the file- for example, a Word document will open in Word Online, within the Outlook App.
- To download an attachment, click the downward facing arrow in the attachment box and choose “Download.”
- A file download dialog box will open, choose “Save File” and click “OK.”
- You will only have the option to “Download” files that are attached to the message. Files linked from OneDrive will not display a download option.
- To adjust the permissions for a file attached from OneDrive, click the downward facing arrow in the attachment box and choose “Change permissions” to open a popup pane.
- To set the file to be viewed only, click “Can view.”
- To allow recipients to edit the file, choose “Can edit.”
- To apply the setting to all attached links, check the “Apply to all attached files” checkbox.
- Click “OK” to save the changes and close the pane.
- Click “Cancel” to not make any changes and close the pane.
- To open a linked file in a new tab, click the downward facing arrow and choose “Open in new tab.”
