Set Margins in Word – Instructions
Set Margins in Word: Video Lesson
This video lesson, titled “Setting Margins,” shows how to set margins in Word. This lesson is from our complete Word tutorial, titled “Mastering Word Made Easy v.2019 and 365.”
Set Margins in Word: Overview
How to Apply Preset Margins in Word
You can set margins in Word to adjust the margin size of your Word documents. To set margins in Word, first click the “Layout” tab in the Ribbon. Then click the “Margins” drop-down button in the “Page Setup” button group.
In this drop-down is a “Last Custom Setting” option, six preset margin choices, and a “Custom Margins” command. To apply preset margins in Word, click one of the preset margin choices shown in the drop-down menu.
How to Apply Custom Margins and Page Orientation in Word
Alternatively, to set custom margins in Word, click the “Custom Margins…” command to open the “Page Setup” dialog box and display the “Margins” tab. In the “Page Setup” dialog box, you can choose the size of the margins for your document by using the spinner arrows for the “Top,” “Bottom,” “Left,” “Right,” and/or “Gutter” spinner boxes in the “Margins” section. A gutter margin is extra space allocated at the left or top of a page for binding documents, if the document is printed and bound. If you set a gutter margin, then use the “Gutter position” drop-down to select either the “Top” or “Left” side for the gutter’s placement. A preview of the changes you make appears in the “Preview” section.
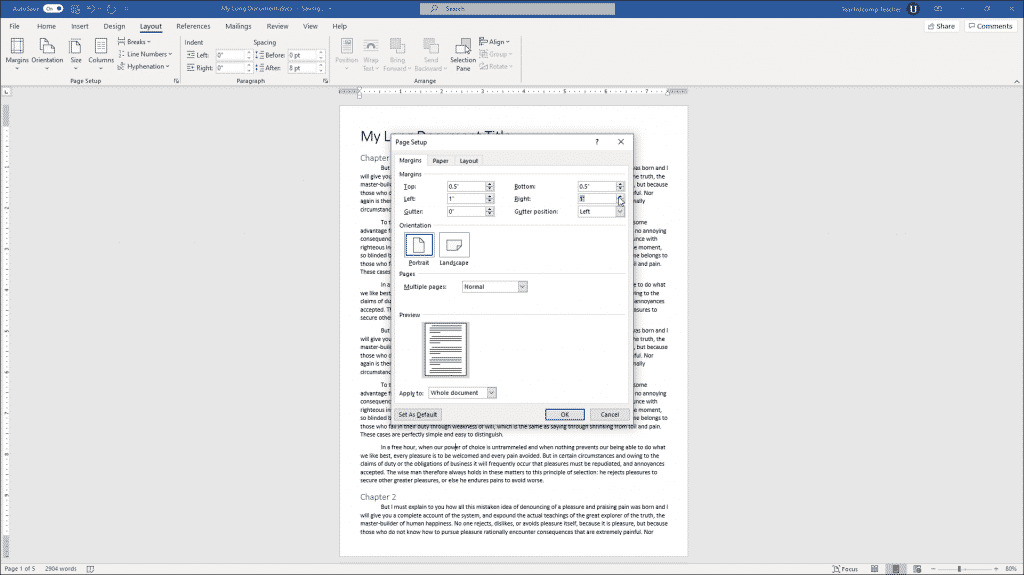
Set Margins in Word – Instructions: A picture of the margin settings available in the “Page Setup” dialog box in Word.
To change the page orientation, click to choose either “Portrait” or “Landscape” in the “Orientation” section. To specify how to apply margins to multiple pages in a document, select the desired choice from the “Multiple pages” drop-down in the “Pages” section. Use the “Apply to” drop-down, if needed, to select to which section of the document to apply the custom margins. When finished, click the “OK” button to save your new page margins and close the dialog box.
How to Quickly Change Page Orientation in Word
Also, note that you can change the page orientation of a document in Word directly from the “Layout” tab in the Ribbon, too. To quickly change the page orientation of a document in Word, click the “Orientation” drop-down in the “Page Setup” button group on the “Layout” tab of the Ribbon. Then choose either the “Portrait” or “Landscape” choice from the drop-down menu that appears.
Set Margins in Word: Instructions
Instructions on How to Apply Preset Margins in Word
- To set margins in Word, first click the “Layout” tab in the Ribbon.
- Then click the “Margins” drop-down button in the “Page Setup” button group.
- This button’s drop-down menu contains a “Last Custom Setting” option, six preset margin choices, and a “Custom Margins…” command.
- To apply preset margins, click one of the preset margin choices shown in the drop-down menu.
Instructions on How to Apply Custom Margins and Page Orientation in Word
- Alternatively, to set custom margins in Word, click the “Custom Margins…” command to open the “Page Setup” dialog box and display the “Margins” tab.
- In the “Page Setup” dialog box, you can choose the size of the margins for your document by using the spinner arrows for the “Top,” “Bottom,” “Left,” “Right,” and/or “Gutter” spinner boxes in the “Margins” section.
- If you set a gutter margin, then use the “Gutter position” drop-down to select either the “Top” or “Left” side for the gutter’s placement.
- A preview of the changes you make appears in the “Preview” section.
- To change the page orientation, click to choose either “Portrait” or “Landscape” in the “Orientation” section.
- To specify how to apply margins to multiple pages in a document, select the desired choice from the “Multiple pages” drop-down in the “Pages” section.
- Use the “Apply to” drop-down, if needed, to select to which section of the document to apply the custom margins.
- When finished, click the “OK” button to save your new page margins and close the dialog box.
Instructions on How to Quickly Change Page Orientation in Word
- Alternatively, to quickly change the page orientation of a document in Word, click the “Orientation” drop-down in the “Page Setup” button group on the “Layout” tab of the Ribbon.
- Then choose either the “Portrait” or “Landscape” choice from the drop-down menu that appears.

