Set Page Breaks in Word- Tutorial and Instructions
How to Set Page Breaks in Word: Video Lesson
This video lesson, titled “Setting Page and Section Breaks,” shows how to set page breaks in Word. This video is from our complete Word tutorial, titled “Mastering Word Made Easy v.2019 and 365.”
How to Set Page Breaks in Word: Overview
In this tutorial, you will learn how to set page breaks in Word. When you create a document, you set a paper size such as 8.5” by 11.” When you reach the end of the specified page size in Word, an automatic page break is inserted. Sometimes these automatic page breaks occur in places where you would rather not have them occur. For example, an automatic page break may leave one sentence on a second page, orphaned from the rest of the paragraph. You cannot delete automatic page breaks in Word. Instead, you must insert a manual page break at a point in the page prior to the occurrence of the automatic page break.
It is easy to set page breaks in Word. Just click into the document at the place where you want the page break to occur. This should, of course, be before the automatic page break. Then press “Ctrl” + “Enter” on your keyboard. Alternatively, click the “Breaks” button in the “Page Setup” group on the “Layout” tab of the Ribbon. Then choose the “Page” option from the drop-down menu.
You can set page breaks in Word to apply the most commonly used type of document break. However, it is by no means the only type of document break available. When you click the “Breaks” button in the “Page Setup” group on the “Layout” tab of the Ribbon, you will see many of the other types of document breaks that are available for use in Microsoft Word. You can also select these types of breaks for your document, if the need arises. We will now examine the other types of document breaks that you can insert into your Word documents and their uses within the program.
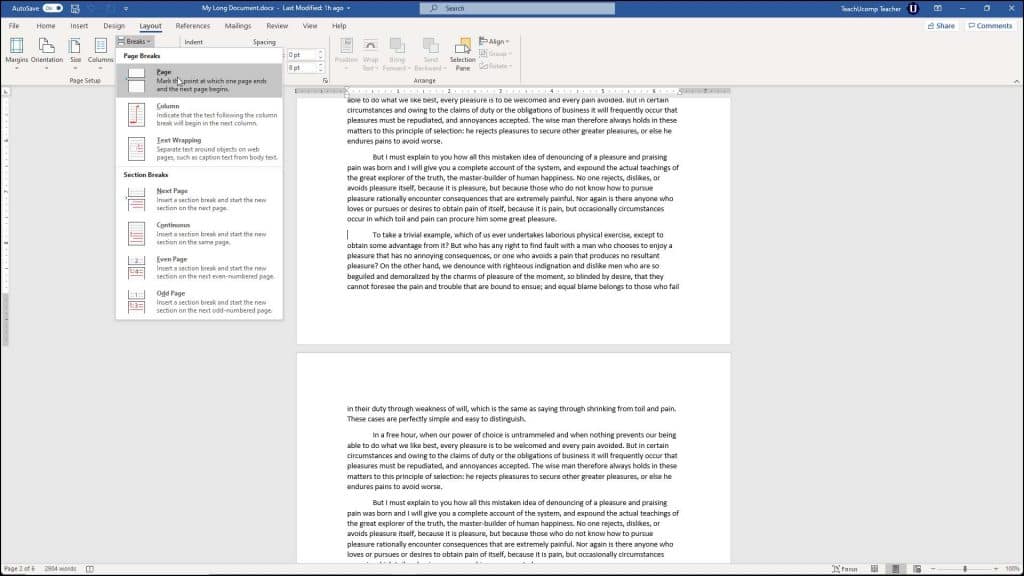
Set Page Breaks in Word- Tutorial and Instructions: A picture of the different types of breaks available in Word.
A “Section Break” is much like a page break, but it breaks the sections of your document. When you insert a section break, you can then set the page layout independently for each section. For example, using a “Next Page” section break, each section could change the page layouts, like switching from a “Portrait” page orientation to a “Landscape” page orientation within a single document.
There are four different types of section breaks that you can insert. They are “Next Page,” “Continuous,” “Odd Page,” and “Even Page.” A “Next Page” section break inserts a page break, but also creates two separate sections of the document so that each section can have its own unique page layout. A “Continuous” section break inserts a break, but continues the next section on the same page. The “Odd Page” or “Even Page” section break will place a break, and then continue the next section on the next odd or even numbered page. This is helpful for inserting section breaks into documents that are intended for double-sided, bound printing.
If you select to view the non-printing characters in a document after you set page breaks in Word, you will see that a manual page break is identifiable by the words “Page Break” in the center of a dashed line within the document. You can easily delete these breaks just as you would any other character. You simply click into the line containing the “Page Break” character, and then press the “Delete” key on your keyboard.
How to Set Page Breaks in Word: Step-By-Step Instructions
- To insert a manual page break, click into the document at the place you want the page break to occur, before an automatic break.
- Press the “Ctrl” + “Enter” keys on your keyboard.
- Alternatively, click the “Layout” tab in the Ribbon and click the “Breaks” drop-down button.
- Then choose the “Page” option from the drop-down menu.
- To insert a section break that creates a new section in your document, click the “Layout” tab of the Ribbon.
- Then click the “Breaks” drop-down button in the “Page Setup” button group.
- Then choose one of the following options from the “Section Breaks” section.
- “Next Page,” will insert a page break and create two separate sections of the document.
- “Continuous,” will inset a break but continue the next section on the same page.
- “Odd Page” or “Even Page” will place a section break and then continue the next section on the next odd or even numbered page.
- To delete page breaks you have added to your document, ensure that you can view non-printing characters.
- Click into the dotted line containing the term “Page Break” and press the “Delete” key on your keyboard.

