Set Task Duration in Project- Instructions
Set Task Duration in Project: Video Lesson
This video lesson, titled “Setting Task Duration,” shows you how to set task duration in Project. This video is from our complete Project training, titled “Mastering Project Made Easy v.2016-2013.”
Set Task Duration in Project: Overview
You can easily set task duration for each task in a project file. This duration can be measured in any unit of time, from minutes to months. Most often, it is measured in terms of hours, days, or weeks.
You can set task duration in Project within the “Duration” column of the table in the Gantt Chart view. You can also set task duration in Project within the “Duration” field on the “General” tab of the “Task Information” dialog box if you use that method of task entry.
When you set task duration in Project from a start date, it schedules the task as soon as possible. However, it only schedules tasks during the project’s available work hours. The available work hours are set using the “Calendar” drop-down in the “Project Information” dialog box. For example, if you chose the “Standard” calendar when defining the project’s working schedule, then tasks are only scheduled during the Monday through Friday, 8 A.M. to 5 P.M. work schedule defined by that calendar choice.
You can also set task duration in Project using the following abbreviations, if desired. You can use “m” for “minutes,” “h” for “hours,” “d” for “days,” “w” for “weeks,” and “mo” for “months” when entering task durations. For example, if using a “Standard” work schedule, a task that starts on a “Monday” and has “5d” as its duration will finish on the following “Friday” of the same week.
Since Microsoft Project is a task scheduling application, you most often set the “Duration” of a task and not the “Start” date. When you set a task’s “Start” date, Microsoft Project interprets that as a constraint on when the task can start. Therefore, it will not schedule it ahead of the specified start date.
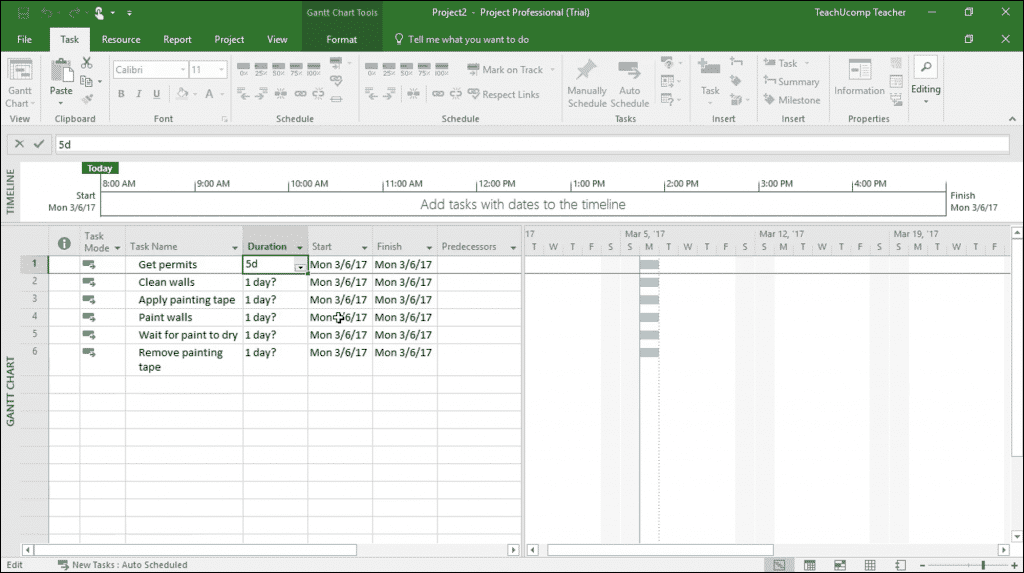
Set Task Duration in Project- Instructions: A picture of a user setting task duration in the Gantt Chart view.
Most often, task start dates are linked to other tasks. This means one task can start whenever the previous task finishes. Setting a task duration and linking tasks to each other by the necessity of their completion, versus setting a start date, lets Project change the start and end times of tasks to reflect the scheduled reality of the workload.
You can also schedule tasks to occur during the non-working times in the scheduling calendar. This helps if you need to create a task like “Wait for paint to dry” within a remodeling project file. Although it is a critical task, it is also a passive task with no active work. Therefore, you can enter it as an “elapsed” duration task. An “elapsed” duration task occurs regardless of the working schedule.
To enter an elapsed time duration for a task, enter the abbreviation “e” before the time abbreviation letters for the task. For example, you could enter an elapsed task duration for the “Wait for paint to dry” task by typing “2eh” into the “Duration” field for that task. That sets two hours of elapsed time for the task that do not need to be performed during scheduled work hours. While most tasks are not “elapsed time” tasks, it is useful to know how to set the duration of these types of tasks, if needed.
Also, if using the “Task Information” dialog box for task entry, checking the “Estimated” checkbox for a task duration explicitly defines the duration as an estimate. While many task durations are estimates, checking the “Estimated” checkbox adds a question mark to the end of the “Duration” shown. You can also do the same thing by typing the question mark (?) at the end of any duration within the “Duration” column in the task list.
Set Task Duration in Project: Instructions
- To set task duration for tasks in the task list, enter the task duration into the “Duration” column of the table in the Gantt Chart view.
- To set task duration in the “Task Information” dialog box, enter it into the “Duration” field on the “General” tab of the “Task Information” dialog box.
- If desired, you can use “m” for “minutes,” “h” for “hours,” “d” for “days,” “w” for “weeks,” and “mo” for “months” to abbreviate the units of measurement when entering task durations.
- To maximize Microsoft Project’s task scheduling, you most often set the “Duration” of a task and not the “Start” date.
- If you set a task’s “Start” date, Project interprets that as a constraint on when the task can start and will not schedule it ahead of the specified start date.
- To enter an elapsed time duration for a task, which lets tasks occur during non-working times, enter the abbreviation “e” before the time abbreviation letters for the task.
- To indicate an estimated task duration if using the “Task Information” dialog box, check the “Estimated” checkbox next to any task duration on the “General” tab of the “Task Information” dialog box to add a question mark to the end of the “Duration” shown.
- Alternatively, to indicate an estimated task duration for tasks in the task list, type the question mark (?) at the end of any duration within the “Duration” column in the task list.
