Set Up Sales Tax in QuickBooks Online – Instructions
Set Up Sales Tax in QuickBooks Online: Video Lesson
This video lesson, titled “How to Enable Sales Tax in QuickBooks Online,” shows you how to set up sales tax in QuickBooks Online. This video lesson is from our complete QuickBooks Online tutorial, titled “Mastering QuickBooks Online Made Easy.”
How to Set Up Sales Tax in QuickBooks Online: Instructions
Collecting and paying sales tax can be complicated for some companies. For example, a company may have to collect and pay more than one sales tax. Many companies have a mix of taxable and non-taxable products and services to sell. Many also have some customers that are taxable while other customers are not. QuickBooks Online uses an automated sales tax process to help simplify this for you.
In QuickBooks Online Plus, you can apply sales tax on selected taxable items for taxable customers during the sales process. It keeps track of how much sales tax is collected and for which taxing agencies the sales tax is collected. It either automatically calculates sales tax in sales forms, based on your company’s location and the customer’s taxable status and location or it calculates sales tax by using a custom sales tax rate you select in the sales form. Either way, it only collects sales tax based on the taxable items sold in the sales form. From this information, QuickBooks Online Plus can then create the check or checks for the appropriate tax agency or agencies when the sales taxes collected are due.
How to Set Up Sales Tax in QuickBooks Online:
To set up sales tax in QuickBooks Online, click the “Overview” link under the “Sales Tax” app in the “All apps” bar. Then click one of the “Turn on sales tax” buttons that appear in the “Sales Tax overview” page to open a “Getting started” page that steps you through the process of setting up your sales tax. The first page shows you the information you need to set up your sales tax in QuickBooks Online. Ensure you have this information and then click the “Next” button to continue.
Enter or Confirm Address Information:
In the “Address” segment of the setup, enter or confirm your company’s physical address in the “Your business address” field. If you need to change this, click the “Edit” link by this field, update your business address in the pane that appears, and then click the “Save” button within it. Your business address determines your default sales tax agency or agencies. When ready, click the “Next” button to continue.
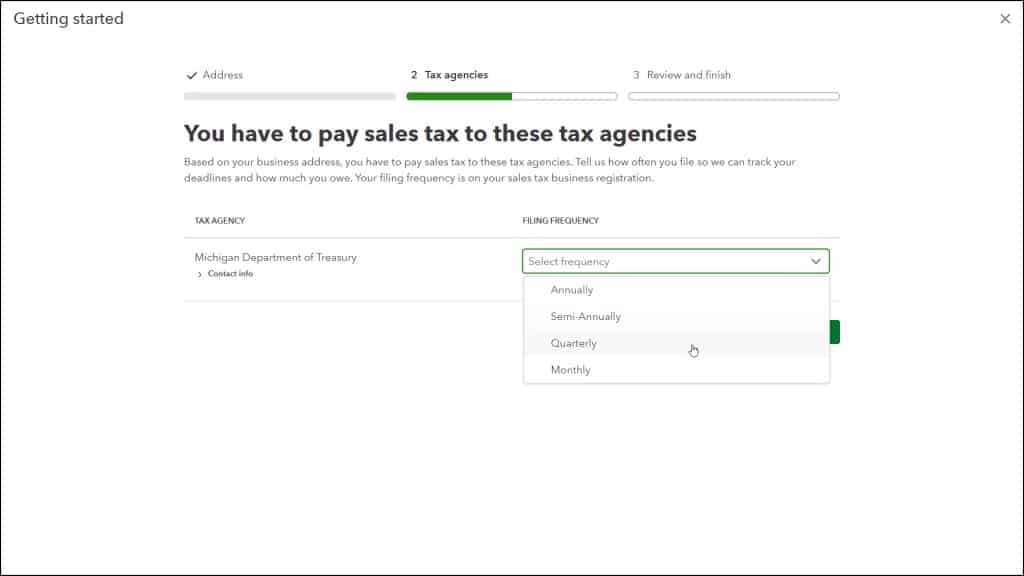
Confirm Initial Sales Tax Agencies:
In the “Tax agencies” segment of the sales tax setup, the associated tax agency or tax agencies for the business’s physical address appear. Select the sales tax filing frequency for each sales tax agency that appears from the “Filing frequency” drop-down. When finished, click the “Next” button to continue.
Add Any Additional Sales Tax Agencies You Need:
The next screen asks you to select either the “Yes” or “No” option to respond to the question of if you registered for sales tax with any other agencies. This helps you to set up additional sales tax agencies if you registered for a different state’s sales tax from the state in which your company is physically located, for example. If you select “Yes,” then use the “Select an agency” drop-down under the “Tax Agency” column that appears to select the tax agency for the different state, county, district, or city tax agencies for whom you must collect sales taxes. For each agency you select, also select the associated sales tax filing frequency from the adjacent “Select frequency” drop-down in the “Filing Frequency” column. To add another sales tax agency, if needed, click the “+ Add another agency” link and then repeat the process.
As you add each sales tax agency, they are added to the sales tax agencies list in QuickBooks Online. If you select one by accident you don’t need, you can click the “Delete” button at the agency row’s right end to remove it. After adding any additional sales tax agencies, or selecting the “No” option to the question in this page if you don’t need additional sales tax agencies, then click the “Next” button to continue.
Review and Finish the Sales Tax Setup:
In the “Review and finish” segment of the sales tax setup, QuickBooks Online then shows the sales tax agencies it will set up for you in a list. To make changes, if needed, click the “Back” button to return and make the needed changes. Alternatively, to finish, click the “Finish and turn on sales tax” button to finish the automatic sales tax setup. Then click the “Done” button in the final screen to close the sales tax setup page.
Use the Sales Tax Overview Page to View and Manage Sales Taxes:
QuickBooks Online then returns you to the “Sales Tax overview” page, which contains widgets showing information about your sales taxes. New menu commands for managing sales tax now also appear in the “All apps” bar.
To view your current sales tax return information, click the “Sales tax returns” link under the “Sales Tax” app in the “All apps” bar. The upper-right corner of the page contains a “Reports” drop-down that lets you access common sales tax reports. Sales tax returns appear in a list at the bottom of this page. To filter the sales tax return list by tax return status, select a choice from the “Status” drop-down above the list. To filter the sales tax return list by tax period, click the “Tax period” field, make your selections in the menu that appears, and click “Apply.”
To filter the sales tax returns by sales tax agency, select a choice from the “Agency” drop-down. Applied filters appear below the sales tax filtering fields. To clear an applied sales tax filter, click the “x” button at the right end of the applied filter.
To view instructions for completing a sales tax return and recording it in QuickBooks Online, click the “View summary” link in the “Action” column for the desired sales tax return.


