Set Up Sales Tax in Sage 50- Instructions
Set Up Sales Tax in Sage 50: Video Lesson
This video lesson, titled “The Sales Tax Wizard,” shows how to set up sales tax in Sage 50. This video lesson on how to set up sales tax in Sage 50 is from our complete Sage 50 tutorial, titled “Mastering Sage 50 Made Easy v.2018.”
Set Up Sales Tax in Sage 50: Overview
You use a two-part process to set up sales tax in Sage 50. First, you must set up sales tax authorities that you will use. Second, you must set up sales tax codes using the sales tax authorities. Sales Tax Authorities are the tax rates for individual governmental agencies. A sales tax code is a group of one or more sales tax authorities. When you create invoices, you use the sales tax code to calculate the sales tax. You can see how much sales tax has been collected per authority in the “Taxable/Exempt Sales” report.
To set up sales tax authorities and set up sales tax codes in Sage 50, select “Maintain| Sales Taxes…” from the Menu Bar. Doing this then opens the “Set Up Sales Taxes” window. This window shows options for creating, editing, deleting, and otherwise maintaining sales tax codes and sales tax agencies.
To set up a new sales tax in this window, select the “Set up a new tax” option. Then click the “Next >” button at the bottom of the window to continue.
The next screen lets you enter the total rate that is charged for the sales tax into the first available fields. If your sales tax is based on a formula, then leave the percentage field blank. Next, use the drop-down to select the number of individual agencies that make up the total tax you are collecting. After making your choices, you then click the “Next >” button to continue.
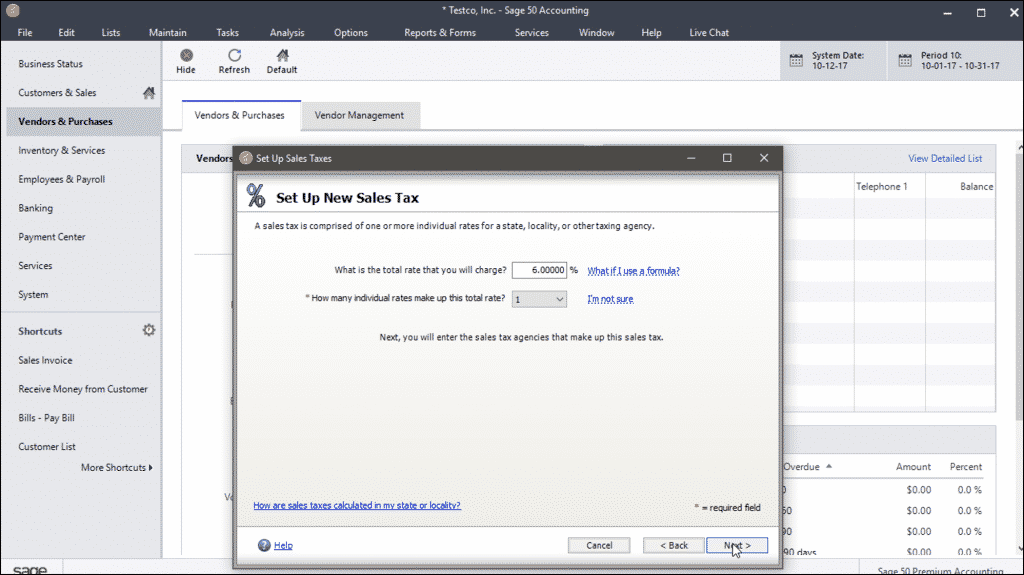
Set Up Sales Tax in Sage 50- Instructions: A picture of a user creating a sales tax within the “Set Up Sales Taxes” window of Sage 50.
The next screen wants you to set up your taxing authorities for your sales tax. You must enter the information for each taxing authority that you selected on the previous screen. Be sure to indicate how much of the total tax rate this vendor collects and which account you use to track the taxes you collect. Note that you can use the drop-down in the middle of the screen to select the “by formula” option, if you need to enter a sales tax rate based on a formula versus a flat percentage. When finished, click the “Next >” button to continue setting up your sales tax agencies.
If you have only one agency collecting a single tax, or after you finish entering your taxing authorities, the last screen lets you name your sales tax code. You also select whether to charge sales tax on shipping, if needed for your state. After entering that information, click the “Finish” button to finish and set up sales tax in Sage 50.
In the future, to edit, delete, or review the sales tax codes and sales tax agencies you have created, open the “Set Up Sales Taxes” window again. To edit either the sales tax agency information or the associated sales tax code, select the “Edit an existing sales tax or sales tax agency” option. Then click the “Next >” button. In the following screens, then select to edit either the code or the agencies, as needed. As when creating the sales tax, change whatever information is needed in each screen while clicking the “Next >” button to continue. Then click the “Finish” button after making your changes.
Set Up Sales Tax in Sage 50: Instructions
- To set up sales tax authorities and set up sales tax codes in Sage 50, select “Maintain| Sales Taxes…” from the Menu Bar to open the “Set Up Sales Taxes” window.
- To set up a new sales tax in this window, select the “Set up a new sales tax” option.
- Then click the “Next >” button.
- In the next screen, enter the total rate charged for the sales tax into the first available field. If you base your sales tax on a formula, leave the percentage field blank.
- Then use the drop-down to select the number of individual agencies that make up the total tax collected.
- Then click the “Next >” button.
- In the next screen, set up the taxing authorities for your sales tax by entering the information for each taxing authority you selected on the previous screen.
- Enter how much of the total tax rate each vendor collects and which account you use to track the collected taxes.
- If you need to enter a sales tax rate based on a formula versus a flat percentage, use the drop-down in the middle of the screen to select the “by formula” option.
- When finished, click the “Next >” button to continue.
- After entering your taxing authorities, name your sales tax code in the last screen.
- Also select whether to charge tax on shipping, if needed for your state
- Then click the “Finish” button to finish creating the sales tax.
- To edit, delete, or review the sales tax codes and sales tax agencies, select “Maintain| Sales Taxes…” from the Menu Bar to open the “Set Up Sales Taxes” window.
- To edit either the tax agency information or the associated code, select the “Edit an existing sales tax or sales tax agency” option.
- Then click the “Next >” button.
- Then edit either the code or the agencies in the following screens by changing the information and then clicking the “Next >” button.
- Finally, click the “Finish” button.
