Slideshows in Photoshop Elements – Instructions
How to Make Slideshows in Photoshop Elements: Video
This video lesson, titled “Learn How to Create a Slide Show in Adobe Photoshop Elements 2023: A Training Tutorial,” shows how to create slideshows in Photoshop Elements. This video lesson on making slideshows in Photoshop Elements is from our complete Photoshop Elements tutorial, titled “Mastering Photoshop Elements Made Easy v.2023.”
Overview of How to Create Slideshows in Photoshop Elements:
Slideshows in Photoshop Elements are a fun way to share your photos with others. You can add text, interesting transitions, and audio files to make a truly impressive slideshow. If you open a slideshow created in an older version of Photoshop Elements, Photoshop Elements automatically converts the old slideshow to the new slideshow format, so you can play it and edit it in the newer version of Photoshop Elements.
How to Make Slideshows in Photoshop Elements
You can create slideshows in Photoshop Elements from photos selected in the Organizer window. You can also create slideshows in Photoshop Elements from currently opened photos in the “Photo Bin” of the Photo Editor. Note, however, you cannot include photos in the Photo Editor that have unsaved changes unless you first save the changes.
To create slideshows in Photoshop Elements from the Organizer window, open the Organizer window. Then select the pictures to add to the slideshow. Then click the “Create” button in the Shortcuts Bar. Choose “Slideshow” from the drop-down menu to launch a preview of the slideshow in the “Slideshow” window.
Alternatively, to create slideshows in Photoshop Elements from opened photos in the Photo Bin of the Photo Editor, click the “Create” button in the Shortcuts Bar. Then select the “Slideshow” command from the drop-down menu to first load the Organizer and then launch a preview of the slideshow in the “Slideshow” window.
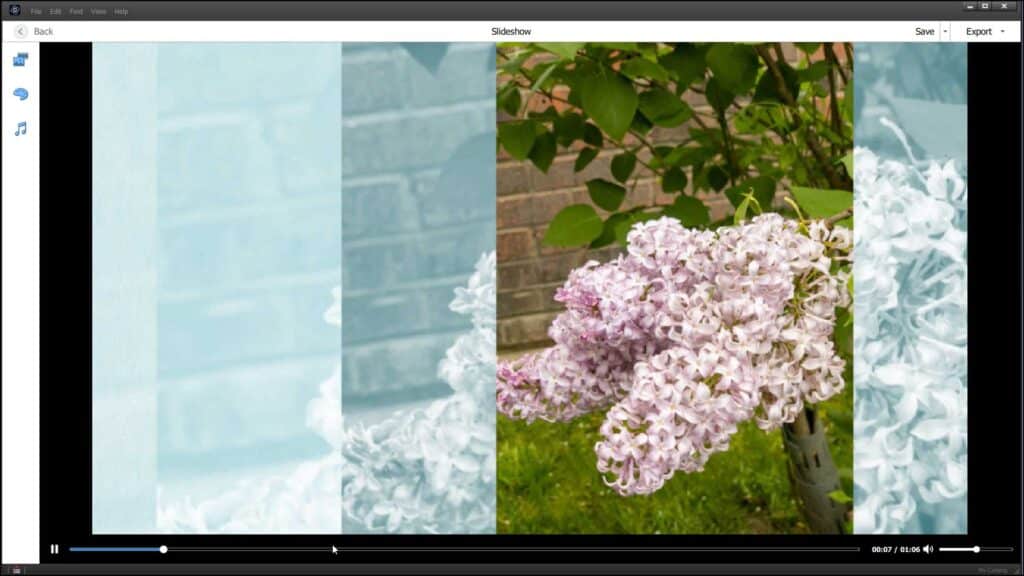
A picture of a slideshow preview playing in Photoshop Elements.
As the slideshow plays, you can see toolbars both above, below, and to the left of the slideshow. You can use the buttons in these three toolbars to control the slideshow playback, edit the slideshow, save the slideshow, export the slideshow, or exit the slideshow. The playback scrubber and volume setting in the bottom toolbar let you control the slideshow playback and volume. You can click and drag the small dot within the slideshow timeline scrubber to rewind or fast forward the slideshow. You can click the “Pause” button at the left end of the toolbar to pause the playback. After clicking it, this button turns into the “Play” button, which you can click again to resume playback. There is also a button for this within the middle of the slideshow screen when it is paused.
After initially creating a slideshow, you can click either the “Media,” “Themes,” or “Audio” buttons in the toolbar at the left side of the slideshow to both expand and collapse the pane for each section and change the slideshow’s settings.
How to Save Slideshows in Photoshop Elements
To save the slideshow, click the “Save” button in the toolbar at the top of the window. Doing this then opens the “Elements Organizer” dialog box. Enter a name for the slideshow and then click the “Save” button to save it. After saving a slideshow, clicking the “Save” button simply saves any unsaved changes. To open the “Elements Organizer” dialog box again after saving it, click the drop-down button at the right side of the “Save” button. Then choose the “Save As” command from the pop-up menu that appears.
How to Export Slideshows in Photoshop Elements
To export a slide show, click the “Export” button in the toolbar that appears above the slide show preview. Then select either the “YouTube,” “Vimeo,” “Export video to local disk,” “Export video to the cloud,” or “Facebook” commands in the drop-down menu that appears either to export the slide show to YouTube, Vimeo, Facebook, or export it as an HD mp4 video file to either your local hard drive or to Elements Web, if using Photoshop Elements 2023 or later.
If you select the “Export video to local disk” command or the “Export video to the cloud” command, then the “Export” dialog box appears. Type a name for the slide show video into the “Filename” field. If exporting to a local disk, the default folder into which to save the file appears in the “Location” section. To select a different location, click the “Browse” button to open a “Browse for Folder” window, where you can select a new destination folder and then click the “OK” button. For both types of exports, use the drop-down in the “Quality” section to select the HD quality of the video to produce. Then click the “OK” button to export the slide show to a video file. If exporting to Elements Web, then upload it to Elements Web in the “Upload to the cloud” dialog box that then appears, as shown in an earlier lesson.
Alternatively, if you export the slide show to YouTube, Vimeo, or Facebook by selecting the “YouTube,” “Vimeo,” or “Facebook” commands from the drop-down menu, Photoshop Elements then prepares the video for uploading and asks you to log into the site to complete the upload of the video file.
Instructions on How to Create Slideshows in Photoshop Elements:
- To create slideshows in Photoshop Elements from the Organizer window, open the Organizer window.
- Then select the pictures to add to the slideshow.
- Then click the “Create” button in the Shortcuts Bar.
- Choose “Slideshow” from the drop-down menu to launch a preview of the slideshow in the “Slideshow” window.
- Alternatively, to create slideshows in Photoshop Elements from photos opened in the Photo Bin of the Photo Editor, click the “Create” button in the Shortcuts Bar.
- Then select the “Slideshow” command from the drop-down menu to first load the Organizer and then launch a preview of the slideshow in the “Slideshow” window.
- As the slideshow plays, you can see toolbars both above, below, and to the left of the slideshow. You can use the buttons in these three toolbars to control the slideshow playback, edit the slideshow, save the slideshow, export the slideshow, or exit the slideshow.
- The playback scrubber and volume setting in the bottom toolbar let you control the slideshow playback and volume.
- To rewind or fast forward the slideshow, click and drag the small dot in the slideshow timeline scrubber.
- To pause the playback, click the “Pause” button at the left end of the toolbar.
- After clicking it, this button turns into the “Play” button, which you can click again to resume playback. There is also a button for this in the middle of the slideshow screen when it is paused.
- After initially creating a slideshow, you can click either the “Media,” “Themes,” or “Audio” buttons in the toolbar at the left side of the slideshow to both expand and collapse the pane for each section and change the slideshow’s settings.
- To save the slideshow, click the “Save” button in the toolbar at the top of the window.
- Doing this then opens the “Elements Organizer” dialog box.
- Enter a name for the slideshow and then click the “Save” button to save it.
- After saving a slideshow, clicking the “Save” button simply saves any unsaved changes.
- To open the “Elements Organizer” dialog box again after saving it, click the drop-down button at the right side of the “Save” button.
- Then choose the “Save As” command from the pop-up menu that appears.
- To export a slide show, click the “Export” button in the toolbar above the slide show preview.
- Then select either the “YouTube,” “Vimeo,” “Export video to local disk,” “Export video to the cloud,” or “Facebook” commands in the drop-down menu that appears either to export the slide show to YouTube, Vimeo, Facebook, or export it as an HD mp4 video file to either your local hard drive or to Elements Web, if using Photoshop Elements 2023 or later.
- If you select the “Export video to local disk” command or the “Export video to the cloud” command, then the “Export” dialog box appears.
- Type a name for the slide show video into the “Filename” field.
- If exporting to a local disk, the default save folder appears in the “Location” section.
- To select a different location, click the “Browse” button to open a “Browse for Folder” window, where you can select a new destination folder and then click the “OK” button.
- For both types of exports, use the drop-down in the “Quality” section to select the HD quality of the video to produce.
- Then click the “OK” button to export the slide show to a video file.
- If exporting to Elements Web, then upload it to Elements Web in the “Upload to the cloud” dialog box that then appears, as shown in an earlier lesson.
- Alternatively, if you export the slide show to YouTube, Vimeo, or Facebook by selecting the “YouTube,” “Vimeo,” or “Facebook” commands from the drop-down menu, Photoshop Elements prepares the video for uploading and asks you to log into the site to finish uploading the video file.

