Straighten a Photo in Lightroom Classic CC- Instructions
Straighten a Photo in Lightroom Classic CC: Video Lesson
This video lesson, titled “Straightening Photos,” shows you how to straighten a photo in Lightroom Classic CC. This video lesson is from our complete Lightroom Classic CC tutorial, titled “Mastering Lightroom Classic Made Easy v.CC.”
Straighten a Photo in Lightroom Classic CC: Overview
You can easily straighten a photo in Lightroom Classic CC. To straighten a photo in Lightroom Classic CC, select the photo in the Develop module. Then click to select the “Crop Overlay” tool in the tool strip. The tool drawer then appears.
You can straighten a photo in Lightroom Classic CC using several different methods. First, you can rotate the photo by moving the “Angle” slider in the tool drawer. This method lets you rotate the photo up to 45 degrees in either direction.
A second way to rotate the photo is to hover your mouse pointer over one of the corner crop handles in the image display area. When you move the pointer just outside of the crop handle, toward the corner of the photo, the pointer turns into a “Rotate” tool. You can then click and drag to rotate the image. When you use this method, the rotation axis is the center of the crop rectangle.
You can also straighten a photo in Lightroom Classic CC by using the “Straighten Tool,” located to the left of the “Angle” slider in the tool drawer. First, click to select the Straighten Tool in the tool drawer. Then click and drag in the image area to draw a line you want to be horizontal or vertical. When you release the mouse button, Lightroom Classic CC straightens the photo so the line you drew is perfectly horizontal or vertical. This method is useful for straightening a photo based upon a specific line that appears in the photo. If you hold down the “Alt” key on your keyboard while using the Straighten Tool, Lightroom Classic CC displays a grid to help you straighten the photo.
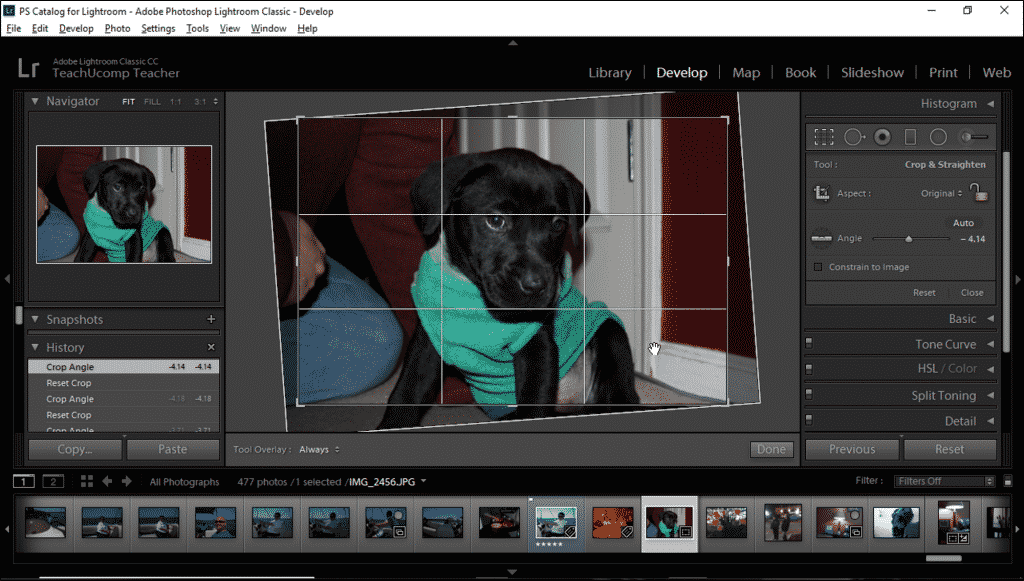
Straighten a Photo in Lightroom Classic CC- Instructions: A picture of a user straightening a photo in Lightroom Classic CC by using the Straighten Tool.
To undo a straightening operation, click the “Reset” option at the bottom of the tool drawer. You can also select “Edit| Undo” from the Menu Bar to remove the last change you made. However, if you click the “Reset” button at the bottom of the right panel grouping in the Develop module, Lightroom Classic CC will remove all image adjustments, not just the crop. To apply your image straightening, you can click the “Done” button in the toolbar below the image preview.
Straighten a Photo in Lightroom Classic CC: Instructions
- To straighten a photo in Lightroom Classic CC, select the photo in the Develop module.
- Then select the “Crop Overlay” tool in the tool strip to show the tool drawer.
- To rotate the photo up to 45 degrees in either direction, click and drag the “Angle” slider in the tool drawer.
- Alternatively, hover your mouse pointer over one of the corner crop handles in the image display area until the pointer turns into a rotation tool.
- Then click and drag to rotate the photo.
- To use the “Straighten Tool” to straighten a photo in Lightroom Classic CC, click the tool, located to the left of the “Angle” slider in the tool drawer.
- Then click and drag in the image area to draw a line you want to be horizontal or vertical.
- When you release the mouse button after drawing the line, Lightroom Classic CC straightens the photo so the line you drew is perfectly horizontal or vertical.
- To show a grid while using the Straighten Tool, hold down the “Alt” key on your keyboard while using it.
- To undo a straightening operation, click the “Reset” option at the bottom of the tool drawer.
- Alternatively, select “Edit| Undo” from the Menu Bar to remove the last change you made.
- To apply your image straightening, click the “Done” button in the toolbar below the image preview.
