The Audit Log in QuickBooks Online – Instructions
The Audit Log in QuickBooks Online: Video Lesson
This video lesson, titled “How to Use the Audit Log in QuickBooks Online,” shows you how to use the Audit Log and the Intuit Intelligence Audit Log in QuickBooks Online. This video lesson is from our complete QuickBooks Online tutorial, titled “Mastering QuickBooks Online Made Easy.”
Overview:
What is the Audit Log and What is the Intuit Intelligence Audit Log?
The audit log in QuickBooks Online Plus lets you view all the changes made in your company file and who made them. Since the introduction of Intuit Intelligence in QuickBooks Online, you can also audit the Intuit Intelligence AI searches your company’s users have performed from within the audit log report, too.
How to Open the Audit Log:
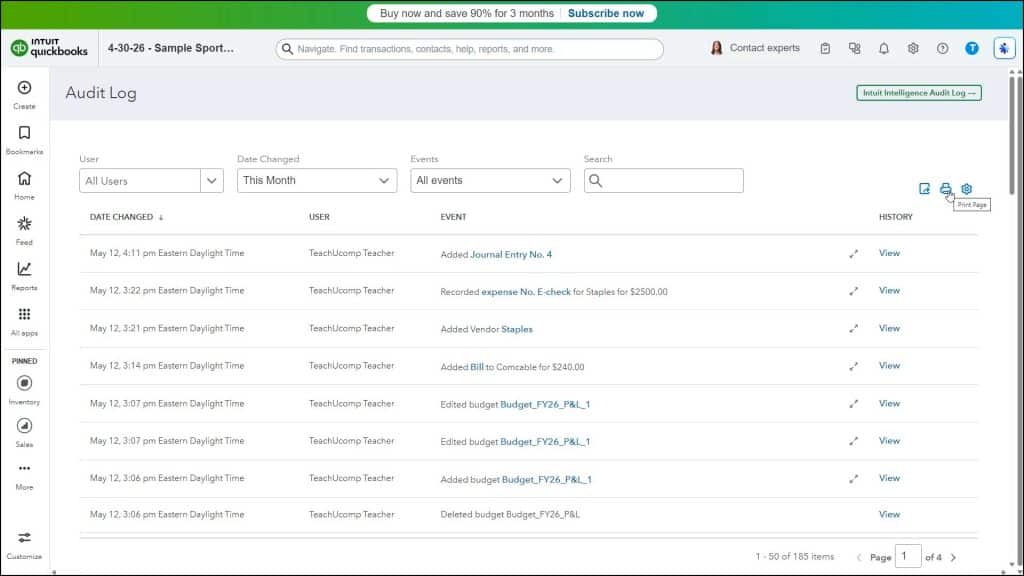
To open the audit log in QuickBooks Online, click the “Settings” button in the QuickBooks Online toolbar and then click the “Audit log” link under the “Tools” heading in the menu that appears. Alternatively, click the “Standard reports” link in the “Reports & analytics” bar. Then click the “Audit Log” report title in the “Business overview” report section in the page to the right.
How to Change the Appearance of the Audit Log:
The audit log in QuickBooks Online shows the 50 most current changes made to your company data, per page, by default. To see older changes in the audit log, either change the date range filter or click the “Next” link in the lower-right corner of the page to review older changes on the next pages in the audit log, if available. To filter the changes shown in the audit log, select filtering choices from the “User,” “Date Changed,” or “Events” drop-downs in the upper-left corner of the page.
To change the columns and rows in the audit log, click the “Settings” button in the upper-right corner of the list of changes to show a drop-down menu. Then check or uncheck the checkboxes under the “Columns” heading in the drop-down menu to show or hide those columns. To set the number of changes to show per page in the audit log, select an option in the “Page Size” section of the drop-down menu.
How to Print or Export the Audit Log:
To print the audit log, click the “Print Page” button in the upper-right corner of the list of changes to open a new page or tab with a printer-friendly view of the audit log. Your web browser’s “Print” dialog box also opens, letting you easily print the audit log. You can close this new web page or tab when you are done printing it. To export and download the audit log as a CSV file, click the “Export to CSV” button in its upper-right corner.
How to View Events and Transaction Histories in the Audit Log:
The rows of changes listed in the audit log in QuickBooks Online often show hyperlinks to the changed transactions they reference under the “Event” column. If needed, to view a transaction referenced by a change in the audit log, click its hyperlinked reference under its “Event” column to open it in a new window. To view the history of changes for a row in the audit log, click its “View” link under its “History” column. To return to the main audit log page from the change history page, click the “< Back” link in the page’s upper-left corner.
How to Open the Inuit Intelligence Audit Log:
To view the Intuit Intelligence audit log report in QuickBooks Online, click the “Intuit Intelligence Audit Log” button towards the upper-right corner of the main page of the audit log report. This report shows the date a query was “Created,” the “User” who made the query, the actual “User query,” the steps in the AI’s “Chain of thought,” the “Actions” taken, and “Conversation” in which the queries occurred.
How to Use the Intuit Intelligence Audit Log:
To expand or collapse the steps in the “Chain of thought” for a query, click its adjacent arrow in its row. To view the conversation for a query, click the “View” link under its “Conversation” row to open it in a new pane, which you can close, when finished, by clicking the “X” in its upper-right corner. To return to the main audit log, if desired, click the “Audit Log” button in the upper-right corner of the Intuit Intelligence Audit Log.


