The Calibration Panel in Camera Raw in Photoshop: Video
This video lesson, titled “Learn about Process Versions and the Calibration Panel in Camera Raw in Adobe Photoshop: A Tutorial,” shows how to select a process version and apply color adjustments in the Calibration Panel in Camera Raw in Photoshop. This video lesson is from our complete Photoshop tutorial, titled “Mastering Photoshop Made Easy.”
Overview:
The Calibration panel in Camera Raw in Photoshop lets you select a camera raw process version. It also lets you apply color rendering adjustments for consistent color issues created by specific camera models, if needed.
Process Versions in Camera Raw in Photoshop:
Before you process camera raw photos using the Camera Raw dialog box in Photoshop, ensure you select the desired process version. A process version in the “Camera Raw” dialog box in Photoshop determines how Photoshop translates your camera raw file format. To select a camera raw process version in Photoshop, click the “Edit” button in the toolbar at the right side of the “Camera Raw” dialog box. Then click the “Calibration” tab in the Edit panel to the left of the toolbar to expand it, if needed.
The current process version for the selected camera raw file appears in the “Process” drop-down. It defaults to using the most-recent version. A process version is a method of translating the camera raw data so you can access the tools and settings available for that process version of camera raw in this dialog box. The most current process version contains the most tools and settings available. However, if you had previously opened the current camera raw image in a previous version of Photoshop, you may see an older process version appear.
To select which process version to apply to the current camera raw image, click the “Process” drop-down and select a choice. Using the most current process version lets you have the most improved and current tools and process settings available. However, you can also select an older version, if needed for your workflow or for consistency between the process settings applied to your camera raw files.
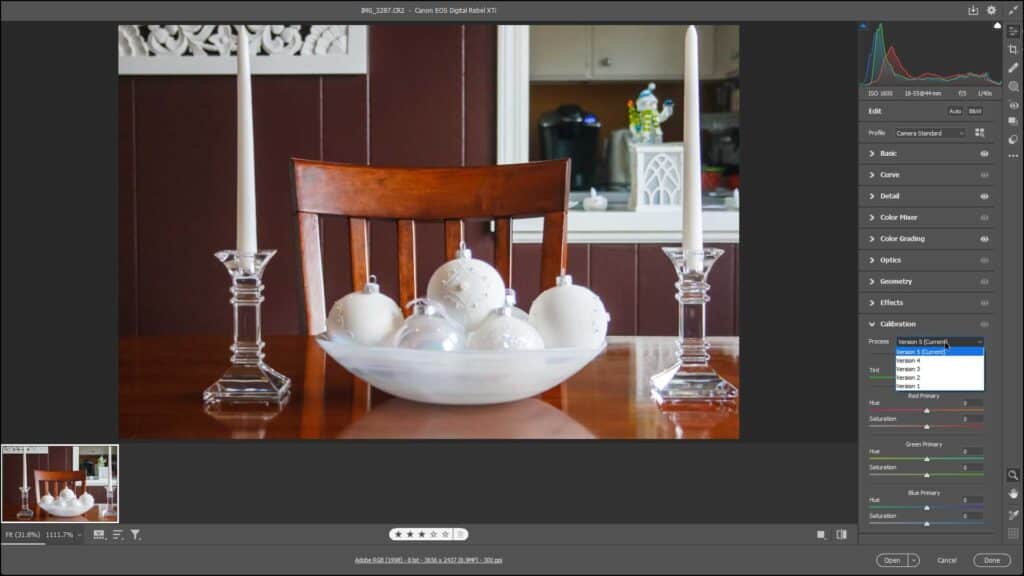
A picture showing how to select the process version in the Calibration panel in Camera Raw in Photoshop.
Color Rendering Adjustments in the Calibration Panel in Camera Raw in Photoshop:
After selecting the desired camera raw process version, you can then make any adjustments to its overall color rendering, if needed, using the sliders below the “Process” drop-down on the “Calibration” tab in the Edit panel. Most camera models interpret color in photos in minutely different ways, which can change the overall color in a camera raw photo.
The settings on the Calibration tab in the Edit panel in the “Camera Raw” dialog box in Photoshop let you tweak these overall color settings to correct any color variations, if needed. Do not use these settings as the main tools to correct color in individual images. Only use them to correct color issues that appear consistently when using a specific camera model if needed. This is why these settings appear on the “Calibration” tab. Alternatively, you can use these same sliders to enhance the colors in photos for artistic effect.
To adjust the color tint of the blacks in the photo, use the “Tint” slider for the “Shadows” setting or enter a value into its adjacent field. This adjusts the green or magenta color of all blacks in the image. Since most colors use some black, this large-scale adjustment appears most everywhere in the photo, but is especially visible in the darker image areas.
The “Red Primary,” “Green Primary,” and “Blue Primary” settings let you adjust the hue and saturation of the primary red, green, and blue colors in the photo. Since all color is created using RGB values, though, changing these colors affects all image color, emphasizing the specific color adjusted. To change the hue of any of these color settings, use its “Hue” slider or enter a value into its adjacent field. To change the color intensity of any of these color settings, use its “Saturation” slider.
Instructions:
How to Select a Process Version in Camera Raw in Photoshop:
- To select a camera raw process version in Photoshop, click the “Edit” button in the toolbar at the right side of the “Camera Raw” dialog box.
- Then click the “Calibration” tab in the Edit panel to the left of the toolbar to expand it, if needed.
- The current process version for the selected camera raw file appears in the “Process” drop-down. It defaults to using the most-recent version.
- To select which process version to apply to the current camera raw image, click the “Process” drop-down and select a choice.
How to Adjust Color Rendering in the Calibration Panel of Camera Raw in Photoshop:
- After selecting the desired camera raw process version, you can then make any adjustments to its overall color rendering, if needed, using the sliders that appear below the “Process” drop-down on the “Calibration” tab in the Edit panel.
- To adjust the color tint of the blacks in the camera raw photo, use the “Tint” slider for the “Shadows” setting or enter a value into its adjacent field.
- To adjust the hue and saturation of the primary red, green, and blue colors in the photo, use the slider for the “Red Primary,” “Green Primary,” and “Blue Primary” settings.
- To change the hue of any of these color settings, use its “Hue” slider or enter a value into its adjacent field.
- To change the color intensity of any of these color settings, use its “Saturation” slider.