The Camera Raw Dialog Box in Photoshop: Video
This video lesson, titled “Learn about the Camera Raw Dialog Box in Adobe Photoshop: A Training Tutorial,” shows you an overview of the names and locations of the main tools within the Camera Raw dialog box in Photoshop. This video lesson is from our complete Photoshop tutorial, titled “Mastering Photoshop Made Easy.”
The Camera Raw dialog box in Photoshop appears after opening a camera raw file for processing. This dialog box contains the tools and settings used to import and process the camera raw data and save those camera raw adjustments, if desired.
Tools in the Title Bar at the Top of the Camera Raw Dialog Box
At the top of the dialog box is the Title Bar, which shows the version of Camera Raw installed. Below that is a bar that shows the camera raw file name and camera used to take the photo. At the right end of this bar are the “Convert and save image,” “Open preferences dialog,” and “Toggle full screen mode” buttons.
The Convert and Save Image, Open Preferences Dialog, and Toggle Full Screen Mode Buttons
You can click the “Convert and save image” button to open the “Save Options” dialog box, which you can use to save a copy of the camera raw image as a different file type, like DNG, with the settings you specify. You will learn how to do this in a separate lesson. However, note that you can hold down the “Alt” key on your keyboard and then click the “Convert and save image” button to convert and save a copy of the image but bypass the “Save Options” dialog box, if desired.
Clicking the “Open preferences dialog” button opens the “Camera Raw Preferences” dialog box, which you will also learn how to use in a separate lesson. You can click the “Cancel” button in this dialog box to close it, if needed. Finally, clicking the “Toggle full screen mode” button toggles the Camera Raw dialog box in Photoshop between a full screen and smaller version of the dialog box.
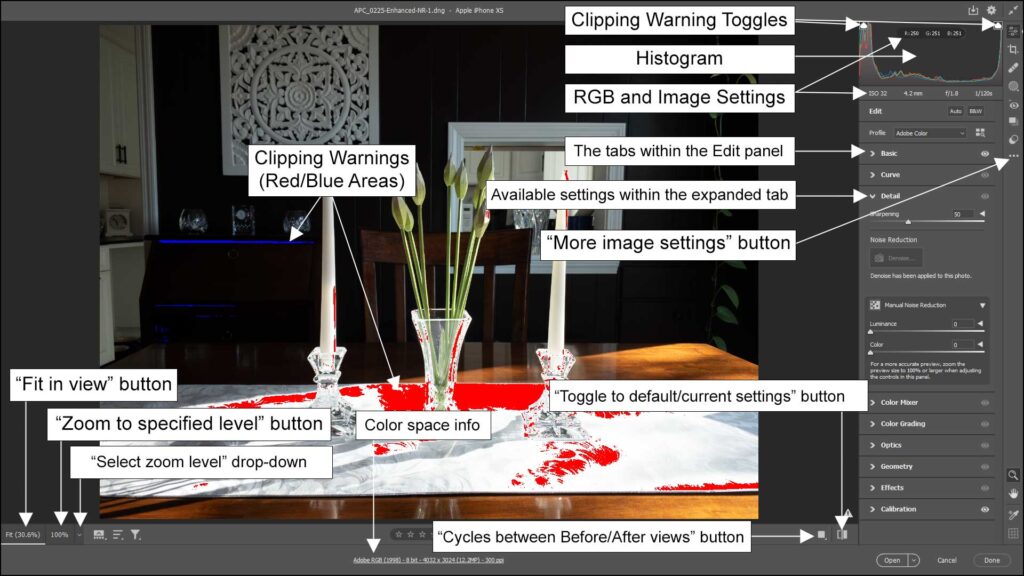
A diagrammed picture showing the locations of the major tools in the Camera Raw dialog box in Photoshop.
Tools in the Toolbar at the Right Side of the Camera Raw Dialog Box
At the far-right side of the dialog box is the toolbar of the Camera Raw dialog box, which contains buttons that let you edit and correct the image while processing it. The buttons are, from top to bottom: “Edit,” “Crop,” “Healing,” “Masking,” “Red Eye,” “Snapshots,” “Presets,” “More image settings,” and, at the bottom, the “Zoom tool”, “Hand Tool,” “Toggle sampler overlay,” and “Toggle grid overlay” buttons.
The Panels and Histogram
The right side of the dialog box shows tabbed panels for the “Edit,” “Crop,” “Healing,” “Masking,” “Red Eye,” “Snapshots,” and “Presets” tool, depending on which tool you select. In the upper-right corner is the current image’s histogram, showing the tonal range of the image at its current settings. As you make editing adjustments in the tabs in the Edit panel after selecting the “Edit” button in the toolbar, the data in the histogram automatically updates.
In the upper-left and upper-right corners of the histogram are two buttons you can click to toggle clipping warnings on and off in the preview image to the left. When enabled, clipping warnings appear as shaded red or blue areas in the preview image. These areas indicate where clipping of the highlights or shadows in the image will occur, according to the current settings. The left button is the “Shadow clipping warning” and the right button is the “Highlight clipping warning.”
Above and below the histogram is the RGB and image information. You can move your pointer over the preview image to see the corresponding RGB information at the top of the histogram for whichever point in the image preview over which your pointer hovers. Below the histogram is the basic image information.
After selecting the “Edit” tool in the toolbar, nine collapsible and expandable tabs then appear at the right side of the dialog box in an Edit panel. You can click these tabs to show or hide the tab’s associated settings and sliders in a panel. The tabs, from top to bottom, are named “Basic,” “Curve,” “Detail,” “Color Mixer,” “Color Grading,” “Optics,” “Geometry,” “Effects,” and “Calibration.”
Tools in the Toolbar at the Bottom of the Camera Raw Dialog Box
Zooming in the Camera Raw Dialog Box
Below the preview image at the left side of the dialog box, in the lower-left corner, is the “Fit in view” button, the “Zoom to specified level” button, and the “Select zoom level” drop-down, which appear in a toolbar at the bottom of the preview image. To fit the image in the preview window, click the “Fit in view” button. Alternatively, to fit the preview image in the window, double-click the “Zoom tool” button in the toolbar at the right side of the “Camera Raw” dialog box.
To set the magnification level to use when you click the preview image with the Zoom tool, select a choice from the “Select zoom level” drop-down. Alternatively, to set the magnification level by clicking and dragging when the Zoom tool is selected, click and hold down with the Zoom tool in the preview image where you want to focus the magnification. To decrease the magnification level, then drag to the left and release when it is the desired magnification. Alternatively, to increase the magnification level, then drag to the right and release when it is the desired magnification.
The Zoom tool is the default tool selected in Camera Raw when the “Edit” button is selected in the toolbar. To zoom in to the set magnification level when it is selected, hold your pointer over the preview image and click to zoom in to the area at which you click. To zoom out to fit the image in the preview area again, click again. Alternatively, to zoom in or out when the Zoom tool is not selected, directly click the “Fit in view” or “Zoom to specified level” button.
Filmstrip Buttons
To the right of the magnification buttons in the toolbar below the preview image are the “Filmstrip,” “Sort,” and “Filters” buttons, which you can use to view, sort, filter and manipulate the filmstrip of thumbnails that appears when working with multiple files at once in the camera raw dialog box, which we will discuss in a separate lesson.
Rating and Mark for Deletion Buttons
Directly below the preview image in the toolbar is a 5-star scale. You can click or click and drag in this scale to set a star rating for the current photo. To toggle the photo as being marked for deletion, click the “Toggle mark for deletion” button to the right of the stars, which looks like a trash can icon.
Changing the View in the Camera Raw Dialog Box
Further to the right in this same bar is the “Cycles between Before/After views” button. You can click this button to cycle the preview of the camera raw image between the five “Before/After” views to choose the way changes you make to the camera raw file appear in the preview area. Alternatively, click and hold down the button to show a pop-up menu of these view choices, instead. Then click the name of the “Before/After” view to apply in the menu that appears.
If you select one of the “Before/After” views and then change the image, you can then click the adjacent “Swap Before/After settings” button to swap the settings between the two photo versions or click the “Copy current settings to Before” button to copy the changes to the “Before” image. You can click the “Toggle to default/current settings” button to toggle between applying the current or default settings to the “After” version of the photo.
The Color Space Info Link
In the center of the bar at the bottom of the dialog box, you can use the “Color space info” link to show the “Workspace” category of the “Camera Raw Preferences” dialog box, which lets you select a different “Preset” or specify values in the “Color Space,” “Image Sizing,” “Output Sharpening,” and “Photoshop” sections and then click the “OK” button to apply them, if needed.
The Open and Cancel Buttons
To apply any camera raw adjustments to the selected camera raw image and close this dialog box without opening the image in Photoshop, click the “Done” button in the lower-right corner of the “Camera Raw” dialog box. Alternatively, to cancel the changes and close the dialog box, click the “Cancel” button. Alternatively, to reset the camera raw changes made in the dialog box, if needed, hold down the “Alt” key on your keyboard and then click the “Reset” button that replaces the “Cancel” button.
To both apply your changes by updating the image’s metadata and open the image in Photoshop, click the “Open” button. Alternatively, to open the selected image in Photoshop without updating the image’s metadata, hold down the “Alt” key on your keyboard and then click the “Open Copy” button that replaces the “Open” button.