The Notebook Recycle Bin in OneNote – Tutorial
The Notebook Recycle Bin in OneNote: Video Lesson
This video lesson, titled “The Notebook Recycle Bin,” shows you how to use the notebook recycle bin in OneNote. This video lesson is from our complete OneNote 2016 training, titled “Mastering OneNote Made Easy v.2016-2013.”
The Notebook Recycle Bin in OneNote: Overview
As you delete sections and pages from your notebooks, they are kept in the notebook recycle bin in OneNote. To restore a deleted section or page within a notebook, you must display the contents of the notebook recycle bin in OneNote. However, many notebooks automatically delete items within the notebook’s recycle bin after 60 days, so you may not be able to retrieve deleted items in a notebook recycle bin from long ago.
To view the notebook recycle bin in OneNote, open a notebook and then click the “Notebook Recycle Bin” button in the “History” button group on the “History” tab in the Ribbon. You can click this same button again to toggle back to the contents of the notebook when finished. You can also switch to the notebook recycle bin in OneNote by clicking the drop-down arrow under the “Notebook Recycle Bin” button and then clicking the “Notebook Recycle Bin” command from the drop-down menu.
Within the notebook recycle bin, you will see all of the deleted sections and pages that have not yet been permanently deleted. To restore a notebook section or page, right-click on the section tab to restore within the Notebook Header tabs or right-click on a page to restore in the Page Tabs bar within the “Deleted Pages” section tab. Select the “Move or Copy…” command in the pop-up menu that appears to open the “Move or Copy” dialog box. Expand the notebooks and sections within this dialog box, if needed, to select the notebook or section to which you want to restore the selected section or page. Then click either the “Move” button to move the section or page from the notebook recycle bin to the selected location or click the “Copy” button to place a copy into the selected location, instead.
To permanently delete the items within the notebook recycle bin in OneNote after reviewing them to ensure you will not need them in the future, click the drop-down arrow under the “Notebook Recycle Bin” button and select the “Empty Recycle Bin” command. You will need to click the “Yes” button in the confirmation dialog box that appears to permanently delete the items from the notebook recycle bin.
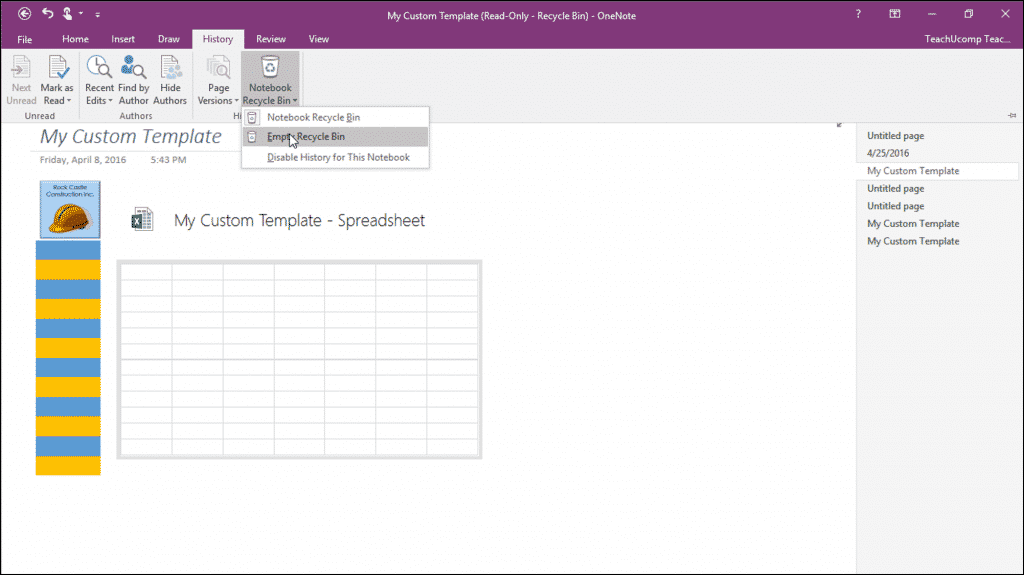
The Notebook Recycle Bin in OneNote – Tutorial: A picture of a user emptying the notebook recycle bin in OneNote 2016.
Also, like the “Page Versions” button, you can also turn the notebook’s history on and off by clicking the “Disable History for this Notebook” command from the “Notebook Recycle Bin” drop-down button and choosing to keep or delete the existing notebook history in the prompt that appears.
The Notebook Recycle Bin in OneNote: Instructions
- To show or hide the notebook recycle bin in OneNote, open a notebook and then click the “Notebook Recycle Bin” button in the “History” button group on the “History” tab in the Ribbon or click the drop-down arrow under the “Notebook Recycle Bin” button and then click the “Notebook Recycle Bin” command.
- To restore a notebook section or page when viewing the Notebook Recycle Bin in OneNote, right-click the section tab to restore within the Notebook Header tabs or right-click a page to restore in the Page Tabs bar within the “Deleted Pages” section tab.
- Select the “Move or Copy…” command in the pop-up menu that appears to open the “Move or Copy” dialog box.
- Expand the notebooks and sections within this dialog box, if needed, to select the notebook or section to which you want to restore the selected section or page.
- Click either the “Move” button to move the section or page from the notebook recycle bin to the selected location or click the “Copy” button to place a copy into the selected location, instead.
- To permanently delete the items within the notebook recycle bin in OneNote, click the drop-down arrow under the “Notebook Recycle Bin” button and select the “Empty Recycle Bin” command.
- Click the “Yes” button in the confirmation dialog box that appears.
- To turn the notebook’s history on or off, click the “Disable History for this Notebook” command from the “Notebook Recycle Bin” drop-down button and choose to keep or delete the existing notebook history in the prompt that appears.
