The OneNote Interface- Tutorial
The OneNote Interface: Video Lesson
This video lesson, titled “The OneNote Environment,” shows the different objects within the OneNote interface. This video lesson about the OneNote interface is from our OneNote tutorial titled “Mastering OneNote Made Easy v.2016-2013.”
The OneNote Interface: Overview
The picture below is of the OneNote interface shown when you start the OneNote application. When you start OneNote for the first time, the program opens a sample notebook called Personal. In the future when you start the application, the notebook you worked on last will open instead.
The OneNote storage structure resembles that of a tabbed notebook. The beauty of OneNote is that you can customize the organization based on your personal tastes and needs. For example, you might have one notebook for personal information and one for work. Alternatively, you might have one notebook for each project on which you work. Each notebook you create is divided into sections and each section is then divided into pages.
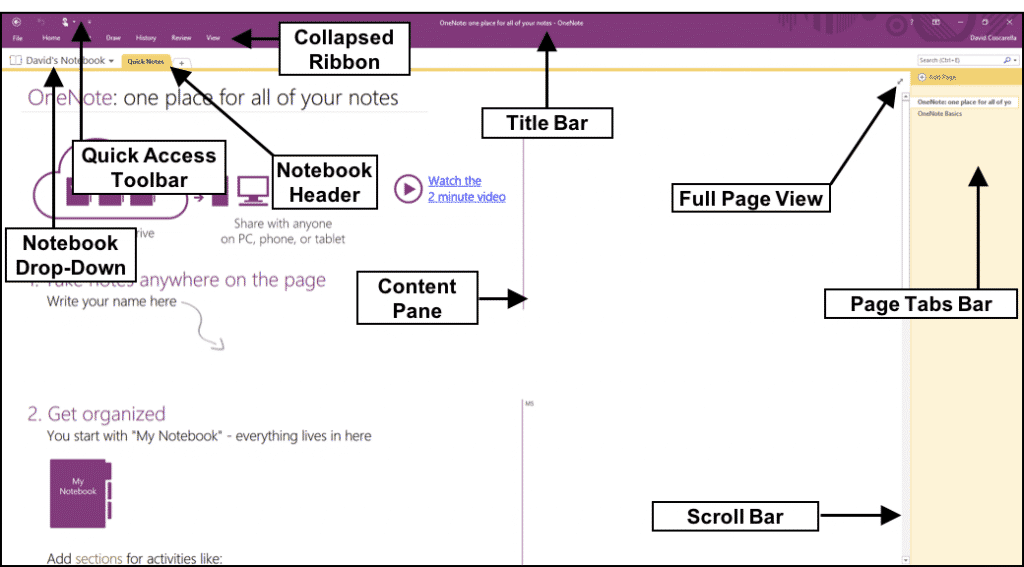
The OneNote Interface- Tutorial: A picture of the OneNote interface in OneNote 2016.
Once the application and notebook are open, notebook information appears in four areas of the OneNote interface. The Notebook Drop-Down Navigation at the top of the program window shows buttons for the notebooks you create. You use the drop-down to select a notebook on which to work.
In versions prior to 2013, notebooks instead appeared in a collapsed Notebook pane at the left side of the OneNote interface. In versions 2013 and 2016, you can access and display the old navigation by clicking the pin button in the notebook drop-down. This is also the same button to click to make the Notebook pane disappear.
The Navigation Bar is collapsed by default, only displaying a button for each notebook. You can easily switch between notebooks in the Navigation Bar by clicking one of these buttons to display it. You can click the small, downward-pointing arrows to collapse and expand the contents of the notebooks. Then click any of these areas within the notebook to quickly jump to that section.
The “Content” pane is the area in the center of the OneNote interface and displays the active notebook page. For pages that you create, the name of the page appears in the Title Bar at the top of the OneNote interface.
Just above the Content” pane is the Notebook Header, which displays tabs for the sections of the active notebook. You can easily jump to different areas of the notebook by clicking these tabs.
The Page Tabs Bar appears to the right of the “Content” pane and shows page tabs you can click to easily move between the pages of the active section. OneNote displays a tab for each page in the current section, by default.
Another object, called the Ribbon, appears at the top of the OneNote interface. This tool is where you find all of the tabs, button groups, and commands within the program. If you are familiar with the Ribbon, one thing to note that is different from other Office programs is that the Ribbon is collapsed by default in OneNote. This gives notebook pages more space. You click a tab to show the Ribbon. Selecting the “File” tab within the Ribbon lets you access the “Backstage View” shared by Microsoft Office products. In the “Backstage View,” you find the most common file management commands, like creating a new notebook, sharing notebooks, and printing.
Above the Ribbon is the Quick Access Toolbar. You can easily add buttons to this toolbar for the commands that you use most frequently and wish to always have available. You will notice several important buttons are already set here, such as “Back” and “Undo.” The buttons that you have added to this toolbar are easily removed. We will examine how to use and customize the Quick Access Toolbar in an upcoming lesson.
If upgrading from a version prior to 2013, you may notice a clean, fresh look for the OneNote interface. OneNote 2013 and 2016 provide support for touch-enabled devices, so you can use OneNote without a keyboard.
To enlarge the space between buttons in the Ribbon to make it easier to select options with your fingers, use the “Touch/Mouse Mode” button. Simply add the “Touch/Mouse” button to the Quick Access Toolbar to switch between modes easily.
To do this, click or tap the drop-down arrow on the Quick Access Toolbar. Then select “Touch/Mouse Mode” to add it to the toolbar. Then tap or click the “Touch/Mouse Mode” button on the Quick Access Toolbar and select the mode you want.
The OneNote Interface: Instructions
- To select notebooks in OneNote 2013 and 2016, use the Notebook Drop-Down Navigation at the top of the program window, below the Ribbon.
- To display the old “Notebook Pane” at the left side of the application window, click the pin button in the Notebook Drop-Down.
- Click the pin button again to make the Notebook Pane disappear.
- To switch between notebooks, click the buttons in the Navigation Bar.
- The “Content” pane is where your active notebook page appears.
- To jump between sections in an open notebook, click the tabs in the Notebook Header section.
- To move between the pages in your notebook, click the name of the page in the Page Tabs Bar to the right of the “Content” pane.
- If you want to access the commands and buttons in OneNote, use the Tabs in the Ribbon.
- To access file management commands for OneNote, click the “File” tab to view the Backstage View.
- To access frequently used commands, use the Quick Access Toolbar.
- If you want to toggle between Touch Mode and Mouse Mode, click the “Customize Quick Access Toolbar” button.
- Then select “Touch/Mouse Mode” to add that button to the Quick Access Toolbar.
- Then click the “Touch/Mouse Mode” button in the Quick Access Toolbar to toggle between the modes.
