The Proposals Window in Sage 50- Instructions
The Proposals Window in Sage 50: Video Lesson
This video lesson, titled “The Proposals Window,” shows how to use the Proposals window in Sage 50. This lesson is from our complete Sage 50 tutorial, titled “Mastering Sage 50 Made Easy v.2018.”
The Proposals Window in Sage 50: Overview
You use the Proposals window in Sage 50 to create a proposal of goods and/or services for a customer. If the customer accepts the proposal, you can mark the proposal as an “Accepted” proposal. Doing this then lets you transfer the items to invoices, as needed, by using the “Sales/Invoicing” window. The Proposals window in Sage 50 also let you perform progress, or partial, billing using multiple invoices. You also do this within the “Sales/Invoicing” window. To open the Proposals window in Sage 50, select “Tasks| Quotes/Sales Orders/Proposals| Proposals…” from the Menu Bar.
To create a new proposal, click the “New” button in the window’s toolbar, if needed. Select the “Customer ID” of the customer for whom you are creating the proposal. Then enter the “Proposal No.,” which is the proposal number assigned to the transaction. Enter the proposal’s creation “Date” and its “Complete by” date.
The billing address of the customer appears in the form. If the billing address is different from the shipping address, you can enter the shipping address here. The “Accept proposal” checkbox is the checkbox you must check after a customer accepts the proposal so you can bill for the items in the proposal by using the “Sales/Invoicing” window. The “Close proposal” checkbox is used to manually close a proposal, if needed. Otherwise, it will automatically check itself after all items from a proposal are shipped and invoiced. To specify a drop shipment, check the “Drop Ship” checkbox. Below that, the “Customer PO,” “Ship via,” “Terms,” and “Sales rep” for customer’s record appear. You can use the “A/R Account” drop-down, if shown, to select which account the proposal debits when you ship the items.
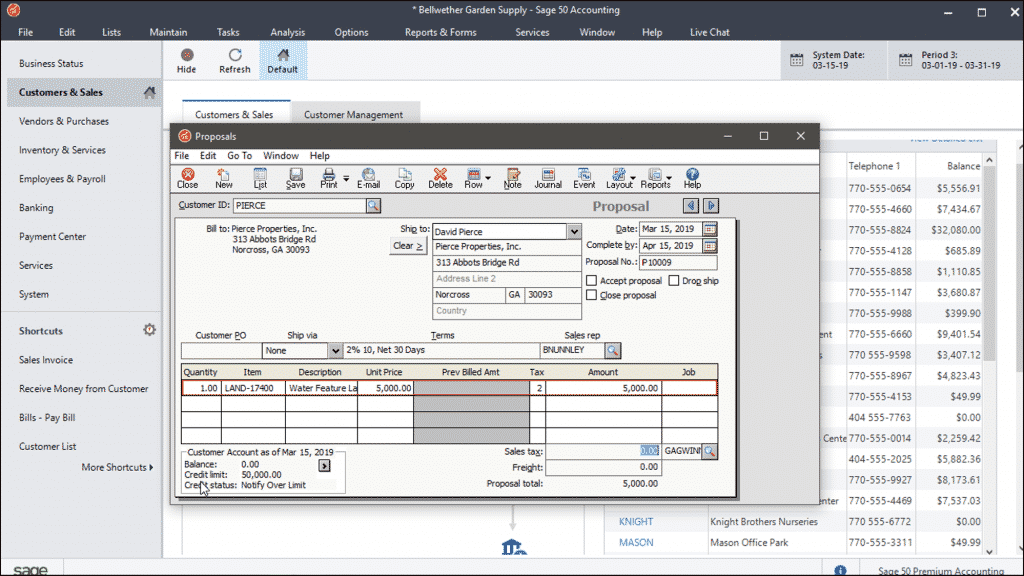
The Proposals Window in Sage 50- Instructions: A picture of the “Proposals” window in Sage 50.
Enter the information about the items sold into the line item area. The “Quantity” field show how many you ordered. The “Item” field shows the item ID of inventory items, if used. The “Description” shows the item’s related description or lets you type a line item description, if needed. The “GL Account” field, if shown, shows the related income account affected by the sale of that line item. When ordering items not in inventory, it is the customer’s default “sales” account, but you can change it, if needed. You also need to check and/or set the “Unit Price,” “Tax,” and “Amount” for each line item. The “Prev Billed Amt” field shows how much of the dollar value of each line item you billed in previous invoices.
Enter any needed fright amount into the “Freight” field and check the “Sales tax” amount. The proposal’s total appears in the “Proposal total” field. The “Customer Account” information in the lower-left corner shows the selected customer’s balance, credit limit, and credit status as of the current date. To save or print the proposal when finished, click the “Save” or “Print” buttons in the window’s toolbar.
To mark a proposal as accepted by the customer, open the “Proposals” window and then click the “List” button in the window’s toolbar. In the “Proposal List” window, double-click the accepted proposal to show it in the “Proposals” window. Check the “Accept proposal” checkbox to accept the proposal. Click the “Save” button in the toolbar at the top of the “Proposals” window to save it. Click the “Close” button in the toolbars of the “Proposals” and “Proposal List” windows to close them.
The Proposals Window in Sage 50: Instructions
- To open the Proposals window in Sage 50, select “Tasks| Quotes/Sales Orders/Proposals| Proposals…” from the Menu Bar.
- To create a new proposal, click the “New” button in the window’s toolbar, if needed.
- Select the “Customer ID” of the customer for whom you are creating the proposal.
- Then enter the “Proposal No.,” which is the proposal number assigned to the transaction.
- Enter the proposal’s creation “Date” and its “Complete by” date.
- The billing address of the customer appears in the form.
- If the billing address is different from the shipping address, you can enter the shipping address here.
- The “Accept proposal” checkbox is the checkbox you must check after a customer accepts the proposal so you can bill for the items within the proposal by using the “Sales/Invoicing” window.
- To manually close a proposal, check the “Close proposal” checkbox. Otherwise, it automatically checks itself after all items from a proposal are shipped and invoiced.
- To specify a drop shipment, check the “Drop Ship” checkbox.
- Below that, the “Customer PO,” “Ship via,” “Terms,” and “Sales rep” for customer’s record appear.
- You can use the “A/R Account” drop-down, if shown, to select which account the proposal debits when you ship the items.
- Then enter the information about the items sold into the line item area.
- The “Quantity” field show how many you ordered.
- The “Item” field shows the item ID of inventory items, if used.
- The “Description” shows the item’s related description or lets you type a line item description, if needed.
- The “GL Account” field, if shown, shows the related income account affected by the sale of that line item. When ordering items not in inventory, it is the customer’s default “sales” account, but you can change it, if needed.
- You also need to check and/or set the “Unit Price,” “Tax,” and “Amount” for each line item.
- The “Prev Billed Amt” field shows how much of the dollar value of each line item you billed in previous invoices.
- Enter any needed fright amount into the “Freight” field and check the “Sales tax” amount.
- The proposal’s total appears in the “Proposal total” field.
- The “Customer Account” information in the lower-left corner shows the selected customer’s balance, credit limit, and credit status as of the current date.
- To save or print the proposal when finished, click the “Save” or “Print” buttons in the window’s toolbar.
- To mark a proposal as accepted by the customer, open the “Proposals” window and then click the “List” button in the window’s toolbar.
- In the “Proposal List” window, double-click the accepted proposal to show it in the “Proposals” window.
- Check the “Accept proposal” checkbox to accept the proposal.
- Click the “Save” button in the toolbar at the top of the “Proposals” window to save it.
- Click the “Close” button in the toolbars of the “Proposals” and “Proposal List” windows to close them.
