The Ribbon in Publisher – Instructions
The Ribbon in Publisher: Video Lesson
This video lesson, titled “The Ribbon,” shows you how to use the Ribbon in Publisher. This video lesson is from our complete Publisher tutorial, titled “Mastering Publisher Made Easy v.2019 and 365.”
The Ribbon in Publisher: Overview
The Ribbon in Publisher is the main tool you use to perform tasks. It lets you perform all the commands available in the program. The Ribbon in Publisher is divided into tabs. These tabs contain different button groups of commands. You can access the commands in each button group by using the buttons, boxes, or menus available in the group.
For advanced options, or for users familiar with the old “dialog box” functionality of Publisher, you can click the Dialog Box launcher button that appears in the lower-right corner of some button groups on the currently displayed, or “active,” tab within the Ribbon in Publisher. Doing this then opens a dialog box of options available for that button group.
You can also double-click the active tab in the Ribbon to both hide and show the Ribbon’s contents. This can be a handy way to gain additional workspace while composing the pages of the active publication.
Click the main tabs in the Ribbon in Publisher to switch the displayed button groups. By default, the “File,” “Home,” “Insert,” “Page Design,” “Mailings,” “Review,” “View,” and “Help” tabs appear in the Ribbon. You can also enable the “Developer” tab, if using macros or code.
In addition to the primary tabs available for you to use, special “contextual” tabs will also appear in the Ribbon when you select a particular type of publication object. Contextual tabs appear when you select either a picture, table, text box, or WordArt in a publication page. The groups of buttons that then appear on the contextual tabs directly relate to the type of object selected. You can make the contextual tabs disappear by clicking away from the selected object in the publication window.
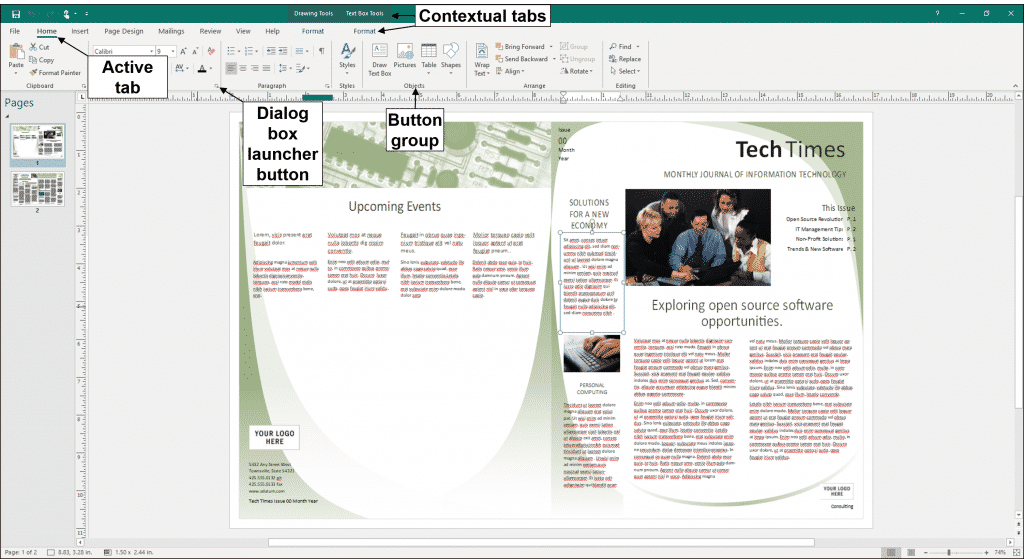
The Ribbon in Publisher – Instructions: A diagram of the Ribbon in Publisher. It shows an active tab, its button groups, a dialog box launcher button, and also the contextual tabs that may appear.
The Ribbon in Publisher: Instructions
- The Ribbon in Publisher appears at the top of the Publisher window, and it is divided into tabs.
- The program’s commands appear within the selected, or “active,” tab in the Ribbon in Publisher.
- To switch the button groups displayed in the Ribbon in Publisher, click one of the tabs in the Ribbon.
- To use the commands in the button group on the active tab, click the related buttons, boxes, or menus within the button group.
- If you want to open a dialog box for the button groups that have that option, click the “Dialog Box” launcher button in the lower-right corner of a button group.
- To hide or show the contents of the Ribbon in Publisher, double-click the active tab in the Ribbon.
- In addition to the primary tabs available for you to use, special “contextual” tabs will also appear in the Ribbon when you select a particular type of publication object. Contextual tabs appear when you select either a picture, table, text box, or WordArt in a publication page. The groups of buttons that then appear on the contextual tabs directly relate to the type of object selected.
- To make contextual tabs disappear from the Ribbon in Publisher, click away from the selected object in the publication window.