The Sampler and Grid Overlays in Camera Raw in Photoshop: Video
This video lesson, titled “How to Toggle the Sampler and Grid Overlays in Camera Raw in Adobe Photoshop: A Training Tutorial,” shows how to use the Sampler and Grid overlays in Camera Raw in Photoshop. This video lesson is from our complete Photoshop tutorial, titled “Mastering Photoshop Made Easy.”
Overview:
The “Toggle sampler overlay” and “Toggle grid overlay” buttons in the “Camera Raw” dialog box of Photoshop show and hide the Sampler and Grid overlays in Camera Raw in Photoshop, respectively. The Sampler and Grid overlays in Camera Raw in Photoshop let you show or hide helpful overlay information when making camera raw adjustments. The sampler overlay lets you see the RGB values of up to 9 points you can sample by clicking into the preview image. The grid overlay shows a grid you can use for alignment and orientation of the photo.
The Sampler Overlay in Camera Raw in Photoshop:
To toggle the sampler overlay on or off, click the “Toggle sampler overlay” button in the toolbar at the right side of the “Camera Raw” dialog box. This shows the sampler overlay section at the top of the preview image and the corresponding numbered color sample icons within the preview image.
After initially activating the sampler overlay, the “New Sample” button within the sampler overlay section also automatically activates. However, to add a new color sample to the sampler overlay section if you reopen it after initially adding color samples to it, then click the “New Sample” button in the sampler overlay section to activate the button.
To add a color sample after activating this button, then click into the preview image in the location that contains the color to sample to show its RGB information in the sampler overlay section. A corresponding numbered icon for the color sample location then also appears in the preview image.
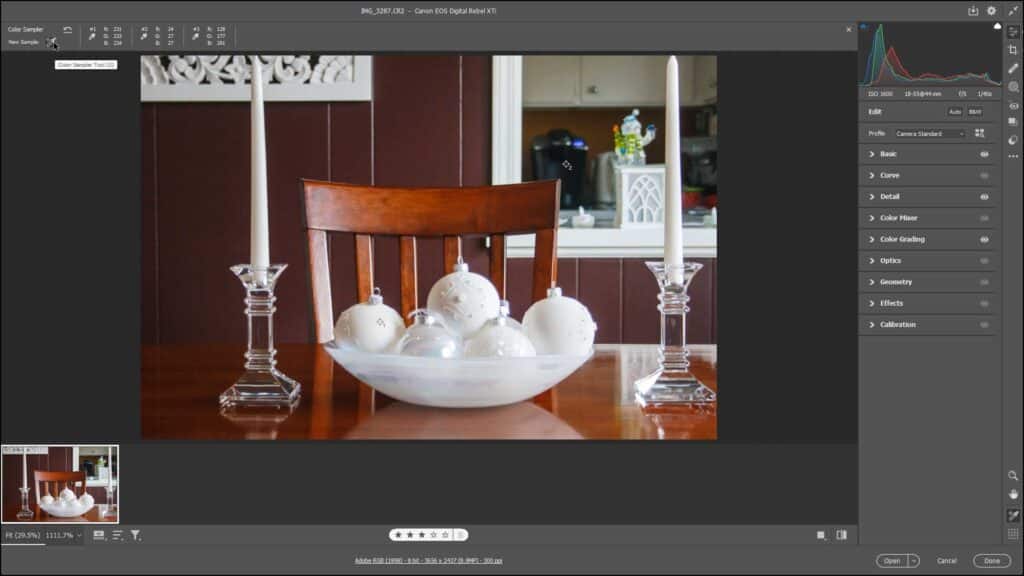
The Sampler and Grid Overlays in Camera Raw in Photoshop: A picture showing the Sampler overlay in Camera Raw in Photoshop.
To move a color sample icon in the preview image, which adjusts its RGB values to its new location, ensure you activate the “New Sample” button in the sampler overlay section. Then click and drag the existing color sample icon in the preview image and drop it into a new location.
To delete a color sample in the sampler overlay, ensure you activate the “New Sample” button and then hold down the “Alt” key (“Option” for Macs) on your keyboard. Then hold the mouse pointer over the color sample icon in the preview image to delete until a scissors icon appears next to the mouse pointer. Then click to delete the color sample. Finally, release the keyboard key. Alternatively, to clear all color samples in the sampler overlay, click the “Reset sampler” button in the sampler overlay section above the camera raw preview image.
The Grid Overlay in Camera Raw in Photoshop:
To use the Hand Tool by default in the Camera Raw dialog box in Photoshop, click the “Hand Tool” button at the bottom of the toolbar at the right side of the Camera Raw dialog box. The Hand Tool lets you scroll and pan the preview image in the window.
To toggle the grid overlay on or off, click the “Toggle grid overlay” button in the toolbar at the right side of the “Camera Raw” dialog box. This shows the grid overlay on the preview image. A grid overlay section also appears at the top of the camera raw preview image. To adjust the grid size, use the “Grid Size” slider in the grid overlay section at the top of the camera raw preview image. To adjust the grid opacity, use the “Opacity” slider in the grid overlay section at the top of the camera raw preview image.
Instructions:
How to Use the Sampler Overlay in the Camera Raw Dialog Box in Photoshop:
- To toggle the sampler overlay on or off, click the “Toggle sampler overlay” button in the toolbar at the right side of the “Camera Raw” dialog box.
- This shows the sampler overlay section at the top of the preview image and the corresponding numbered color sample icons within the preview image.
- After initially activating the sampler overlay, the “New Sample” button within the sampler overlay section also automatically activates.
- However, to add a new color sample to the sampler overlay section if you reopen it after initially adding color samples to it, click the “New Sample” button in the sampler overlay section to activate it.
- To add a color sample after activating this button, click into the preview image in the location of the color to sample to show its RGB information in the sampler overlay section.
- A corresponding numbered icon for the color sample location also appears in the preview image.
- To move a color sample icon, which adjusts its RGB values to its new location, ensure you activate the “New Sample” button.
- Then click and drag the existing color sample icon in the preview image and drop it into a new location.
- To delete a color sample in the sampler overlay, ensure you activate the “New Sample” button and then hold down the “Alt” key (“Option” for Macs) on your keyboard.
- Then hold the mouse pointer over the color sample icon in the preview image to delete until a scissors icon appears next to the mouse pointer.
- Then click to delete the color sample.
- Finally, release the keyboard key.
- Alternatively, to clear all color samples in the sampler overlay, click the “Reset sampler” button in the sampler overlay section above the camera raw preview image.
How to Use the Grid Overlay in the Camera Raw Dialog Box in Photoshop:
- To toggle the grid overlay on or off, click the “Toggle grid overlay” button in the toolbar at the right side of the “Camera Raw” dialog box. This shows the grid overlay on the preview image. A grid overlay section also appears at the top of the camera raw preview image.
- To adjust the grid size, use the “Grid Size” slider in the grid overlay section at the top of the camera raw preview image.
- To adjust the grid opacity, use the “Opacity” slider in the grid overlay section at the top of the camera raw preview image.