Track Meeting Attendance in Outlook- Instructions
Track Meeting Attendance in Outlook: Video
This video lesson, titled “Checking Meeting Attendance Status,” shows you how to track meeting attendance in Outlook. This video lesson is from our complete Outlook tutorial, titled “Mastering Outlook Made Easy v.2019 and 365.”
Overview of How to Track Meeting Attendance in Outlook
You can track meeting attendance in Outlook if you are the person who created the meeting request. Since you are the meeting organizer, the meeting automatically appears in your Calendar. To check the status of the meeting’s attendees in Outlook, double-click the meeting in your Calendar folder to open the Meeting window. A summary of the meeting’s responses appears at the top of the meeting information on the “Meeting” tab of the Ribbon in the “Meeting” window.
To view more detailed tracking information for the meeting, click the “Tracking” tab in the Ribbon of the “Meeting” window to show the responses of the meeting’s invitees. To change the attendance status of a meeting attendee in Outlook, click into the “Attendance” column of the attendee’s row. Then use the drop-down that appears to select a different attendance status.
To change the response status of a meeting attendee in Outlook, click into the “Status” column of the attendee’s row. Then use the drop-down that appears to choose a different response status. To save your changes, if needed, click the “Save” button at the left end of the Quick Access toolbar. When finished, you can then close the “Meeting” window.
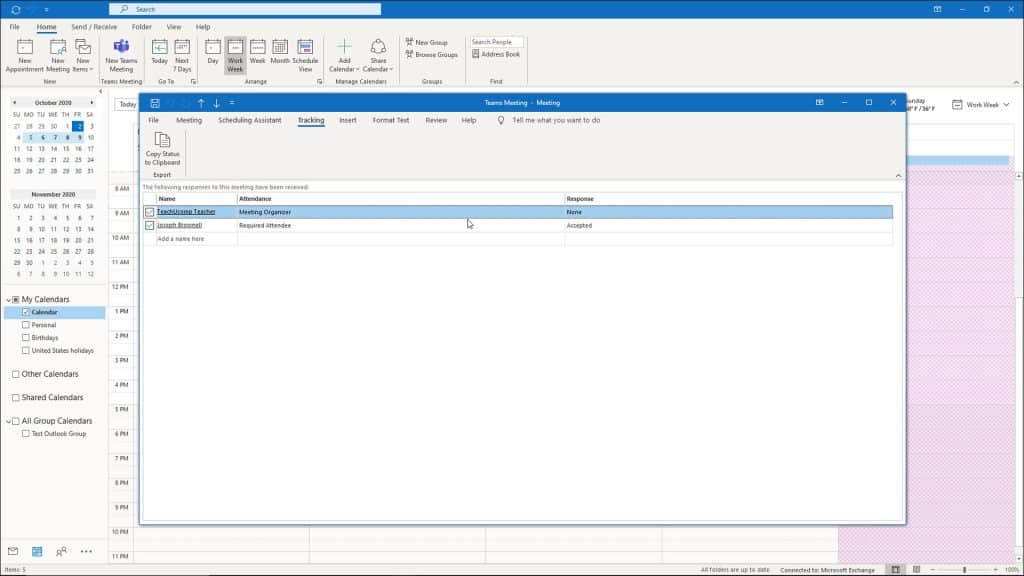
A picture of a meeting organizer tracking meeting attendance in Outlook.
Instructions on How to Track Meeting Attendance in Outlook
- To track meeting attendance in Outlook if you are the person who created the meeting request, double-click the meeting in your Calendar folder to open the Meeting window.
- A summary of the meeting’s responses appears at the top of the meeting information on the “Meeting” tab of the Ribbon in the “Meeting” window.
- To view more detailed tracking information for the meeting, click the “Tracking” tab in the Ribbon of the “Meeting” window to show the responses of the meeting’s invitees.
- To change the attendance status of a meeting attendee in Outlook, click into the “Attendance” column of the attendee’s row.
- Then use the drop-down that appears to select a different attendance status.
- To change the response status of a meeting attendee in Outlook, click into the “Status” column of the attendee’s row.
- Then use the drop-down that appears to choose a different response status.
- To save your changes, if needed, click the “Save” button at the left end of the Quick Access toolbar.
- When finished, you can then close the “Meeting” window.