Unzip Files in Windows 10 – Instructions
Unzip Files in Windows 10: Video Lesson
This video lesson, titled “Unzip Files in File Explorer,” shows how to unzip files in Windows 10. To learn more about Windows 10, check out our complete Windows 10 tutorial, titled “Mastering Windows Made Easy v.10.”
Unzip Files in Windows 10: Overview
You can easily unzip files in Windows 10. You can unzip a zipped file that appears in a File Explorer window to open its contents. To unzip files in Windows 10, display the zipped file to unzip in a File Explorer window. Then click or tap the zipped file to select it. A new “Compressed Folder Tools” contextual tab then appears within the Ribbon of the File Explorer window. Click the “Compressed Folder Tools” contextual tab in the Ribbon to view your unzipping options.
To unzip, or “extract,” all the files in a zipped file, click the “Compressed Folder Tools” contextual tab in the Ribbon. Then click the “Extract All” button in the “Extract To” button group. Doing this then opens an “Extract Compressed (Zipped) Folders” dialog box. Alternatively, you can also unzip a zipped file by right-clicking the file. Then click the “Extract all…” command in the pop-up menu that appears to open the same “Extract Compressed (Zipped) Folders” dialog box.
The current file’s folder pathway appears in the “Files will be extracted to this folder” field. To choose the destination folder, click the “Browse…” button to open a “Select a destination” dialog box. Use the dialog box to choose the folder and then click the “Select Folder” button to set the new destination folder for the extracted contents. To show the extracted files when complete, check the “Show extracted files when complete” checkbox. Then click the “Extract” button to finish.
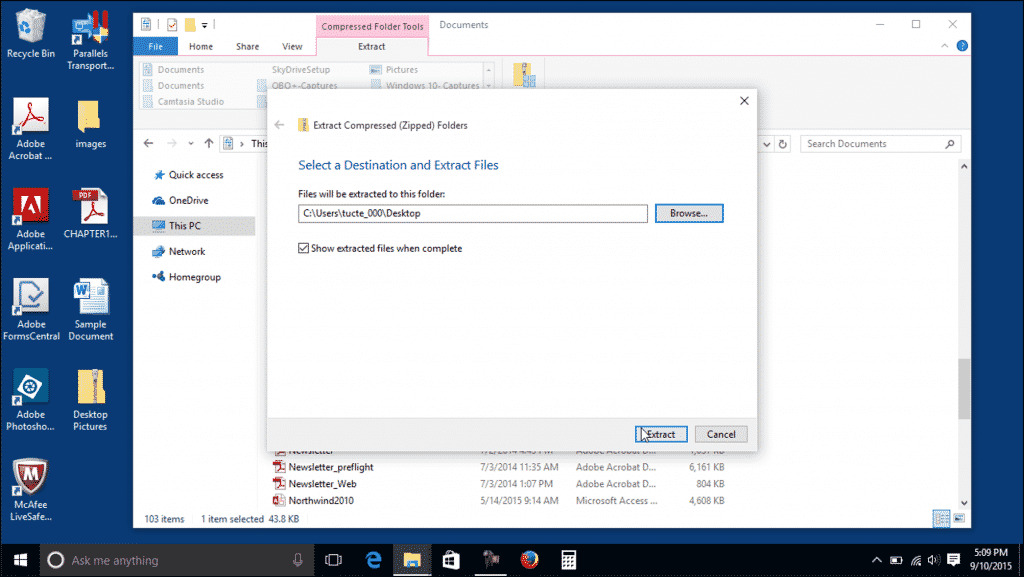
Unzip Files in Windows 10 – Instructions- A picture of the “Extract Compressed (Zipped) Folders” dialog box in Windows 10.
You can also unzip files in Windows 10 to extract only individual files within a zipped file to locations you choose using the File Explorer window. To unzip files in Windows 10 and extract individual files to locations you choose, select the zipped file from which you only want to extract selected files within the File Explorer window. Then click the “Compressed Folder Tools” contextual tab within the Ribbon. Then double-click the zipped file in the File Explorer window to “open” the zipped file and display its contents in the File Explorer window. Doing this does not extract the zipped folder, it simply shows its contents.
Then select the individual items to extract within the File Explorer window. Then click the “Compressed Folder Tools” contextual tab in the Ribbon. Next, click a folder name in the “Extract To” button group to extract and save the selected files into that folder. To save them into a folder not shown, click the “More” button in the lower-right corner of the button group to display a “Choose location…” command. Then click this command to open a “Copy Items” dialog box. Select the folder into which to extract and save the files within the “Copy Items” dialog box. Then click the “Copy” button in the dialog box to finish.
Unzip Files in Windows 10: Instructions
- To unzip files in Windows 10, display the zipped file to unzip within a File Explorer window.
- Then click or tap the zipped file to select it.
- Then click the “Compressed Folder Tools” contextual tab within the Ribbon to view your unzipping options.
- To unzip, or “extract,” all the files in a zipped file, click the “Compressed Folder Tools” contextual tab within the Ribbon.
- Then click the “Extract All” button in the “Extract To” button group to open an “Extract Compressed (Zipped) Folders” dialog box.
- Alternatively,right-click the file.
- Then click the “Extract all…” command in the pop-up menu that appears to open the same “Extract Compressed (Zipped) Folders” dialog box.
- The current file’s folder pathway appears in the “Files will be extracted to this folder” field.
- To set a new destination folder for the extracted contents, click the “Browse…” button to open a “Select a destination” dialog box.
- Then choose the destination folder and click the “Select Folder” button.
- To show the extracted files when complete, ensure there is a checkmark in the “Show extracted files when complete” checkbox.
- Then click the “Extract” button to finish.
- To unzip files in Windows 10 and extract individual files to locations you choose, select the zipped file from which you only want to extract selected files within the File Explorer window.
- Then click the “Compressed Folder Tools” contextual tab within the Ribbon.
- Double-click the zipped file in the File Explorer window to “open” the zipped file and display its contents in the File Explorer window. Note that doing this does not extract the zipped folder, it simply shows its contents.
- Select the individual items to extract within the File Explorer window.
- To extract and save the selected files into a folder you choose, click a folder name in the “Extract To” button group of the “Compressed Folder Tools” contextual tab in the Ribbon.
- To save them into a folder not shown, click the “More” button in the lower-right corner of the button group to display a “Choose location…” command.
- Click this command to open a “Copy Items” dialog box.
- Select the folder to extract and save the files into within the “Copy Items” dialog box.
- Then click the “Copy” button in the dialog box to finish.
