Use the Handout Master in PowerPoint- Instructions
How to Use the Handout Master in PowerPoint: Video
This video lesson, titled “Using the Handout Master,” shows you how to use the handout master in PowerPoint. This video lesson is from our complete PowerPoint tutorial, titled “Mastering PowerPoint Made Easy v.2019 and 365.”
Overview of How to Use the Handout Master in PowerPoint:
You use the handout master in PowerPoint to change the appearance of a presentation’s printed handouts. To edit the handout master for a PowerPoint presentation, click the “Handout Master” button in the “Master Views” button group on the “View” tab of the Ribbon. Doing this then opens the presentation’s handout master in the main window. A new “Handout Master” contextual tab also appears in the Ribbon.
To select which handout layout to modify, select a layout choice from the “Slides Per Page” drop-down in the “Page Setup” button group on the “Handout Master” contextual tab in the Ribbon. Any content you then add to the selected handout layout then appears for that type of handout within the presentation.
However, note that you cannot modify the slide thumbnail placeholders for the selected handout layout in the handout master view. If you want to make those kinds of editing changes to slide handouts, you must export the handouts to Word and then make the changes there.
To show or hide placeholders for all handout layouts in the presentation, check or uncheck the desired placeholder checkboxes in the “Placeholders” button group on the “Handout Master” contextual tab in the Ribbon. To close the handout master view after making your desired changes, click the “Close Master View” button in the “Close” button group on the “Handout Master” contextual tab of the Ribbon.
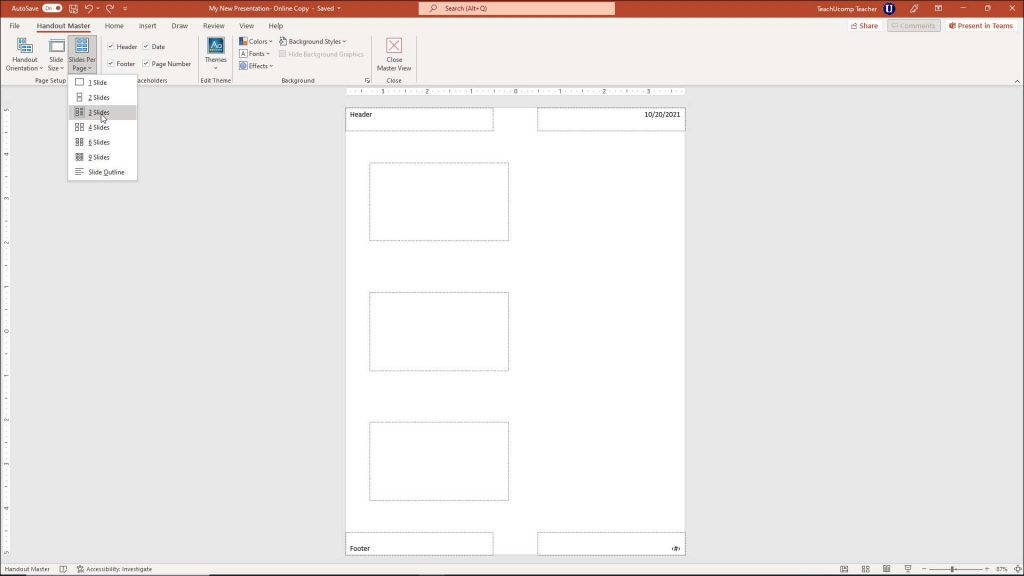
A picture showing how to use the handout master in PowerPoint to select a handout layout to edit.
Instructions on How to Use the Handout Master in PowerPoint:
- To use the handout master in PowerPoint to change the appearance of a presentation’s printed handouts, click the “Handout Master” button in the “Master Views” button group on the “View” tab of the Ribbon.
- Doing this then opens the presentation’s handout master in the main window.
- A new “Handout Master” contextual tab also appears in the Ribbon.
- To select which handout layout to modify, select a layout choice from the “Slides Per Page” drop-down in the “Page Setup” button group on the “Handout Master” contextual tab in the Ribbon.
- Any content you then add to the selected handout layout then appears for that type of handout within the presentation.
- However, note that you cannot modify the slide thumbnail placeholders for the selected handout layout in the handout master view. If you want to make those kinds of editing changes to slide handouts, you must export the handouts to Word and then make the changes there.
- To show or hide placeholders for all handout layouts in the presentation, check or uncheck the desired placeholder checkboxes in the “Placeholders” button group on the “Handout Master” contextual tab in the Ribbon.
- To close the handout master view after making your desired changes, click the “Close Master View” button in the “Close” button group on the “Handout Master” contextual tab of the Ribbon.