Using the Database Expert in Crystal Reports 2013- Tutorial
Using the Database Expert in Crystal Reports 2013: Video Lesson
This video lesson, titled “The Database Expert,” discusses using the Database Expert in crystal Reports 2013. This video is from our complete Crystal Reports 2013 training, titled “Mastering Crystal reports Made Easy v.2013-2011.”
Using the Database Expert in Crystal Reports 2013: Overview
In this tutorial, you will lean about using the Database Expert in Crystal Reports 2013. After you create a new report, you will see the “Database Expert” dialog box. This dialog box allows you to select the source of the data that will be used for the report. The pane at the left side of the dialog box lists the set of available types of data connections that you can use to connect to the desired data you wish to use for the report. Click the small plus signs (+) next to each folder to expand them and view existing connections or launch a dialog box that will allow you to connect to a data source of that type.
| Name: | Connection Type: |
| My Connections | Clicking the small plus sign next to this folder displays a listing of the most recently accessed data sources on your machine for easy access to data sources that you have recently used. |
| Create New Connection | When you click the small plus sign next to this folder, you will then see another list of folders displaying the names of the various types of possible data connections that you can use for the report. Click the plus sign next to these folders to establish a new data connection to a data source of the selected type. |
When using the Database Expert in Crystal Reports 2013, you will then need to input any additional information in any dialog boxes that appear to connect to your desired type of database file. After you have made this connection, you will see any tables, views, stored procedures, or other data within the selected data connection shown within the left pane of the “Database Expert” dialog box. Once again, these are shown in collapsible and expandable sections within your data connections. When expanded, you can click the icons of the tables or other data you wish to add to the report to select them and then click the “>” arrow to add the selected data to your report. The data will then appear within the “Selected Tables:” pane at the right side of the “Database Expert” dialog box.
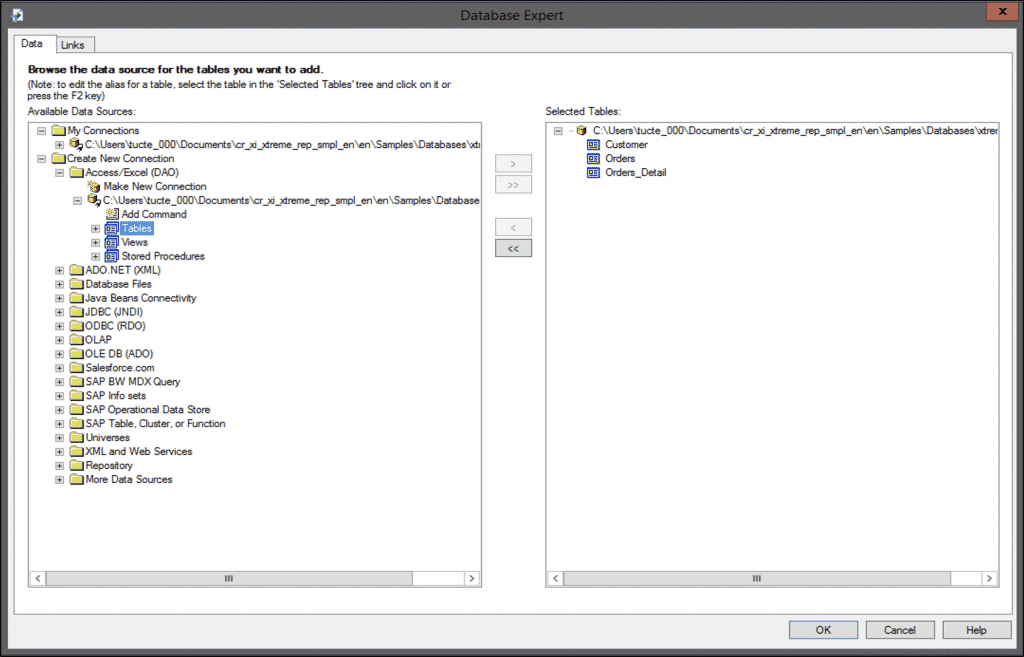
Using the Database Expert in Crystal Reports 2013- Tutorial: A picture of the Database Expert within Crystal Reports 2013.
Once you have added the necessary data into the right panel for use within your report by using the Database Expert in Crystal Reports 2013, you can click the “OK” button within the “Database Expert” dialog box to set the report’s data source.
Using the Database Expert in Crystal Reports 2013: Instructions
- If necessary, you can invoke the “Database Expert” by clicking the button of the same name in the Experts toolbar.
- You can click the small plus sign (+) next to a folder to expand its contents. You can click the small minus sign (-) next to a folder to collapse and hide its contents.
- The “My Connections” folder displays a listing of the most recently accessed data connections on your computer.
- The “Create New Connection” folder displays a listing of the various types of data source connection types. You can click the folder of the type of connection that you want to create/use to make a connection or access a connection that you have created.
- The “Repository” displays a listing of data source connections that have been stored to a Crystal Enterprise server, if you have one.
- Select the data connection that will serve as the source of the current report from the “Available Data Sources:” list at the left side of this dialog box.
- Highlight the first table to add to the report from the list, and click the “>” button to add it to the “Selected Tables:” list at the right. Repeat as needed until all of the tables needed for the report are added.
- You can remove a table from the “Selected Tables:” list by highlighting it and then clicking the single left-pointing arrow button to return it to the list at the right side of the dialog box.
- When you are ready adding tables to the report, click the “OK” button.
