TeachUcomp, Inc.

 MY CART
  • VIDEO COURSES
    • All-Access Subscriptions
    • Business Licensing
    • Course List
      • Accounting
      • Adobe
        • Acrobat
        • Lightroom Classic
        • Photoshop
        • Photoshop Elements
      • Crystal Reports
      • Employment Skills
        • Interview Skills
        • Resume Skills
      • For Lawyers
        • Excel for Lawyers
        • Outlook for Lawyers
        • QuickBooks for Lawyers
        • Word for Lawyers
      • HTML
      • JavaScript
      • Microsoft Office
        • Access
        • Excel
        • Microsoft Office Suite
        • OneNote
        • Outlook
        • Outlook on the Web
        • PowerPoint
        • Publisher
        • Word
      • Microsoft Project
      • Microsoft Teams
      • QuickBooks Online
      • QuickBooks Pro
      • Sage
        • Peachtree
        • Sage 50
      • SQL
      • Windows
    • Video Course Options
  • SUBSCRIPTIONS
  • MANUALS
    • Adobe
      • Acrobat
      • Lightroom Classic
      • Photoshop
      • Photoshop Elements
    • Crystal Reports
    • For Lawyers
      • Excel for Lawyers
      • Outlook for Lawyers
      • QuickBooks for Lawyers
      • Word for Lawyers
    • HTML
    • JavaScript
    • Microsoft Office
      • Access
      • Excel
      • OneNote
      • Outlook
      • Outlook on the Web
      • PowerPoint
      • Publisher
      • Word
    • Microsoft Project
    • Microsoft Teams
    • QuickBooks Online
    • QuickBooks Pro
    • Sage
      • Peachtree
      • Sage 50
    • SQL
    • Windows
  • REFERENCE CARDS
    • Adobe
      • Acrobat
      • Lightroom Classic
      • Photoshop
      • Photoshop Elements 2023
      • Photoshop Elements 2022
      • Photoshop Elements 2021
      • Photoshop Elements 2020
      • Photoshop Elements 2019
      • Photoshop Elements 2018
      • Photoshop Elements 15
    • Google
      • Google Classroom for Teachers
      • Google Docs
      • Google Drive
      • Google Forms
      • Google Sheets
      • Google Slides
    • Mac OS
      • Mac OS Ventura-Mojave Keyboard Shortcuts
    • Microsoft Office
      • Microsoft Office 365
        • Access for Office 365
        • Excel for Office 365
        • Microsoft Office 365
        • Outlook for Office 365
        • PowerPoint for Office 365
        • Publisher for Office 365
        • Word for Office 365
      • Microsoft Office 2021
        • Access 2021
        • Excel 2021
        • Microsoft Office 2021
        • Outlook 2021
        • PowerPoint 2021
        • Publisher 2021
        • Word 2021
      • Microsoft Office 2019
        • Access 2019
        • Excel 2019
        • Microsoft Office 2019
        • Outlook 2019
        • PowerPoint 2019
        • Publisher 2019
        • Word 2019
      • Microsoft Office 2016
        • Access 2016
        • Excel 2016
        • Microsoft Office 2016
        • OneNote 2016
        • Outlook 2016
        • PowerPoint 2016
        • Publisher 2016
        • Word 2016
      • Microsoft Office 2013
        • Excel 2013
        • Microsoft Office 2013
        • OneNote 2013
        • Outlook 2013
        • PowerPoint 2013
        • Word 2013
      • Microsoft Office for iPad
        • Microsoft Office for iPad
    • Microsoft Teams
      • Microsoft Teams
    • QuickBooks Online
      • QuickBooks Online
    • QuickBooks Pro
      • QuickBooks Pro 2023
      • QuickBooks Pro 2022
      • QuickBooks Pro 2021
      • QuickBooks Pro 2020
      • QuickBooks Pro 2019
      • QuickBooks Pro 2018
      • QuickBooks Pro 2017
      • QuickBooks Pro 2016
      • QuickBooks Pro 2015
      • QuickBooks Pro 2014
    • Sage
      • Sage 50 2019
      • Sage 50 2018
    • SQL
      • SQL
    • Windows
      • Windows 11
      • Windows 11 and 10 Keyboard Shortcuts
      • Windows 10
  • STICKERS
    • Chrome OS
      • Chrome OS for Chromebooks
    • Mac OS
      • Mac OS Ventura
      • Mac OS Monterey-Mojave
    • Microsoft Office
      • Word and Excel (Mac) 2022
      • Word and Excel (PC/Windows) 2021-2016 and 365
    • QuickBooks Desktop
      • QuickBooks Desktop (PC/Windows) 2023
      • QuickBooks Desktop (PC/Windows) 2022-2015
    • Windows
      • Windows 11 and 10
  • SUPPORT
    • Company
      • About Us
      • Blog
      • Contact Us
      • Our History
      • Our Philosophy
        • Customer Service
        • Mission
      • Policies
      • Testimonials
    • Contact Us
    • FAQ
    • Help
    • Lost Password
    • Register a Product
  • LOGIN
    • Manage My Account
    • Member Login
    • My Courses
Shop Now

Using Touch Mode in Microsoft Office 2013

by Keeley Byrnes / Thursday, September 05 2013 / Published in Latest, Windows 8

Because of the increased use of tablets, the products within Microsoft Office 2013 have been redesigned with a new mode to allow for easier access to the buttons and other commands within the Ribbon and Quick Access toolbar. This mode is called touch mode. When you enter touch mode within any product interface in the Office 2013 product line, the Ribbon and Quick Access toolbar are enlarged and extra space is added around the buttons and commands within the Ribbon and Quick Access toolbar so that you can more easily access them on your touch-based tablet.


Figure 1: A picture of Microsoft Office Word 2013 in its normal “Mouse” mode. Note the placement of the buttons within the Ribbon at the top of the application interface.


Slide1


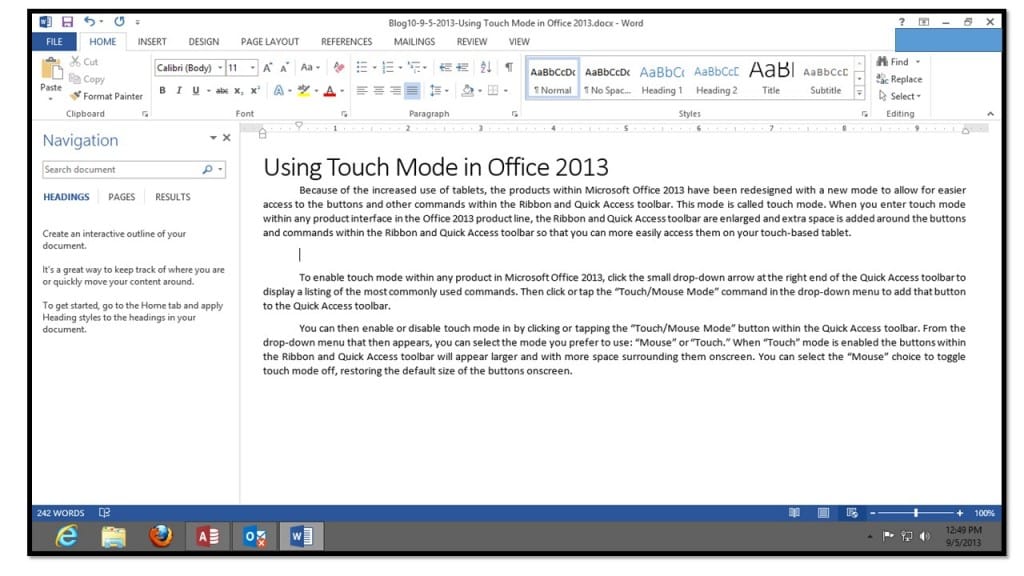
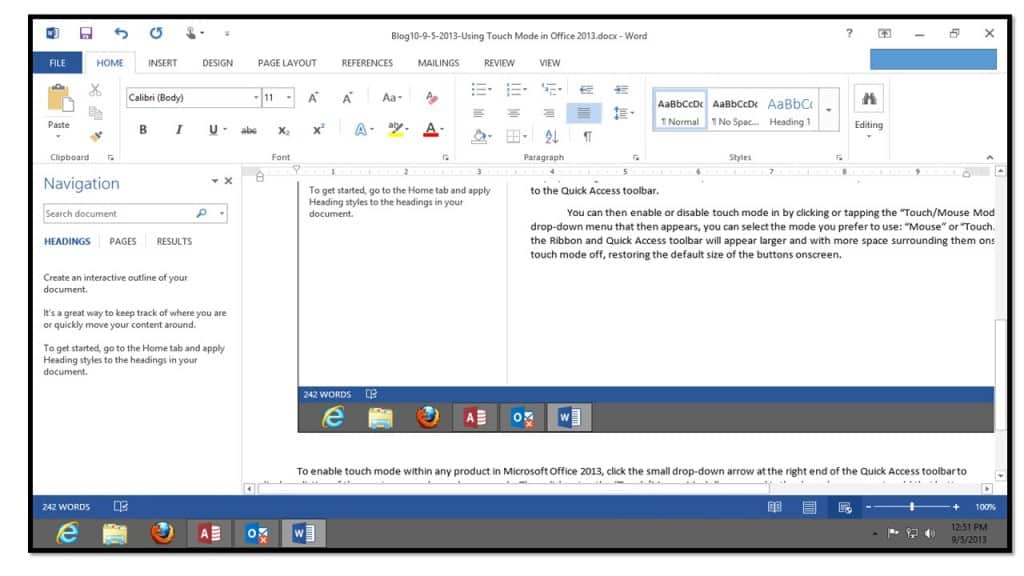
Figure 2: A picture of Microsoft Office Word 2013 when it has been placed into its “Touch” mode. Note that the buttons within the Quick Access toolbar and Ribbon have been enlarged and space has been added around the buttons.


Slide2


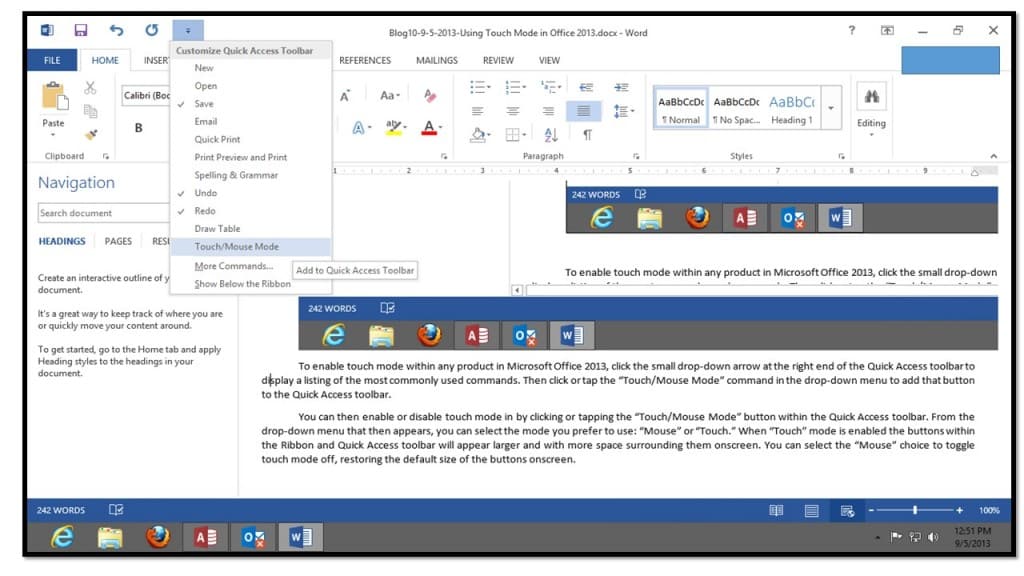
To enable touch mode within any product in Microsoft Office 2013, click the small drop-down arrow at the right end of the Quick Access toolbar to display a listing of the most commonly used commands. Then click or tap the “Touch/Mouse Mode” command in the drop-down menu to add that button to the Quick Access toolbar.


Figure 3: A picture of Microsoft Office Word 2013. To enable the “Touch/Mouse Mode” button that allows you to toggle between “Touch” and “Mouse” mode, you must add it to the Quick Access toolbar. This picture shows the button at the right end of the Quick Access toolbar that you must click, and the command that you want to select is highlighted within the drop-down menu.


Slide3


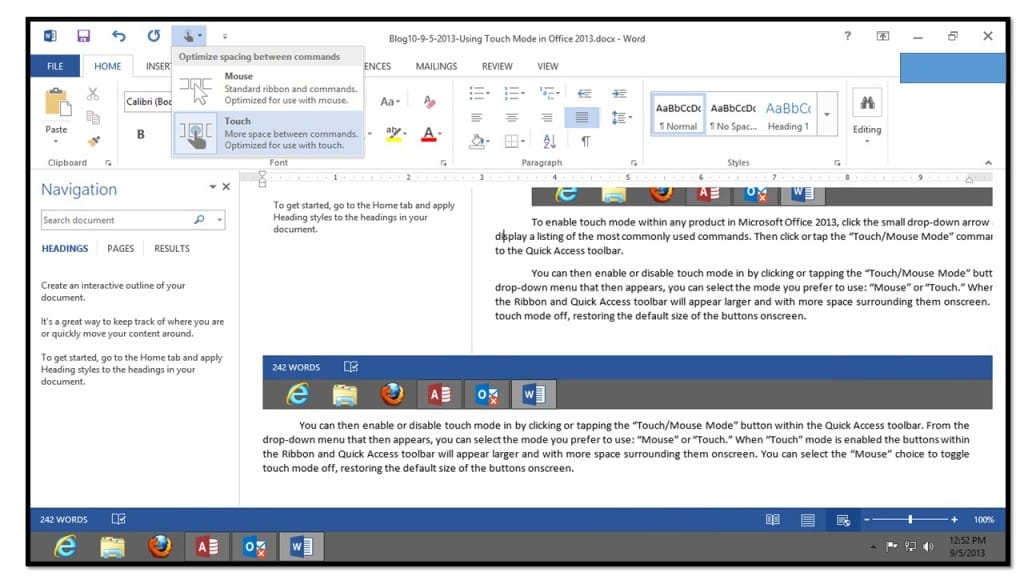
You can then enable or disable touch mode in by clicking or tapping the “Touch/Mouse Mode” button within the Quick Access toolbar. From the drop-down menu that then appears, you can select the mode you prefer to use: “Mouse” or “Touch.” When “Touch” mode is enabled the buttons within the Ribbon and Quick Access toolbar will appear larger and with more space surrounding them onscreen. You can select the “Mouse” choice to toggle touch mode off, restoring the default size of the buttons onscreen.


Figure 4: A picture of Microsoft Office Word 2013. After adding the “Touch/Mouse Mode” button to the Quick Access toolbar, you can then click it to choose between the “Mouse” and “Touch” modes, which are shown in the drop-down menu.


Slide4


Tagged under: employee, group, how-to, microsoft, office, touch, touch mode, train, training, Windows

About Keeley Byrnes

Keeley is our Director of Marketing and has been with TeachUcomp since 2010. Keeley manages all aspects of our Marketing Department, acts as liaison for our reseller and affiliate partners and also authors courses in software and taxation.

What you can read next

WordPress Tutorial: How to Create a Post in WordPress
Comments in JavaScript - Tutorial: A picture describing the use of single-line comments in JavaScript.
Comments in JavaScript – Tutorial
Microsoft Office 2016 Released 9-22-15- News: A picture of the Office 2016 product page. Source: Microsoft.
Microsoft Office 2016 Released 9-22-15- News


Recent Posts

  • A picture showing how to duplicate a layer in Photoshop Elements using the “Duplicate Layer” dialog box.

    Duplicate a Layer in Photoshop Elements – Instructions

    Overview of How to Duplicate a Layer in Photosh...
  • A picture of the “New Item” window when you create payment items in QuickBooks Desktop Pro.

    Create Payment Items in QuickBooks Desktop Pro – Instructions

    Overview of How to Create Payment Items in Quic...
  • Photoshop Cheat Sheet

    Photoshop Cheat Sheet Now Available            ...

Categories

Archives

  • GET SOCIAL

© 2001-2023 Copyright TeachUcomp, Inc. All rights reserved.

TOP
Sale! $49 All-Access 0 Days 13 Hours 57 Minutes 50 Seconds      $199 $49 Entire Library!
See Deal