Workbook Protection in Excel- Instructions
Workbook Protection in Excel: Video Lesson
This video lesson, titled “Workbook Protection,” shows you how to apply and remove workbook protection in Excel. This video lesson is from our complete Excel tutorial, titled “Mastering Excel Made Easy v.2019 and 365.”
Workbook Protection in Excel: Overview
When you apply workbook protection in Excel, users cannot add, delete, hide, rename, or move workbook worksheets. You can also provide an optional password that must be entered before the workbook can be unprotected. This option is also a bit risky, because if you forget the password, you cannot remove the workbook protection.
To apply workbook protection in Excel, click the “Review” tab in the Ribbon. Then click the “Protect Workbook” button in the “Protect” button group to open the “Protect Structure and Windows” dialog box. For most users, check the “Structure” checkbox to prevent users from adding, deleting, hiding, renaming, or moving worksheets.
The “Windows” checkbox is not available for Office 2019 or Excel for Office 365 users on Windows machines. However, if it is available for a different version of Excel you happen to be using, then you can check the “Windows” checkbox. Doing this prevents users from moving, resizing, or closing the workbook window, or hiding and unhiding windows.
Finally, if desired, enter a password into the “Password (optional)” field. Then click the “OK” button, when finished. If you entered a password, you must re-enter it into the “Confirm Password” dialog box that appears and then click the “OK” button.
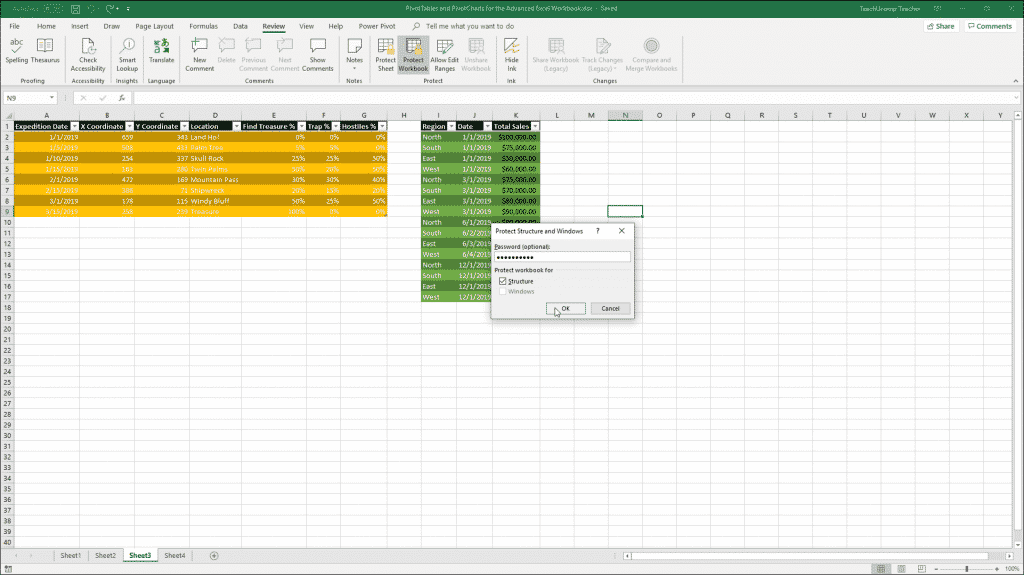
Workbook Protection in Excel- Instructions: A picture of the “Protect Structure and Windows” dialog box that is used to apply workbook protection in Excel.
To remove workbook protection, click the “Review” tab in the Ribbon. Then click the “Protect Workbook” button in the “Protect” button group to toggle workbook protection off. If there is a password, enter it into the “Unprotect Workbook” dialog box and then click the “OK” button.
Workbook Protection in Excel: Instructions
- To apply workbook protection in Excel, click the “Review” tab in the Ribbon.
- Then click the “Protect Workbook” button in the “Protect” button group to open the “Protect Structure and Windows” dialog box.
- For most users, check the “Structure” checkbox to prevent users from adding, deleting, hiding, renaming, or moving worksheets.
- The “Windows” checkbox is not available for Office 2019 or Excel for Office 365 users on Windows machines. However, if it is available for a different version of Excel you happen to be using, then you can check the “Windows” checkbox to prevent users from moving, resizing, or closing the workbook window, or hiding and unhiding windows.
- Then, if desired, enter a password into the “Password (optional)” field.
- Then click the “OK” button, when finished.
- If you entered a password, re-enter it into the “Confirm Password” dialog box that appears and then click the “OK” button.
- To remove workbook protection in Excel, click the “Review” tab in the Ribbon.
- Then click the “Protect Workbook” button in the “Protect” button group to toggle workbook protection off.
- If there is an associated password, enter it into the “Unprotect Workbook” dialog box and then click the “OK” button.

