Write Checks in Sage 50- Instructions
Write Checks in Sage 50: Video Lesson
This video lesson, titled “Writing Checks,” shows how to write checks in Sage 50. This video lesson on how to write checks in Sage 50 is from our complete Sage 50 tutorial, titled “Mastering Sage 50 Made Easy v.2018.”
Write Checks in Sage 50: Overview
The “Write Checks” window lets you quickly write checks in Sage 50 and then apply the amount to one or more accounts. If the payment you are making doesn’t involve invoices or inventory items, then this is simply the easiest payment method to use. To access this window to write checks in Sage 50, select “Tasks| Write Checks…” from the Menu Bar.
You can use this window to pay non-invoice bills or to write checks in Sage 50 to vendors that don’t have Vendor IDs. It is basically a simplified version of the “Payments” window that lets you enter check information without having to enter line items distributions.
Enter the Vendor ID of the vendor being paid into the “Vendor ID” field. If paying a vendor without an ID, then leave this field blank and type the vendor’s name into the “Pay to the order of” field. You can enter the vendor’s address information, if they aren’t in your vendors list, under the “Pay to the order of:” field.
If printing this check, then leave the “Check number” field blank. Otherwise, fill-in the check number of the check you wrote to the vendor. Enter the date the check was created into the “Date:” field. Then, enter the amount of the check into the “Dollars:” field. Select the account number from which the check draws its funds from the “Cash account” field.
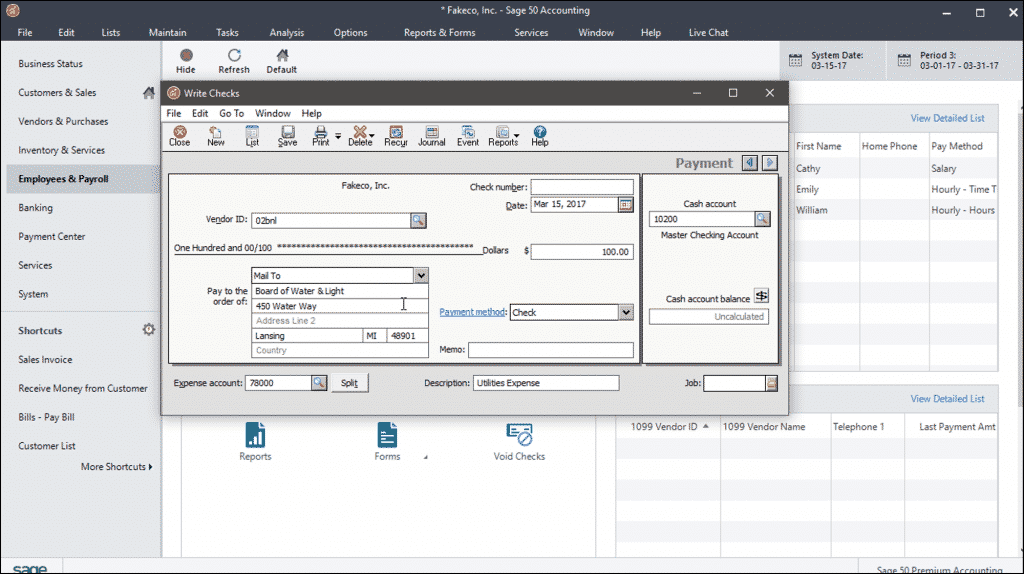
Write Checks in Sage 50- Instructions: A picture of the “Write Checks” window in Sage 50.
Select the account to which you will attribute the payment from the “Expense account” field. To attribute the total amount to multiple accounts, click the “Split” button. Doing this opens the “Split Transaction” window. In this window, you can split the total value of the check between multiple accounts. Then click the “OK” button in this window to return to the check. You can enter a memo for the check into the “Memo” field.
To save the check after creating it, click the “Save” button in the toolbar at the top of the window. To print the check, click the “Print” button in the toolbar to open the “Print Forms: Disbursement Checks” dialog box. Then enter the first check number to print into the “First check number” field. To select a different check form to use, click the “Select Form” button to open another dialog box where you can select the check form to use and then click the “OK” button. If needed, you can select what to replace the “Item ID” with from the “Replace Item ID with” drop-down. To then print the check, click the “Print” button within the dialog box.
Write Checks in Sage 50: Instructions
- To write checks in Sage 50, select “Tasks| Write Checks…” from the Menu Bar.
- Enter the vendor ID of the vendor being paid into the “Vendor ID:” field.
- To pay a vendor without an ID, leave this field blank and type the vendor’s name into the “Pay to the order of:” field.
- Then enter the vendor’s address information, if they aren’t in your vendors list, under the “Pay to the order of:” field.
- If printing this check, leave the “Check number:” field blank.
- Otherwise, enter the check number of the check you wrote to the vendor.
- If sending the payment electronically, select the “Electronic payment” checkbox.
- Enter the check creation date into the “Date:” field.
- Enter the amount of the check into the “Dollars:” field.
- Select the account number from which the check draws its funds from the “Cash account” field.
- Select the account to which you will attribute the payment from the “Expense account:” field.
- To attribute the total amount to multiple accounts, click the “Split” button to open the “Split Transaction” window.
- In this window, split the total value of the check between multiple accounts.
- Then click the “OK” button in this window to return to the check.
- You can enter a memo for the check into the “Memo” field.
- To save the check, click the “Save” button in the toolbar at the top of the window.
- To print the check, click the “Print” button in the toolbar to open the “Print Forms: Disbursement Checks” dialog box.
- Enter the first check number to print into the “First check number” field.
- To select a different check form to use, click the “Select Form” button to open another dialog box where you can select the check form to use and then click the “OK” button.
- If needed, you can select what to replace the “Item ID” with from the “Replace Item ID with” drop-down.
- To then print the check, click the “Print” button within the dialog box.
