 MY CART
How to Customize the Start Menu in Windows 11: Video Lesson
This video lesson, titled “How to Customize the Start Menu in Windows 11: A Windows 11 Training Tutorial,” shows you how to customize the Start menu in Windows 11. This video lesson is from our complete Windows tutorial, titled “Mastering Windows Online Made Easy.”
Overview:
Windows 11 provides fewer customization options for the Start menu than earlier versions of Windows, such as Windows 10. However, you can still adjust several settings that control which items appear in the Start menu and how they are displayed. Keep in mind that the available options and layout of the Start menu may change slightly depending on your device, system settings, or future Windows updates.
How to Customize the Start Menu Settings:
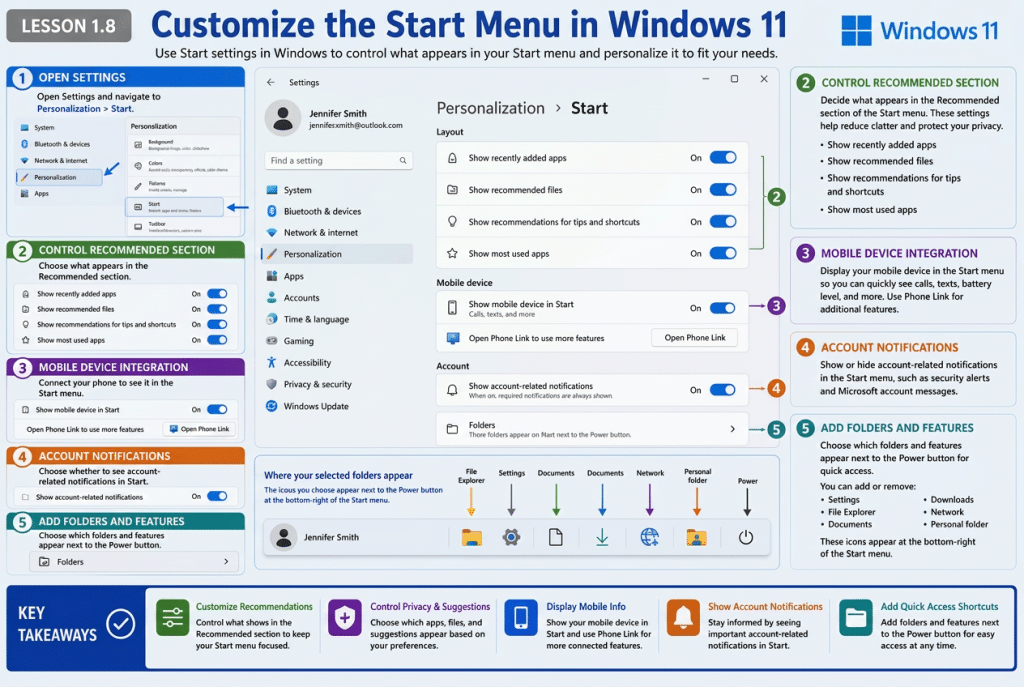
To customize the Start menu, open the Settings app by either clicking its icon in the Start menu or by right-clicking the Start button and then clicking the “Settings” command in the menu that appears. In the Settings app window, click “Personalization” at the left side of the window to display the personalization settings to the right. Then click “Start” in the list of personalization options to display the available Start menu settings.
How to Change the Recommended Section of the Start Menu:
At the top of the “Start” settings are options that control the Recommended section of the Start menu. The first option, “Show recently added apps,” controls whether newly installed apps appear in the Start menu. To show recently added apps, click this toggle switch to set it to the on position. To hide them, click the switch again to turn it off.
The next option, “Show recommended files in Start, recent files in File Explorer, and items in Jump Lists,” controls whether recently used files and items appear in the Recommended section and in other areas of Windows. To display these items, set the toggle switch to the on position. To hide them, set it to the off position.
The next option, “Show recommendations for tips, shortcuts, new apps, and more,” controls whether Windows displays suggestions and tips within the Start menu and related areas. To show these recommendations, set the toggle switch to the on position. To hide them, set it to the off position.
Below these options is the “Show most used apps” setting. This setting controls whether frequently used applications appear in the list of all apps. To display your most used apps, set this toggle switch to the on position. To hide them, set it to the off position.
How to Show or Hide Your Mobile Device in the Start Menu:
In the next section, to show or hide information from a connected mobile device in the Start menu, enable or disable the “Show mobile device in Start” toggle switch, respectively. If you expand this setting, you can click the “Open Phone Link” button to configure the related Phone Link settings.
How to Show Account Notifications in the Start Menu:
The “Show account-related notifications” setting controls whether notifications related to your account appear in the Start menu and other areas of Windows. These notifications may include messages about account settings, sign-in status, or suggestions related to your account. To display these notifications, set the toggle switch to the on position. To hide them, set it to the off position.
How to Add Account Folder and Windows Feature Buttons to the Start Menu
Below this setting is the “Folders” option. Click “Folders” to display a list of folders and features that can appear at the bottom of the Start menu, next to the Power button. To add a folder or feature, click its toggle switch to set it to the on position. To remove it, set the toggle switch to the off position. Any selected items will appear as buttons at the bottom of the Start menu. To close the Settings window after you finish customizing the Start menu, click the Close button in the upper-right corner of the window.