Create a Clipping Mask in Photoshop Elements – Instructions and Video
Create a Clipping Mask in Photoshop Elements: Video
This video lesson, titled “Learn How to Create Clipping Masks in Adobe Photoshop Elements 2023: A Training Tutorial,” shows how to create a clipping mask in Photoshop Elements. This video lesson is from our complete Photoshop Elements tutorial, titled “Mastering Photoshop Elements Made Easy v.2023.”
Overview of How to Create a Clipping Mask in Photoshop Elements:
What is a Clipping Mask in Photoshop Elements?
When you create a clipping mask in Photoshop Elements, you make a grouped set of two or more layers. In a clipping mask, the content within the bottom layer acts as a mask for the content in the layers above it. The bottom layer will “clip” the content of the layers above it.
For example, assume you have a base, or bottom, layer which contains a shape. Also, assume you have a layer above that one which contains an image. Finally, assume you have a layer above the image layer which contains text. Then assume you create a clipping mask in Photoshop Elements from the layers. At that point, the image and text appear only within the area defined by the underlying shape. The top layers also take on the opacity settings of the bottom layer.
Also, note that only adjacent layers within the Layers panel can be included in a clipping mask. The order of the layers within the Layers panel is also very important. In a clipping mask, the base layer’s name is underlined and the thumbnails for the overlying layers appear indented. The top layers also show the clipping mask icon. The clipping mask icon is a picture of a layer with a small bent arrow pointing downward.
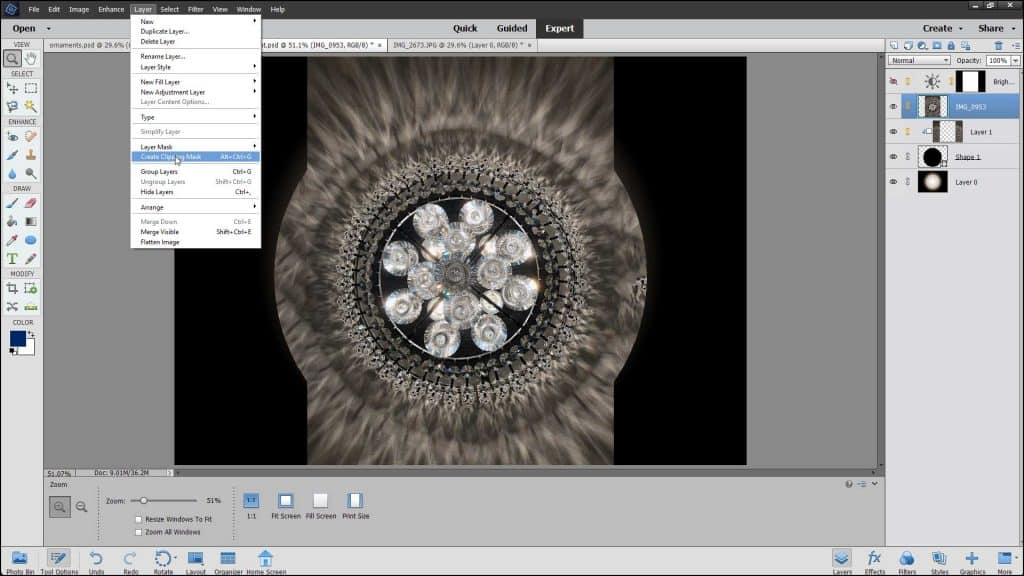
A picture showing how to create a clipping mask in Photoshop Elements.
How to Create a Clipping Mask in Photoshop Elements:
To create a clipping mask in Photoshop Elements, place the layers into the appropriate order using the Layers panel. You can only create a clipping mask between two adjacent layers at a time. Select the top layer in the group within the Layers panel. Then select “Layer| Create Clipping Mask” from the Menu Bar to create a clipping mask in Photoshop Elements from the selected layer and the layer below it..
To add more layers to the clipping mask, select either the layer above the current clipping mask or the bottom layer of the existing clipping mask. Then select “Layer| Create Clipping Mask” from the Menu Bar again to add either the layer above or below the clipping mask. However, remember the content of the bottommost layer acts as the clipping mask for all the layers above it! Therefore, be sure you have that layer as the bottommost layer within the group.
How to Release a Clipping Mask in Photoshop Elements:
To undo a clipping mask by releasing the top layers from the bottom layer, select the layer directly above the bottommost layer within a clipping mask. Then select “Layer| Release Clipping Mask” from the Menu Bar. This dissolves the entire clipping mask created by the layers in the Layers panel.
To only remove the topmost layer from a multi-layer clipping mask, instead, select the topmost layer in the clipping mask. Then choose “Layer| Release Clipping Mask” from the Menu Bar. After selecting this command, any layers above and including the selected layer are released from the clipping mask.
Instructions on How to Create a Clipping Mask in Photoshop Elements:
- To create a clipping mask in Photoshop Elements, place the layers into the desired order using the Layers panel.
- You can only create a clipping mask between two adjacent layers at a time.
- To create a clipping mask between two adjacent layers, select the top layer in the group within the Layers panel.
- Select “Layer| Create Clipping Mask” from the Menu Bar to a create a clipping mask between the selected layer and the layer below it.
- To add more layers to the clipping mask, select either the layer above the current clipping mask or the bottom layer of the existing clipping mask.
- Then select “Layer| Create Clipping Mask” from the Menu Bar again to add either the layer above or below the clipping mask.
- Remember that the content of the bottommost layer acts as the clipping mask for all the layers above it. Ensure you have that layer as the bottommost layer within the group!
- To undo a clipping mask by releasing the top layers from the bottom layer, select the layer directly above the bottommost layer within a clipping mask.
- Then select “Layer| Release Clipping Mask” from the Menu Bar.
- To only remove the topmost layer in a multi-layer clipping mask, instead, select the topmost layer in the clipping mask.
- Then choose “Layer| Release Clipping Mask” from the Menu Bar.
- After selecting this command, any layers above and including the selected layer are released from the clipping mask.

