Create a Commission or Bonus Paycheck in QuickBooks Online
Create a Commission or Bonus Paycheck in QuickBooks Online: Video
This video lesson, titled “Creating Commission Only or Bonus Only Paychecks,” shows you how to create a commission or bonus paycheck in QuickBooks Online. This video lesson is from our complete QuickBooks Online tutorial titled “Mastering QuickBooks Online Made Easy.”
Overview of How to Create a Commission or Bonus Paycheck in QuickBooks Online
To create a commission or bonus paycheck in QuickBooks Online if you subscribe to a QuickBooks Online Payroll service and have added the “Bonus” and/or “Commission” pay types for employees, hover over the “Payroll” link in the Navigation Bar and then click the “Employees” link in the side menu that appears to open the “Employees” page. Then click the drop-down arrow on the “Run payroll” button in the upper-right corner of the page. Then select either the “Bonus only” or “Commission only” command from the drop-down menu, as needed.
If you select the “Bonus only” command, then the “Run Payroll: Bonus Only” window opens. This screen doesn’t appear for the “Commission only” choice. In this screen, you choose how to pay the bonus. To enter the “take-home pay” for the employee, or the amount left after any withholdings are removed, select the “As net pay” option. To enter the total pay for the bonus, or what the amount is before any withholdings are removed, select the “As gross pay” option, instead. After selecting your choice, click the “Continue” button in the lower-right corner of the window.
Select How to Pay and Whom to Pay
For both types of pay, in the next screen, select the bank account from which to pay the bonus, if you created multiple bank accounts, from the “Pay from” drop-down at the top of the screen. Then enter the pay date by selecting it from the “Pay date” calendar selector.
Then check the checkbox to the left of the name of the employee or employees to pay in this bonus or commission payroll run within the employees table below. Alternatively, uncheck the checkbox for the employees to not pay. To check or uncheck all checkboxes, click the checkbox at the top of the column of checkboxes in this table to select or unselect them all, respectively.
For the selected employees, enter the amount of the bonus or commission for each employee into the “Bonus” or “Commission” column, as needed. You can enter an optional “Memo” for the pay into the “Memo” column. Optionally, to review the paycheck details for an employee, click the “pencil” icon at the right end of their row to make any adjustments needed in the “Paycheck details” window that opens and then click the “OK” button in the lower-right corner of that window to return to the “Run Payroll” window.
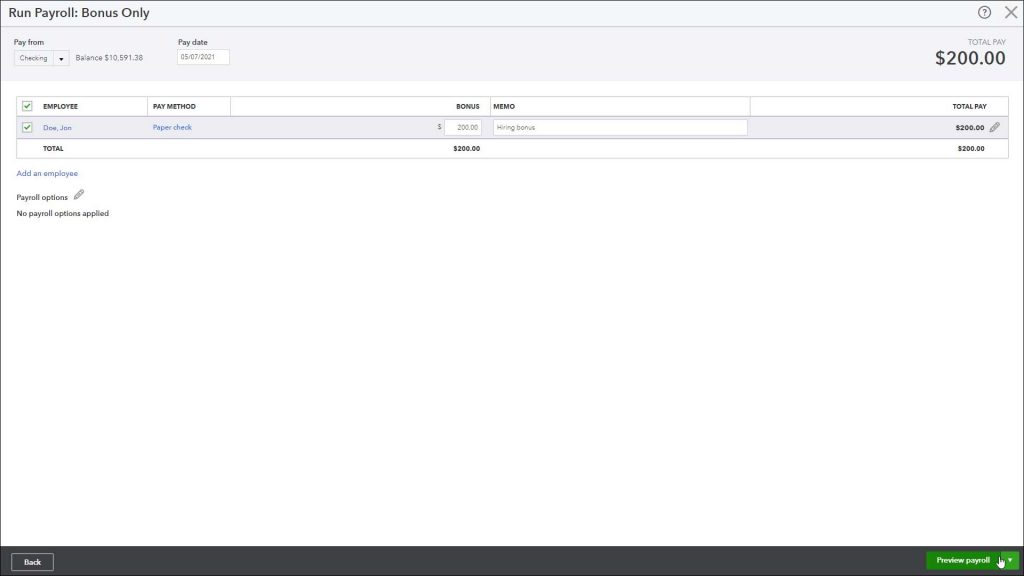
A picture showing how to create a commission or bonus paycheck in QuickBooks Online for selected employees.
Set Options and Review Paychecks
Optionally, to set any payroll options, click the pencil icon next to the “Payroll options” link below the employee table in the “Run Payroll” window. Check any payroll options you need to apply and then click the “Apply button that appears to apply them. Alternatively, click the “Cancel” button to close the payroll options section without applying any options.
To continue, click the “Preview payroll” button in the lower-right corner of the “Run Payroll” window to show the “Review and Submit” screen. Make sure to thoroughly check your work! If desired, to preview the payroll details report, click the “Preview payroll details” link in the toolbar at the bottom of the window to open the payroll details report in a new window, which you can close after reviewing it for accuracy.
If needed, to save your changes to this point and leave, click the drop-down arrow on the button in the lower-right corner of the window and select the “Save for later” command from the pop-up menu to save your changes and exit the “Run Payroll” window. Alternatively, to close the “Run Payroll” window without saving changes, click the “X” button in its upper-right corner to exit without saving changes.
Submit the Payroll
After ensuring the information is correct in the “Review and Submit” screen of the “Run Payroll” window, click the “Submit payroll” button to then show the paycheck information onscreen. To print pay stubs, click the “Print pay stubs” button to show a preview of the pay stubs in a separate browser tab or window, where you can print them and then close it, when finished. If needed, to record check numbers if printing paper checks, type them into the “Check Number” field for the associated paycheck.
View Payroll Reports and Finish Payroll
To view your payroll reports as individual worksheets within an exported Excel workbook, click the “View payroll reports” link in the toolbar at the bottom of the “Run Payroll” window to open a “Your payroll reports are ready” window that lists the available payroll reports.
Check the checkboxes to the left of the names of the reports to export and then click the “Export to Excel” button to download them to your computer as worksheets in an Excel workbook. You can then click the “OK” button in the lower-right corner of the “Your payroll reports are ready” window to return to the “Run Payroll” window. To finish the payroll, click the “Finish payroll” button in the lower-right corner of the “Run Payroll” window.
Instructions on How to Create a Commission or Bonus Paycheck in QuickBooks Online
- To create a commission or bonus paycheck in QuickBooks Online if you subscribe to a QuickBooks Online Payroll service and have added the “Bonus” and/or “Commission” pay types for employees, hover over the “Payroll” link in the Navigation Bar and then click the “Employees” link in the side menu that appears to open the “Employees” page.
- Then click the drop-down arrow on the “Run payroll” button in the upper-right corner of the page.
- Then select either the “Bonus only” or “Commission only” command from the drop-down menu, as needed.
- If you select the “Bonus only” command, then the “Run Payroll: Bonus Only” window opens. This screen doesn’t appear for the “Commission only” choice.
- To enter the “take-home pay” for the employee, or the amount left after any withholdings are removed, select the “As net pay” option.
- Alternatively, to enter the total pay for the bonus, or what the amount is before any withholdings are removed, select the “As gross pay” option, instead.
- After selecting your choice, click the “Continue” button in the lower-right corner of the window.
How to Select How to Pay and Whom to Pay
- For both types of pay, in the next screen, select the bank account from which to pay the bonus, if you created multiple bank accounts, from the “Pay from” drop-down at the top of the screen.
- Then enter the pay date by selecting it from the “Pay date” calendar selector.
- Then check the checkbox to the left of the name of the employee or employees to pay in this bonus or commission payroll run within the employees table below.
- Alternatively, uncheck the checkbox for the employees to not pay.
- To check or uncheck all checkboxes, click the checkbox at the top of the column of checkboxes in this table to select or unselect them all, respectively.
- For the selected employees, enter the amount of the bonus or commission for each employee into the “Bonus” or “Commission” column, as needed.
- You can enter an optional “Memo” for the pay into the “Memo” column.
- Optionally, to review the paycheck details for an employee, click the “pencil” icon at the right end of their row to make any adjustments needed in the “Paycheck details” window that opens and then click the “OK” button in the lower-right corner of that window to return to the “Run Payroll” window.
How to Set Options and Review Paychecks
- Optionally, to set any payroll options, click the pencil icon next to the “Payroll options” link below the employee table in the “Run Payroll” window.
- Check any payroll options to apply and then click the “Apply button that appears to apply them.
- Alternatively, click the “Cancel” button to close the payroll options section without applying any options.
- To continue, click the “Preview payroll” button in the lower-right corner of the “Run Payroll” window to show the “Review and Submit” screen and make sure to thoroughly check your work.
- If desired, to preview the payroll details report, click the “Preview payroll details” link in the toolbar at the bottom of the window to open the payroll details report in a new window, which you can close after reviewing it for accuracy.
- If needed, to save your changes to this point and leave, click the drop-down arrow on the button in the lower-right corner of the window and select the “Save for later” command from the pop-up menu to save your changes and exit the “Run Payroll” window.
- Alternatively, to close the “Run Payroll” window without saving changes, click the “X” button in its upper-right corner to exit without saving changes.
How to Submit the Payroll
- After ensuring the information is correct in the “Review and Submit” screen of the “Run Payroll” window, click the “Submit payroll” button to then show the paycheck information onscreen.
- To print pay stubs, click the “Print pay stubs” button to show a preview of the pay stubs in a separate browser tab or window, where you can print them and then close it, when finished.
- If needed, to record check numbers if printing paper checks, type them into the “Check Number” field for the associated paycheck.
How to View Payroll Reports and Finish Payroll
- To view your payroll reports as individual worksheets within an exported Excel workbook, click the “View payroll reports” link in the toolbar at the bottom of the “Run Payroll” window to open a “Your payroll reports are ready” window that lists the available payroll reports.
- Check the checkboxes to the left of the names of the reports to export and then click the “Export to Excel” button to download them to your computer as worksheets in an Excel workbook.
- You can then click the “OK” button in the lower-right corner of the “Your payroll reports are ready” window to return to the “Run Payroll” window.
- To finish the payroll, click the “Finish payroll” button in the lower-right corner of the window.

