 MY CART
How to Use the Start Menu in Windows 11: Video Lesson
This video lesson, titled “How to Use the Start Menu in Windows 11: A Windows 11 Training Tutorial for Beginners,” shows you how to use the Start menu in Windows 11. This video lesson is from our complete Windows tutorial, titled “Mastering Windows Online Made Easy.”
Overview:
How to Show the Start Menu in Windows 11:
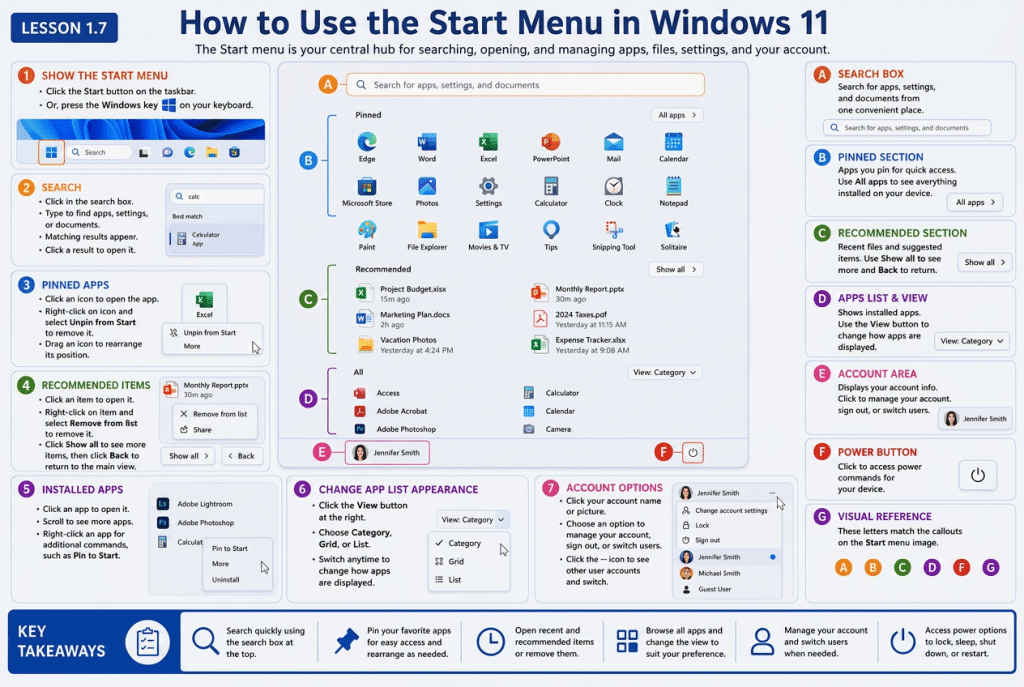
The Start menu has been redesigned in Windows 11. To show the Start menu, click the “Start” button in the taskbar. Alternatively, press the Windows key on your keyboard.
How to Search for Apps, Settings, and Files in the Start Menu:
At the top of the Start menu is a search box that lets you search for apps, settings, and documents. To search, click into the search box and begin typing. As you type, matching results appear, and you can click a result to open it.
How to Open, Pin, and Unpin Apps in the Start Menu:
Below the search box is the “Pinned” section, which shows apps that you have pinned for easy access. To open a pinned app, click its icon. To remove an app from this section, right-click its icon and select the “Unpin from Start” command from the menu that appears. You can also rearrange pinned apps by clicking and dragging an app icon to a new location within the “Pinned” section.
How to Open and Manage Recommended Items in the Start Menu:
Below the “Pinned” section is the “Recommended” section, which shows recently opened files and other suggested items. To open an item in this section, click its icon. To remove an item from the list, right-click its icon and select the “Remove from list” command. If desired, to view additional recommended items, click the “Show all” button at the right side of the section. To return to the main Start menu view afterward, click the “Back” button.
How to Open Apps and Show Additional App Commands in the Start Menu:
The apps installed on the device appear next in the Start menu. To open an app, click its icon. You can scroll through the list to view apps and right-click an app to show additional commands, such as the “Pin to Start” command, which adds the selected app to the “Pinned” section of the Start menu.
How to Change the Appearance of the App List in the Start Menu:
The appearance of the apps list can be changed by using the “View” button at the right side of the apps list. Click the “View” button and then select either the “Category,” “Grid,” or “List” view. The “Category” view groups apps into categories based on their function. The “Grid” view displays apps as larger icons arranged alphabetically within the list. The “List” view displays apps in a traditional alphabetical list with one app shown per row. You can switch between these views at any time to change how installed apps are displayed in the Start menu.
How to Show Account Options and Switch Accounts in the Start Menu:
At the bottom of the Start menu is an area that displays your user account name and picture at the left side and the “Power” button at the right side. To display account options, click your user account name. A menu then appears that lets you manage your account, sign out, or switch users. To switch to another user account, click the triple-dot icon in the menu’s upper-right corner and then select the desired account from the list.
How to Access the Device’s Power Commands in the Start Menu:
To access power options for the computer, click the “Power” button. A menu then appears that contains the “Lock,” “Sleep,” “Shut down,” and “Restart” commands. To perform any of these actions, click the desired command in the menu.