How to Create a Delayed Credit in QuickBooks Online
How to Create a Delayed Credit in QuickBooks Online: Video
This video lesson, titled “How to Create a Delayed Credit in QuickBooks Online,” shows you how to create a delayed credit in QuickBooks Online. This video lesson is from our complete QuickBooks Online tutorial, titled “Mastering QuickBooks Online Made Easy.”
Overview:
What is a Delayed Credit in QuickBooks Online?
A delayed credit in QuickBooks Online is useful for creating customer credits you can apply as line item credits within future invoices for the customer. Delayed credits are not posted until you manually apply them when creating a future invoice for the customer, regardless of how QuickBooks Online handles applying customer credits.
How to Create a Delayed Credit in QuickBooks Online:
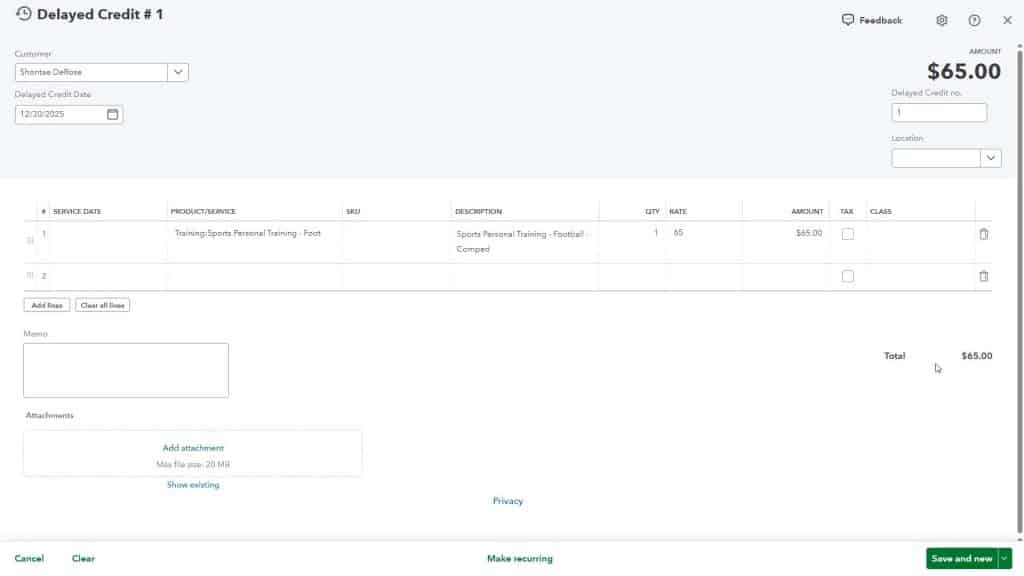
To create a delayed credit in QuickBooks Online, hover over the “+ Create” button in the Navigation Bar. Then select the “Delayed credit” link under the “Customers” heading to open the “Delayed Credit” window. Select the customer’s name from the “Customer” drop-down. Enter the creation date of the delayed credit into the “Delayed Credit Date” field.
The delayed credit’s number appears in the “Delayed Credit no.” field, and you can change it if you enabled custom transaction numbers in your company file’s settings. If classes are assigned per transaction or locations are enabled, you can use the “Class” and “Location” drop-downs at the right side of this form to select your desired choices.
Enter the Return or Refund Line Items:
Next, click into the “Product/Service” column in the line items section to select the products or services for which the customer is being credited and enter the associated line items’ return refund information. Alternatively, to create a new general “Credit” line item, select the “+Add new” choice from the “Product/Service” drop-down and create it in the product/service information pane that then appears. Take care if creating a general credit product or service to select the correct income account and set its correct taxable setting.
Check the Delayed Credit Total and Save the Delayed Credit:
Note that unlike a credit memo, which is applied in the “Receive Payment” window, a delayed credit’s sales tax and subtotal information is only calculated after it is added to an invoice in the future. So, note that information doesn’t appear in this form. However, make sure the total amount to credit is accurately entered and that the line item information is correct, so you won’t need to change that in the invoice in the future. When finished, save the delayed credit by selecting a choice from the “Save and new/Save and close” drop-down button in the toolbar at the bottom of the window.
How to Apply a Delayed Credit to a Customer Invoice in QuickBooks Online:
To later apply a delayed credit to a future invoice for this customer, open a new “Invoice” window. Then select the name of the customer for whom you created the delayed credit from the “Customer” drop-down. At that point, a “Suggested transactions” pane appears at the right side of the “Invoice” window and shows any billable items or delayed credits you can add to the selected customer’s invoice.
To add a delayed credit that appears in this pane, click the “Add” button below the desired credit in the pane to add the delayed credit as a line item credit within the new invoice. Then complete and save the invoice as you normally would.


