How to Print Checks in QuickBooks Online
How to Print Checks in QuickBooks Online: Video
This video lesson, titled “How to Print Checks in QuickBooks Online,” shows you how to print checks in QuickBooks Online that you have saved and marked as “Print later.” This video lesson is from our complete QuickBooks Online tutorial titled “Mastering QuickBooks Online Made Easy.”
Overview:
Open the Print Checks Window and Perform the Print Checks Setup, if Needed:
To print your saved checks in QuickBooks Online, hover over the “+ Create” button in the Navigation Bar and then click the “Print checks” link under the “Vendors” heading in the menu that appears. The first time you try to print a check in QuickBooks Online, the “Print checks setup” window appears. This window asks what type of checks you use, like “Voucher” or “Standard.” You then print a sample check on blank paper to ensure the fields print properly on the check. If finished and satisfied with the results, click the “Yes, I’m finished with setup” button to open the “Print checks” page.
If the check’s fields are not properly aligned, instead click the “No, continue setup” button to move to the next step in the setup. This lets you download the most recent version of Adobe Acrobat Reader. If you already have the most recent version, click the “No, continue setup” button to go to the next step.
The final step to ensure your checks print properly is the “Adjust Alignment” step. This step lets you drag a grid onscreen to adjust where QuickBooks Online prints the check to ensure the proper check alignment. After making the adjustments and confirming all the fields are properly aligned, click “Finish setup” to close the setup window and open the “Print Checks” window.
In the future, when you try to print a check, you immediately open the “Print checks” window. If you need to change your check setup later, you can click the “Print setup” button in the toolbar at the bottom of this window to go through the “Print check setup” wizard again.
Select the Account Containing the Checks to Print:
The “Print Checks” window shows a list of any checks you have created but not printed. To select the account that has checks waiting to print, use the “Account” drop-down in the upper-left corner of the window. The account’s “Balance” appears to the right. To create a new check from this window, if needed, click the “Create check” button in the upper-right corner to open a new “Check” window.
Filter and Sort the Checks, if Needed, and Enter the Starting Check Number to Print:
To filter the list of checks by transaction type, select a choice from the “Transaction type” drop-down. To change the sort order of the checks, select a choice from the “Sort by” drop-down. Enter the starting check number of the checks to print into the “Starting check number” field.
Select the Checks to Print:
To select the checks to print in the list of saved checks, check the checkbox to the left of the checks. A black box then appears above the list, showing the total number of checks selected to print, followed by the total amount of the selected checks.
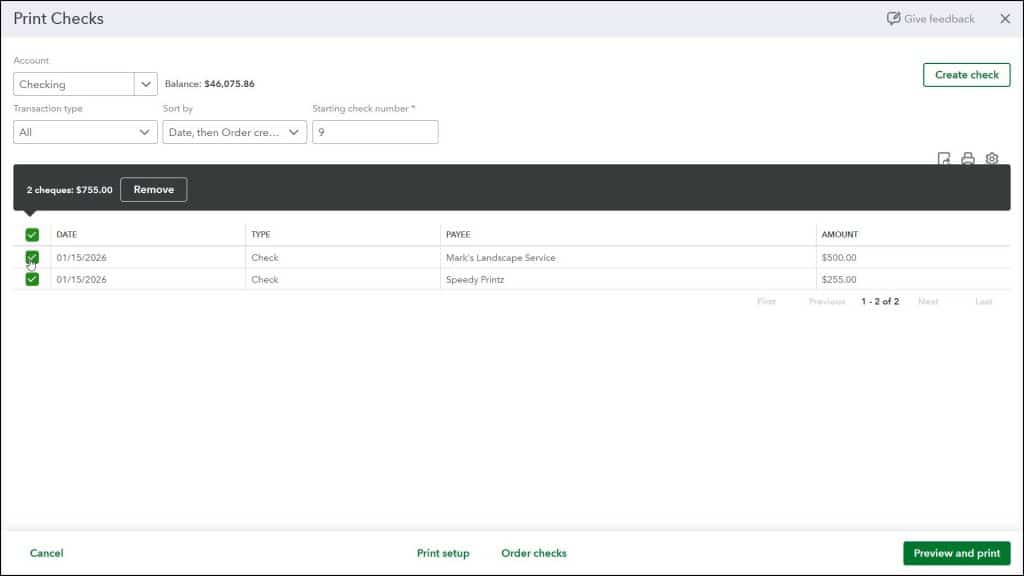
To remove the selected checks from the list, if needed, click the “Remove” button in the black box above the list to open a confirmation popup window. In this window, click the “No” button to cancel the check removal and return to the “Print Checks” page. Alternatively, click the “Yes” button to remove the selected checks from the list. You must then individually print those checks.
Optionally, Print, Export, or Change the Display of the List of Checks:
In the upper-right corner of the check list are the “Export to Excel,” “Print” and “Settings” buttons. To download the list of checks as an Excel workbook, click the “Export to Excel” button. To open your web browser’s “Print” dialog box and preview the list of checks, click the “Print” button.
To show the list’s display options in a drop-down menu, click the “Settings” button. To show or hide columns in the list, check or uncheck the column names under the “Columns” heading in the drop-down menu. To select the number of rows to show per page in the list, click the “Rows” drop-down in the drop-down menu and select a choice.
Finish Printing the Checks:
The toolbar at the bottom of the page contains “Cancel,” “Print setup,” “Order checks” and “Preview and print” buttons. To cancel printing checks, click the “Cancel” button. To configure checks for printing again, click the “Print setup” button. To order checks online from Inuit, click the “Order checks” button.
After entering a starting check number, to then open a PDF print preview of the selected checks where you can click a “Print” button to print them or click a “Download” button to download them, click the “Preview and print” button. To print the checks in the PDF preview, click the “Print” button in the toolbar at the top of the PDF preview. You can click the “Close” button in the window after printing or downloading the checks.
Confirm the Check Printing and Reprint Any Checks, if Needed:
After printing the checks, a pop-up window appears and asks, “Did your checks print OK?” If they printed correctly, select the “Yes, they all printed correctly” option. If you need to reprint some checks, select the “Some checks need reprinting, starting with check” option, and then use the adjacent drop-down to select the starting check number of the checks that need reprinting. If none of the checks printed correctly, select the “No, keep all checks in the Print Checks list” option. After selecting an option, click the “Done” button to close the page and continue with the check printing option you selected, if any.


