How to Create an Expense in QuickBooks Online
How to Create an Expense in QuickBooks Online: Video
This video lesson, titled “How to Create an Expense in QuickBooks Online,” shows you how to create expenses in QuickBooks Online. This video lesson is from our complete QuickBooks Online tutorial titled “Mastering QuickBooks Online Made Easy.”
Overview:
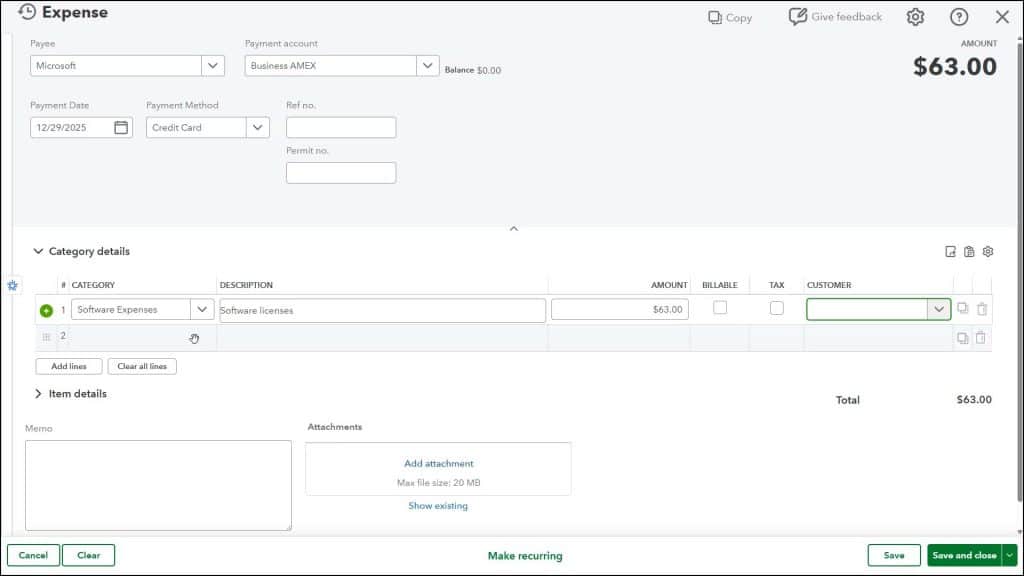
Creating an expense in QuickBooks Online lets you enter company expenses not entered within one of the other transaction expense forms, like the “Check” window, for example. To create an expense in QuickBooks Online, hover over the “+ Create” button in the Navigation Bar and then click the “Expense” link under the “Vendors” heading in the drop-down menu to open the “Expense” window.
Enter the Expense and Payee Information:
To select the name of the person paid by this expense, use the “Payee” drop-down in the upper-left corner of the window. To select the account from which to pay the expense, use the “Payment account” drop-down to the right. The selected account’s “Balance” appears to the right.
Select or enter the date of the expense by using the “Payment date” calendar drop-down field. Then use the “Payment method” drop-down to select the method of payment. If needed, you can enter a reference number, like a check number, into the “Ref no.” field at the right side of the window.
If Needed, Enter the Account Information:
To enter an expense related to an account and NOT tied to any products and/or services from your “Products & services” list, use the “Category details” section. To expand and collapse this section, click the black arrow by the label for this section. The columns shown in the “Category details” section are “Category,” “Description,” “Amount,” “Billable,” “Tax,” and “Customer.” There may also be a “Class” column, if classes are enabled.
You can click into the “Category” column and then use the drop-down to select the account. You can enter a description of the expense to that account into the “Description” field. Then enter the amount to attribute to that account into the “Amount” field. If the amount is billable to a specific customer, and you want to invoice them later for it, check the “Billable” checkbox. To associate the amount with a specific customer, select a customer from the “Customer” column in that row.
If needed, click into the next row and repeat this process to allocate the total expense amount to the necessary accounts. To delete a row you entered, click the trashcan icon at the right end of the row. To add multiple rows or clear all rows, click the “Add lines” or “Clear all lines” buttons below this section.
If Needed, Enter the Product and Service Line Item Information:
Alternatively, to enter an expense for items in the “Products & services” list that have “Purchasing Information” associated with them, select the items from the “Item details” section. Because those items are already associated with expense accounts, the related expense information for the items you select is tracked by entering the items into this section. The columns in the “Item details” section are “Product/Service,” optionally “SKU,” “Description,” “Qty,” “Rate,” “Amount,” “Billable,” “Tax,” and “Customer.” There may also be a “Class” column, if classes are enabled.
Click into the “Product/Service” column and then use the drop-down to select the item to buy. The information for the line item should appear in the adjacent columns, however you can edit the information or change it, as needed. Then enter the quantity, rate, and/or amount of the line item into the “Qty,” “Rate,” and/or “Amount” fields.
Like account expenses, you can also associate a line item with a specific customer by selecting them from the “Customer” column’s drop-down. If the item is billable back to the selected customer and you want to invoice them for it later, check the “Billable” checkbox. If needed, click into the next row and repeat this process to enter all the other line items to buy into this section. To delete a row you entered, click the trashcan icon at the right end of the row. To add multiple rows or clear all rows, click the “Add lines” or “Clear all lines” buttons below this section.
Enter Any Miscellaneous Expense Information:
To add a note about the expense, type it into the “Memo” field. To attach files to the expense, use the “Attachments” field.
Cancel, Clear, or Save the Expense:
The buttons in the toolbar at the bottom of the page let you manage the expense. To cancel the expense, click the “Cancel” button. To clear the expense window, click the “Clear” button. To create a recurring expense, click the “Make Recurring” button to open a page that lets you set the recurrence pattern. To save the expense, click the “Save” button. To save the expense and then close the window or open a new window, click or select a choice from the “Save and new / Save and close” drop-down button.
How to Manage a Saved Expense in QuickBooks Online:
Like other transactions, after saving an expense, you can click the “More” button that then appears towards the center of the toolbar at the bottom of the “Expense” window to show a pop-up menu of additional options. These options are “Copy,” to copy the expense, “Void,” to void it, “Delete,” to delete it, “Copy to credit card credit,” to copy the information to a credit card credit, if needed, “Transaction journal,” to view its accounts and debit and credit amounts, and “Audit History,” which shows its change history. You can select the associated command to perform it.


