Bank Transactions in QuickBooks Online
Bank Transactions in QuickBooks Online: Video
This video lesson, titled “How to Manage Bank and Credit Card Transactions in QuickBooks Online,” shows you how to connect bank and credit card accounts or upload bank and credit card transactions and then manage those bank transactions in QuickBooks Online. This video lesson is from our complete QuickBooks Online tutorial, titled “Mastering QuickBooks Online Made Easy.”
Overview:
To open the “Bank transactions” page in QuickBooks Online to link bank and credit card accounts or import bank and credit card account transactions and view and manage these transactions, click the “Bank transactions” link under the “Accounting” app in the “All apps” bar. You can either connect actual bank or credit card accounts to QuickBooks Online to download transactions from online feeds, or you can import banking transactions by uploading a bank account transactions file within the “Bank transactions” page.
Connect a Bank Account or Upload Bank Account Transactions:
To connect a bank or credit card account the first time you visit this page, type the name or sign-in URL for your financial institution into the “Search by name or sign-in URL” field and then click the entry for your financial institution when it appears in the search list below and follow the onscreen prompts to sign-in and connect the desired account. Alternatively, to import banking transactions, click the “Upload transactions” button and then follow the onscreen prompts to upload the file in the new window that opens.
After initially linking an account or importing transactions, the linked or imported account and transactions then appear on the “Bank transactions” page when you view it in the future. If you connect or upload transactions for multiple accounts, then you can use the drop-down in the upper-left corner of this page to select the name of the account to view. Its transactions then appear on the “Pending,” “Posted,” and “Excluded” tabs below. You can click each tab to see the account transactions for each transaction category.
To link another new account or upload transactions from a file after you first link an account or import account transactions, click or select either the “Link account” or “Upload from file” choice, as needed, from the drop-down button in the upper-right corner of the “Bank transactions” page. Then follow the onscreen prompts to either link a new account or import account transactions from a file. Note this drop-down button also contains an “Order checks” link you can select to open a page that lets you order checks from Intuit, if desired, and a “Manage connections” link you can select to manage your linked accounts.
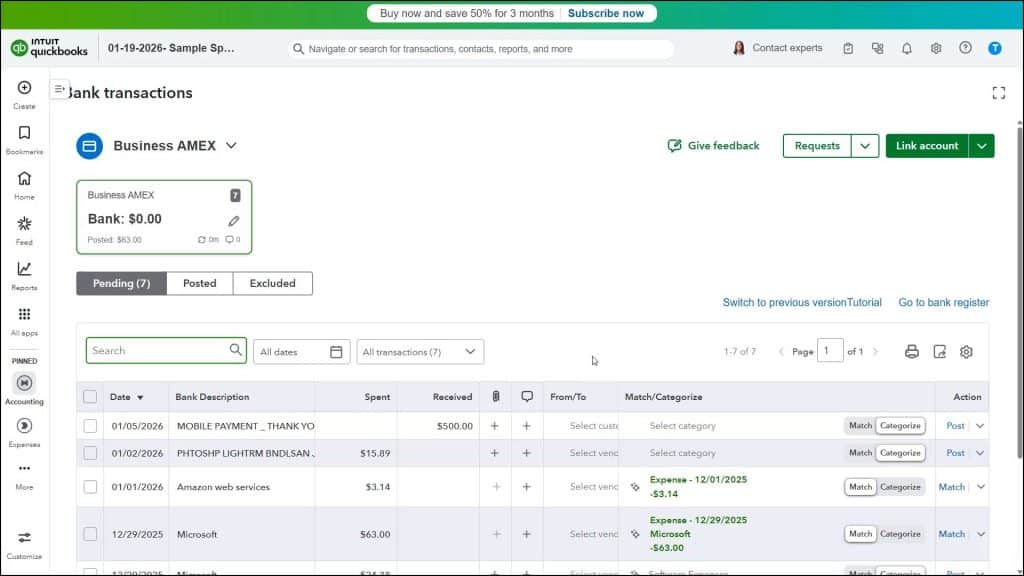
Review the Transactions on the Pending Tab in the Bank Transactions Page:
For the selected bank account in the “Bank transactions” page, the “Pending” tab shows transactions you uploaded from a file or downloaded from a feed and now need to review. The “Posted” tab shows matched or manually added transactions in QuickBooks. Finally, the “Excluded” tab shows any transactions you excluded from QuickBooks Online. Clicking the “Go to bank register” link at the far-right side of the page opens the account register in QuickBooks Online.
How to Filter Pending Bank Transactions for Review:
To review the transactions, click the “Pending” tab. If needed, to filter the transactions list by dates, click the “All dates” drop-down above and to the left of the list and then select or type the dates to show by using the “Date” and/or the “From” and “To” filtering fields in the drop-down menu. Then click the “Apply” button to apply the date filter or click the “Reset” button to reset the date filter.
To instead filter the transactions list by status, select a status from the drop-down to the right of the dates filter. Alternatively, to search for transactions by description, account number, or amount, type the term to find into the “Search” field above the list and then click the magnifying glass button at its right end. Matching transactions then appear in the list, and the applied filters appear to the right of the field. To clear any applied filters to show all transactions again, if desired, click the “X” by each filter’s name.
How to Print or Export Bank Transactions:
Like other lists in QuickBooks Online, the upper-right corner of the “Pending” transactions list shows three buttons for “Print list,” “Export to Excel,” and “Settings.” To open a printer-friendly list page and open your web browser’s “Print” dialog box to print the page, click the “Print list” button. You can close this page after printing it. Alternatively, to download the list as an Excel workbook, click the “Export to Excel” button.
How to Change the Display of Pending Transactions in the Bank Transactions Page:
If desired, to show the list display options in a drop-down menu, click the “Settings” button. Under the “Columns” heading in the drop-down menu, you can check or uncheck the names of the columns to show or hide them in the list. To automatically add common vendors for transactions to your vendors list, ensure the “Add new vendors” toggle switch under the “Automation” section is set to the “On” position.
Under the “Other preferences” section, check or uncheck the other, miscellaneous list display options to enable or disable each one, as preferred. Under the “Page Size” section, select the desired option button for the number of transactions to show per page in the list. Note that the “Page Size” setting is the only setting that appears for transactions on the “Posted” and “Excluded” tabs.
Match Recognized Bank Transactions to Existing Transactions in QuickBooks Online:
To match transactions that QuickBooks Online recognizes in the account to transactions you already entered in QuickBooks Online, click the “Match” link that appears under the “Action” column at the right end of the transaction row to move the item to the “Posted” tab. If needed, to review a transaction in more detail or edit it, click its row to expand it and see the details. You can either click the “X” button in the upper-right corner of the expanded transaction or click the same transaction row again to close the expanded details, if desired.
To perform the related action for the existing transaction data, as is, click the corresponding link in its action column. For example, to quickly add a transaction that was correctly categorized by QuickBooks Online when it was imported, but which you forgot to record in QuickBooks Online before importing it, click its “Post” link under its action column. For unmatched transactions not recorded in QuickBooks Online, you should edit the transactions or at least review their details for accounting accuracy before adding them.
Review, Categorize, and Post Unmatched Transactions:
To review and add an unmatched transaction, click the transaction row to expand it. Then select the “Categorize” option button at the top of the expanded section. Then edit the transaction’s information to add missing data or change the account category, as needed, by using the fields available. When satisfied, then click the “Post” button to add it to the “Posted” tab.
How to Split a Transaction to Multiple Accounts, if Needed:
Alternatively, if needed, to split the transaction to multiple accounts, click the “Split” button at the bottom of the expanded section to open a “Split transaction” window, where you can split the total amount to multiple accounts. If you do this, then click the “Split and post” button in this window, when finished, to add it to the “Posted” tab or click “Cancel” to cancel the split.
How to Mark the Transaction as a Transfer or Credit Card Payment, if Needed:
Alternatively, to mark the transaction as a transfer or credit card payment, if available, select the “Transfer” or “Credit Card Payment” choice from the “Transaction type” drop-down at the top of the expanded transaction section. Then use the fields that appear to select the correct accounts for the transfer or credit card payment and click the “Post” button to finish.
How to Look for a Matching Transaction, if Needed:
Alternatively, to attempt to find a matching transaction, select the “Match” button at the top of the expanded transaction to open a window that shows possible transaction matches. If there is a matching transaction in the list in the window that opens, you can check the checkbox to the left of the transaction to select it and then click the “Match” button at the bottom of the window to save the match. If matches aren’t found, you can just click the “Cancel” button in this window to close it.
How to Exclude the Transaction, if Needed:
Alternatively, to exclude the transaction, if needed, click the “Exclude” button at the bottom of the expanded section to move it to the “Excluded” tab.
How to Attach a File to the Transaction or Create a Bank Rule from the Transaction, if Needed:
Also note the “Upload” button under the “Files” label above this area, which you can click to add an attachment to the transaction, and the “Create rule” button, which you can click to create a rule using the transaction’s criteria, if needed, in the “Create rule” pane that then opens at the right side of the window. We’ll examine creating rules in the next lesson.
How to Quickly Post or Match Transactions without Reviewing Their Details:
Also, note that Intuit has made it easier to more quickly post and match transactions in QuickBooks Online if you don’t need to see all a transaction’s details by clicking the “Match/Categorize” toggle switch under the transaction’s “Match/Categorize” column to switch between matching and posting it, as needed.
To add a new transaction if you select the “Categorize” option, then you can use the “From/To” drop-down to select the payee, if needed, and use the drop-down under the “Match/Categorize” column to select the associated account. You can then click the “Post” button to quickly add the transaction to the “Posted” tab. However, you should only use this for transactions you immediately recognize as legitimate and which you know do not have an existing matching transaction in QuickBooks Online. For all other transactions, it’s better to first inspect their details to verify them.
How to Match/Post, Edit, or Exclude Multiple Transactions at a Time:
If needed, to add, edit, or exclude multiple transactions at once on the “Pending” tab, check the checkboxes next to the transactions to select them as a batch. A new black bar section then appears within the page. To match or post all the transactions, as they are, click the “Match,” “Post,” or “Match/Post” button in this new black bar section.
Alternatively, to update them all with the same information if posting new transactions, click the “Edit” button in the black bar and then select the information with which to update the selected records from the drop-downs in the “Edit selected transactions” window that opens. To cancel the update, if needed, click the “Cancel” button in this window. To only apply the update, but not post the transactions, click the “Apply” button. To both apply the update and post the transactions, click the “Apply and post” button in this window, instead.
Alternatively, to exclude all the selected transactions, click the “Exclude” button in the new black bar section.
How to Undo Posted or Excluded Transactions in QuickBooks Online:
To review the transactions moved to the “Posted” or “Excluded” tabs, click the desired button above the list of transactions in the “Bank transactions” page. To undo a transaction categorization or exclusion, click the “Undo” link in its action column to move the transaction back to the “Pending” tab.
Alternatively, to undo multiple transaction categorizations or exclusions, check the checkboxes next to multiple transactions to select them. Then click the “Undo” button that appears in the black bar in the page to move the selected transactions back to the “Pending” tab.


