Approve Time from QuickBooks Time in QuickBooks Online
How to Approve Time from QuickBooks Time in QuickBooks Online: Video
This video lesson, titled “How to Approve QuickBooks Time Entries in QuickBooks Online,” shows you how to approve time entries from QuickBooks Time in QuickBooks Online Plus when used with a subscription to Payroll Premium and/or QuickBooks Time. This video is from our complete QuickBooks Online tutorial, titled “Mastering QuickBooks Online Made Easy.”
Overview:
How to Approve Time in QuickBooks Online:
If using the QuickBooks Time service with QuickBooks Online, then you must approve the time entries from QuickBooks Time before you can use them in QuickBooks Online. To approve the QuickBooks Time entries from within QuickBooks Online, hover over the “+ Create” button in the Navigation Bar and select the “Review time” command under the “Team” heading or click the “Approvals” link under the “Time” app in the “All apps” bar.
Approve Time in Either the “Approve Time” window or “Approvals” Page:
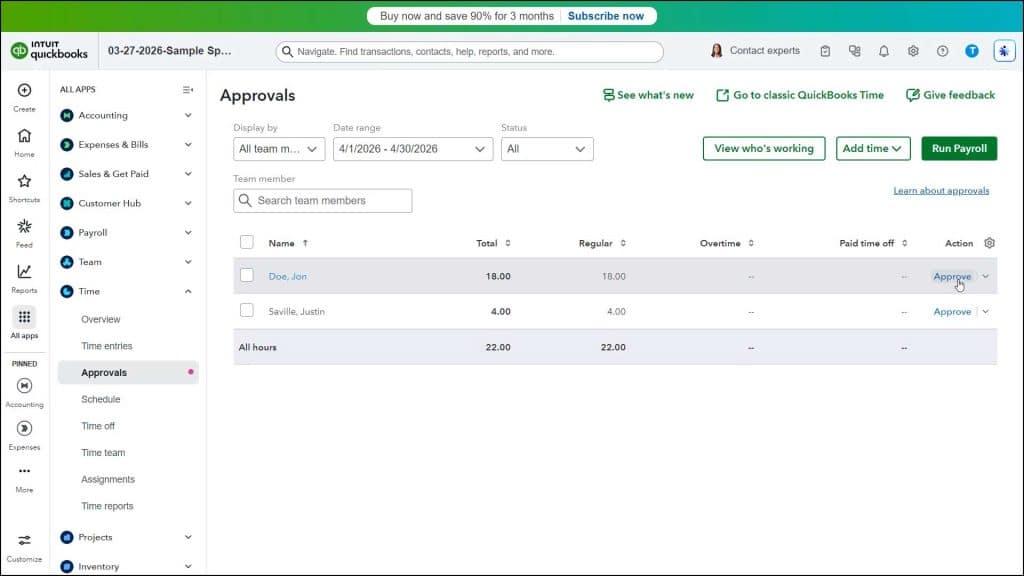
If you select the “Review time” command, then QuickBooks Online opens the “Approve Time” window. Alternatively, if you select the “Approvals” command, QuickBooks Online shows the “Approvals” page to the right. In either location, the time entries from QuickBooks Time for the selected date period and approval status appear, totaled by person. To change the date range, if needed, select a choice from the “Date range” drop-down. To change which time approval statuses appear, select a choice from the “Status” drop-down.
How to Review Individual Time Entries for a Person:
The people whose time you need to approve appear in a list in this window. To see the individual time entries for a person, click a person in this list. To edit a time entry, click the “Edit” link to the right of the entry, make your changes, and then click the “Save” button. To return to the “Approve Time” window or the “Approvals” page, click the “< Back” button in the detail page’s upper-left corner. To approve the employee’s time in the “Approve Time” window or “Approvals” page, click the “Approve” link at the right end of their row.
How to Approve Time in QuickBooks Time:
Alternatively, to approve time from within QuickBooks Time, open the QuickBooks Time application and then click the “Approvals” link in the Navigation Bar at the left side of the window to open the “Approvals Report” window to the right. Use the “Report Filters” pane that appears to select through when and for whom to show the time to approve and then click the “Run Report” button in the pane to show the time entries by employee. To view the details for an employee, click the “view details” link under their hours at the right end of their row to open the “Approval Details Report” in a new window where you can review the time entered and then close that window, when finished.
How to Approve Time for One or More People:
To approve the time for an employee, click the “Approve” button in their row. To approve time for multiple, selected employees, check the checkbox to the left of their row to select them. Alternatively, to select all unapproved employees, check the “Select all unapproved” checkbox at the top of the report tab. After making the desired selections, then click the “Approve Selected” button at the top of the tab.
If approving and locking time for days that aren’t over yet, a browser warning message confirmation box appears to ask if you really want to do this. To continue to confirm the approval, click the “OK” button in the browser warning message confirmation box that then appears. Otherwise, click the “Cancel” button.
How to Export the Approved Time to QuickBooks Online:
To manually export approved time from QuickBooks Time to QuickBooks Online, if needed, click the “QuickBooks” or “QuickBooks Payroll” button in the toolbar at the top of the QuickBooks Time window to show a drop-down menu of commands. Then click the “Export Approved Time” command in the drop-down menu that appears. Alternatively, click the “Export Approved Time” button in the upper-right corner of the current tab within the “Approvals Report” window. After doing either task, then click the “Export all hours” button in the “Proceed with export?” dialog box that appears. Alternatively, click the “Cancel” button to cancel the export.


