How to Make a General Journal Entry in QuickBooks Online
How to Make a General Journal Entry in QuickBooks Online: Video
This video lesson, titled “How to Make General Journal Entries in QuickBooks Online,” shows you how to make a general journal entry in QuickBooks Online. This video lesson is from our complete QuickBooks Online tutorial, titled “Mastering QuickBooks Online Made Easy.”
Overview:
There will be times when you need to enter information into your company file that may not have a dedicated, associated form. For example, this could happen if you must enter depreciation values for fixed asset accounts. You can create a journal entry to account for these types of transactions.
Create the General Journal Entry and Enter Its Date an Entry Number:
To create a general journal entry in QuickBooks Online, hover over the “+ Create” button in the Navigation Bar. Then click the “Journal entry” link under the “Other” heading to open the “Journal Entry” page. In the “Journal Entry” page, select the transaction date from the “Journal date” calendar selector field. Then enter a reference number for the transaction into the “Journal no.” field to identify the transaction in any reports.
Enter All Its Accounts, Credit or Debit Amounts, Descriptions, and Optional Names:
Then click into the “Account” column in the first blank row and select the first account affected by the transaction. Traditionally, you enter debits first. However, as long as you perform double-entry to ensure the total credit and total debit amounts balance, it really doesn’t matter whether or not you enter the debits or credits first.
After selecting the first account, enter its associated amount into either the “Debits” or “Credits” column, as appropriate for the selected account. Then enter a description for the account line into the “Description” field. Finally, if there is a vendor or customer associated with the transaction line, you can choose their name from the drop-down in the “Name” column.
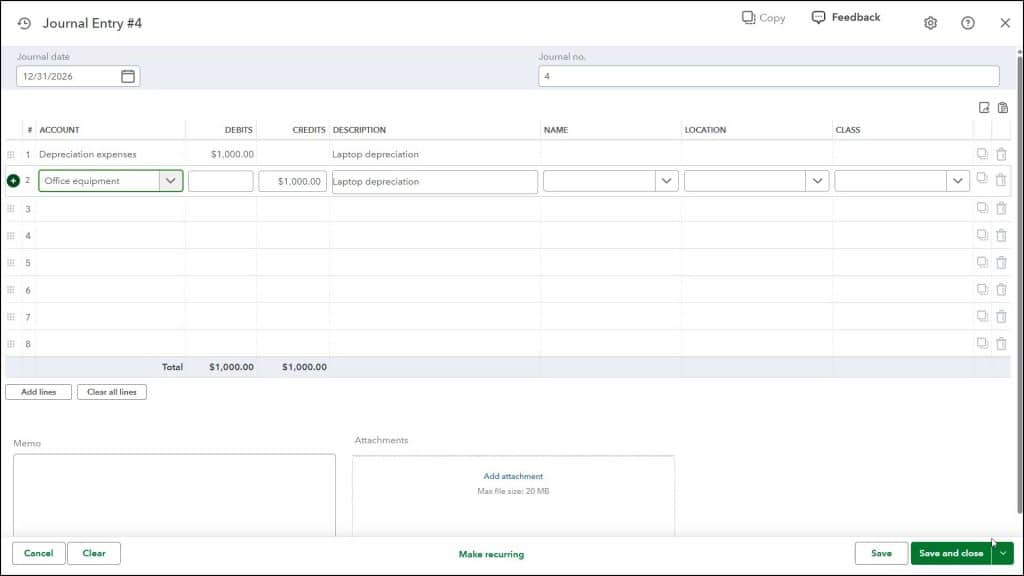
Repeat this process for all the other accounts affected by this transaction. Ensure you have listed the correct accounts affected, the correct amounts, and that the total amounts within the “Credits” and “Debits” columns balance one another. To save the journal entry and close the page or open a new “Journal Entry” window when finished, click or select the desired save choice from the drop-down button in the toolbar in the lower-right corner of the window.


