The Terms List in QuickBooks Online
How to Use the Terms List in QuickBooks Online: Video
This video lesson, titled “How to Use the Terms List in QuickBooks Online,” shows you how to create and manage customer terms and vendor terms using the Terms list in QuickBooks Online. This video lesson is from our complete QuickBooks Online tutorial, titled “Mastering QuickBooks Online Made Easy.”
Overview:
How to Open the Terms List in QuickBooks Online:
To view both customer and vendor terms in QuickBooks Online, click the “Settings” button in the QuickBooks Online toolbar and then click the “All lists” link under the “Lists” heading in the menu that appears to open the “Lists” page. Then click the “Terms” link in the “Lists” page to open the “Terms” list page. This page shows all the terms used for your customers and vendors.
How to Create New Terms:
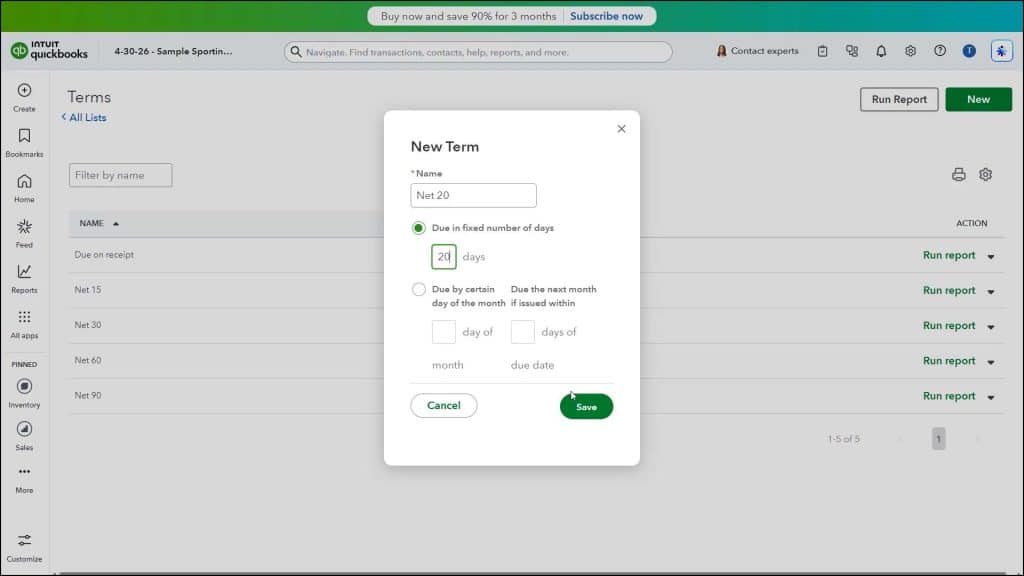
To create new terms, click the “New” button in the upper-right corner of the “Terms” page to open a “New Term” window. Type a name for the terms into the “Name” field. Then select either the “Due in fixed number of days” or the “Due by certain day of the month” option button. Then, based on your selected option button, enter either the number of days, the day of the month, and/or the number of days of due date, as needed, into the fields for your selected option. To save the terms, then click the “Save” button.
How to Run a Report on Terms or Edit Terms:
To run a “Terms QuickReport” on terms in the terms list, click the “Run report” link under the “Action” column in the desired term’s row. To edit existing terms, click the drop-down under the “Action” column for the term’s row and then click the “Edit” link to open the “Edit Term” window. Then change any term settings and click the “Save” button to save the changes.
How to Inactivate Terms:
To inactivate terms, click the drop-down under the “Action” column for the term’s row and then click the “Make inactive” link. To continue and deactivate the terms, then click “Yes” in the confirmation window that appears to confirm your choice.
If you inactivate terms, any form in which you used it shows “Name (deleted),” where “Name” is the name of the inactivated terms. For example, if you deleted terms named “Net 20,” the form reads “Net 20 (deleted).” It also appears like this within the “Terms” list if you choose to show inactive list items.
How to Reactivate Terms:
To reactivate deleted terms, if needed, click the “Settings” button in the upper-right corner of the “Terms” list and then check the “Include inactive” checkbox in the drop-down menu that appears. Doing this then shows the inactive terms in your list. Then click the “Make active” link that appears under the “Action” column in the row for the inactivated terms you want to reactivate.


