 MY CART
Learn about File Explorer in Windows 11: Video Lesson
This video lesson, titled “Learn about File Explorer in Windows 11: A Windows 11 Training Tutorial,” shows you how to use File Explorer in Windows 11. This video lesson is from our complete Windows tutorial, titled “Mastering Windows Online Made Easy.”
Overview:
What Is File Explorer?
File Explorer is a long-standing feature of Windows that lets you view and manage files, folders, and storage locations. In earlier versions of Windows, this tool was called Windows Explorer, but it has since been renamed. Although the name has changed, its purpose remains the same, with updated features and a redesigned layout in Windows 11.
File Explorer in Windows 11 has a modern interface that differs from earlier versions. It now uses a cleaner layout with a command bar instead of the older Ribbon. You can use File Explorer to browse files stored on your computer, connected devices, and cloud services like OneDrive.
How to Open File Explorer in Windows 11:
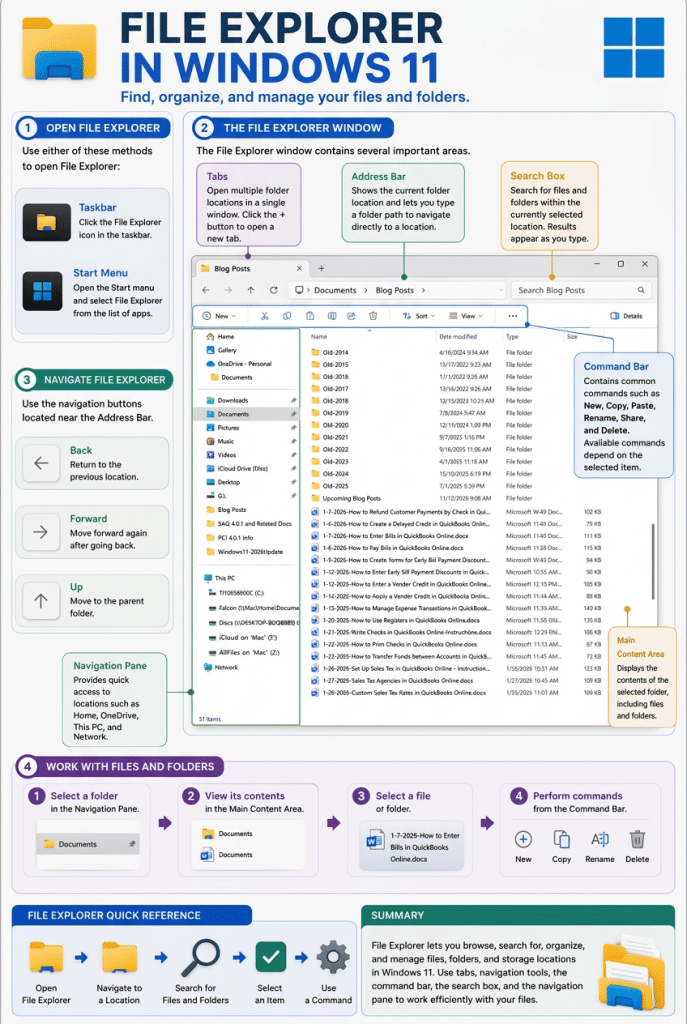
To open File Explorer, click the File Explorer icon in the taskbar. Alternatively, click the Start button to display the Start menu, then click the File Explorer app in the list of apps. If necessary, scroll through the list of apps to locate it.
How to Use Tabs in File Explorer:
At the top of the File Explorer window is the title bar, address bar, and command bar. File Explorer in Windows 11 now supports tabs, which let you open multiple folder locations within a single window. Tabs appear in the title bar, and each tab shows the name of its displayed location. To open a new tab, click the “Add new tab” button in the title bar. You can switch between tabs by clicking them, which helps you manage multiple locations more easily.
How to Navigate File Explorer:
Below the title bar is the Address bar, which shows the current folder location. You can click within the Address bar, type a folder path, and then press the “Enter” key on your keyboard to navigate to that location. To move between the folders you navigate in File Explorer, use the Back, Forward, and Up buttons that appear near the Address bar. The Back button returns you to the previous location, while the Forward button moves you forward again after going back. The Up button moves you to the parent folder of the currently selected location.
How to Find Files and Folders in File Explorer:
To the right of the Address bar is the Search box, which lets you search for files and folders within the selected location by typing keywords. To search for a file or folder, click into the Search box and begin typing. Search results appear as you type and are limited to the currently selected folder or location. You can then click a result to open it.
How to Perform Tasks in File Explorer:
Below the Address bar is the command bar. The command bar contains common commands like New, Copy, Paste, Rename, Share, and Delete, which become available based on the item you select in the File Explorer window. These commands allow you to quickly perform tasks on selected files and folders.
How to Access Locations Using the Navigation Pane in File Explorer:
The Navigation pane appears at the left side of the File Explorer window. This pane lets you quickly access common locations such as “Home,” “OneDrive,” “This PC,” and “Network.” The “Home” location shows recent files and frequently used items to help you quickly return to your work. To expand or collapse sections in the Navigation pane, click the arrows to the left of their names.
How to Select Files and Folders in File Explorer:
The main area of the File Explorer window displays the contents of the selected folder. This area may show files and folders as icons, lists, or detailed rows, depending on the selected view. In Details view, information such as name, date, type, and size appears in columns that you can use to sort and organize items. You can click an item in the main area of File Explorer to select it. You can then click the desired command to apply to the selected item from the available choices in the command bar.