
TeachUcomp, Inc.

 MY CART
  • HOME
  • PRODUCTS
    • Books
      • QuickBooks Online
    • Manuals
      • Adobe
        • Acrobat
        • Lightroom Classic
        • Photoshop
        • Photoshop Elements
      • Crystal Reports
      • For Lawyers
        • Excel for Lawyers
        • Outlook for Lawyers
        • QuickBooks for Lawyers
        • Word for Lawyers
      • HTML
      • JavaScript
      • Microsoft Office
        • Access
        • Excel
        • OneNote
        • Outlook
        • Outlook on the Web
        • PowerPoint
        • Publisher
        • Word
      • Microsoft Project
      • Microsoft Teams
      • QuickBooks Online
      • QuickBooks Pro
      • Sage
        • Peachtree
        • Sage 50
      • SQL
      • Windows
    • Reference Guides
      • Adobe
        • Acrobat
        • Lightroom Classic
        • Photoshop
        • Photoshop Elements 2027
        • Photoshop Elements 2026
        • Photoshop Elements 2025
        • Photoshop Elements 2024
        • Photoshop Elements 2023
        • Photoshop Elements 2022
        • Photoshop Elements 2021
        • Photoshop Elements 2020
        • Photoshop Elements 2019
        • Photoshop Elements 2018
        • Photoshop Elements 15
      • Chrome OS
        • Chrome OS Keyboard Shortcuts
      • FreshBooks
      • Google
        • Google Classroom for Teachers
        • Google Docs
        • Google Drive
        • Google Forms
        • Google Sheets
        • Google Slides
      • macOS
        • macOS Keyboard Shortcuts
        • macOS Tahoe
      • Microsoft Office
        • Excel Formulas and Functions
        • Excel Keyboard Shortcuts (macOS)
        • Excel Keyboard Shortcuts (PC/Windows)
        • Excel Tables PivotTables and Charts
        • Microsoft 365
          • Access for Microsoft 365
          • Excel for Microsoft 365
          • Microsoft Office 365
          • Outlook for Microsoft 365 Classic Edition
          • Outlook for Microsoft 365 (New Outlook)
          • PowerPoint for Microsoft 365
          • Publisher for Microsoft 365
          • Word for Microsoft 365
        • Microsoft Office 2021
          • Access 2021
          • Excel 2021
          • Microsoft Office 2021
          • OneNote for Windows 10
          • Outlook 2021
          • PowerPoint 2021
          • Publisher 2021
          • Word 2021
        • Microsoft Office 2019
          • Access 2019
          • Excel 2019
          • Microsoft Office 2019
          • Outlook 2019
          • PowerPoint 2019
          • Publisher 2019
          • Word 2019
        • Microsoft Office 2016
          • Access 2016
          • Excel 2016
          • Microsoft Office 2016
          • OneNote 2016
          • Outlook 2016
          • PowerPoint 2016
          • Publisher 2016
          • Word 2016
        • Microsoft Office 2013
          • Excel 2013
          • Microsoft Office 2013
          • OneNote 2013
          • Outlook 2013
          • PowerPoint 2013
          • Word 2013
        • Microsoft Office for iPad
          • Microsoft Office for iPad
        • Word Keyboard Shortcuts (macOS)
        • Word Keyboard Shortcuts (PC/Windows)
      • Microsoft Teams
      • QuickBooks Online
      • QuickBooks Pro
        • QuickBooks Pro 2024
        • QuickBooks Pro 2023
        • QuickBooks Pro 2022
        • QuickBooks Pro 2021
        • QuickBooks Pro 2020
        • QuickBooks Pro 2019
        • QuickBooks Pro 2018
        • QuickBooks Pro 2017
        • QuickBooks Pro 2016
        • QuickBooks Pro 2015
        • QuickBooks Pro 2014
      • Sage 50 Accounting
      • SQL
      • Windows
        • Windows 11
        • Windows 11 and 10 Keyboard Shortcuts
        • Windows 10
    • Video Courses
      • All-Access Subscriptions
      • Course List
        • Accounting
        • Adobe
          • Acrobat
          • Lightroom Classic
          • Photoshop
          • Photoshop Elements
        • Crystal Reports
        • Employment Skills
          • Interview Skills
          • Resume Skills
        • For Lawyers
          • Excel for Lawyers
          • Outlook for Lawyers
          • QuickBooks for Lawyers
          • Word for Lawyers
        • HTML
        • JavaScript
        • Microsoft Office
          • Access
          • Excel
          • Microsoft Office Suite
          • OneNote
          • Outlook
          • Outlook on the Web
          • PowerPoint
          • Publisher
          • Word
        • Microsoft Project
        • Microsoft Teams
        • QuickBooks Online
        • QuickBooks Pro
        • Sage
          • Peachtree
          • Sage 50
        • SQL
        • Windows
      • My Courses
      • Video Course Options
    • Shortcut Stickers
      • Chrome OS
      • macOS
      • Microsoft Office
        • Word and Excel (Mac)
        • Word and Excel (PC/Windows)
      • QuickBooks Desktop
        • QuickBooks Desktop (PC/Windows) 2024
        • QuickBooks Desktop (PC/Windows) 2023
        • QuickBooks Desktop (PC/Windows) 2022-2015
      • QuickBooks Online
      • Windows
  • SHOP BY TOPIC
  • FOR TEAMS
  • SUPPORT
    • Company
      • About Us
      • Blog
      • Our History
      • Our Philosophy
        • Customer Service
        • Mission
      • Policies
      • Testimonials
    • Contact Us
    • FAQ
    • Help
    • Lost Password
    • Register a Product
  • LOGIN
    • Manage My Account
    • Member Login
    • My Courses
Shop Now

How to Apply Conditional Formatting in Excel

by Joseph Brownell / Thursday, October 29 2026 / Published in Excel 2016, Excel 2019, Excel 2021, Excel for Office 365, Latest, Microsoft, Office 2016, Office 2019, Office 2021, Office 365

How to Apply Conditional Formatting in Excel: Video Lesson

  This video lesson, titled “How to Apply Conditional Formatting in Excel: A Microsoft 365 and Excel 2019 Training Tutorial,” shows you how to apply conditional formatting in the desktop version of Microsoft Excel. This video lesson is from our complete Excel tutorial, titled “Mastering Excel Made Easy.”

Overview:

What Is Conditional Formatting in Excel?

Conditional formatting in Excel lets you define criteria for cells which change the way the cells look in the worksheet, but only if the cells’ values match the criteria. For example, you could create a conditional formatting criterion that makes a worksheet cell appear with a red fill color only if it contains a negative number. You can apply conditional formatting in Excel to all types of cells. However, it is very helpful for visually changing the display of formula cells based on their values, which may change due to data entry.

How to Apply Conditional Formatting in Excel:

            You can apply several preset conditional formatting rules in Excel. Alternatively, you can create your own rules and formatting to apply. To apply conditional formatting in Excel, first select the worksheet cells to which to apply conditional formatting. Then click the “Conditional Formatting” button in the “Styles” button group on the “Home” tab of the Ribbon.

How to Apply Preset Conditional Formatting:

            To apply a preset conditional format using the selected cells’ values as the conditional formatting criterion’s upper and lower bounds, then simply roll down to the conditional formatting style to use in the second section of the drop-down menu that appears. From the side menu that appears, then click to choose the specific style variation to apply to the selected cells.

How to Apply Custom Conditional Formatting:

            Alternatively, to create custom conditional formatting rules that let you define the cell criteria and associated formatting to apply, select one of the rule choices in the first section of the drop-down menu. You can select either the “Highlight Cell Rules” or “Top/Bottom Rules” choice. From the side menu that then appears, select the type of values to highlight. Doing this opens a dialog box where you enter the criteria, which when met, applies the formatting you then choose. Then click the “OK” button to create the rule.

How to Create Multiple Conditional Formatting Rules for Selected Cells:

            You can also create multiple rules for selected cells. However, to do this, it’s best to begin by selecting the cells to which to apply multiple conditional formatting rules. Then click the “Conditional Formatting” button in the “Styles” button group on the “Home” tab of the Ribbon. Then choose the “Manage Rules…” command from the drop-down menu that appears to open the “Conditional Formatting Rules Manager” dialog box.

            To only view the conditional formatting rules for the selected cells, choose the “Current Selection” choice from the “Show formatting rules for:” drop-down at the top of this dialog box. Otherwise, you can choose to view the conditional formatting rules for the whole worksheet or the entire workbook from this drop-down. Any conditional formatting rules for the selected area then appear in the rules list below that. If you haven’t created any rules for the selected area yet, then this list is blank.

How to Create a New Rule for the Selected Cells:

            To create a new rule for the selected area, click the “New Rule…” button at the top of the “Conditional Formatting Rules Manager” dialog box. In the “New Formatting Rule” dialog box, select the rule type to create from the “Select a Rule Type:” list. Then enter its evaluation criterion into the area at the bottom of this window. Then choose the formatting to apply when this criterion is met and click the “OK” button to return to the “Conditional Formatting Rules Manager” dialog box.

How to Create Additional Rules for the Selected Cells:

            To add other rules to the selection, just repeat the process. New rules are added to the list in the “Conditional Formatting Manager” dialog box. If applying multiple rules, they are enforced in the order they appear, from top to bottom, within this dialog box. You can click to select a rule in this dialog box and then click the “Move Up” and “Move Down” arrow buttons to change its order in this list. For any listed rule, you can check the “Stop If True” checkbox at its right end to end the sequence of rule processing if the cell value meets the criteria specified by the selected rule.

How to Edit Conditional Formatting Rules:

            To edit a rule you applied, select it from the list in the “Conditional Formatting Rules Manager” dialog box. Then click the “Edit Rule…” button at the top of the “Conditional Formatting Rules Manager” dialog box to reopen the rule in the “Edit Formatting Rule” window. Change its criterion or formatting and then click the “OK” button. To delete a rule in the “Conditional Formatting Rules Manager” dialog box, select it. Then click the “Delete Rule” button at the top of the “Conditional Formatting Rules Manager” dialog box.

            After you finish creating, editing, reordering, or deleting your rules, click the “OK” button in the “Conditional Formatting Rules Manager” dialog box to apply your changes.
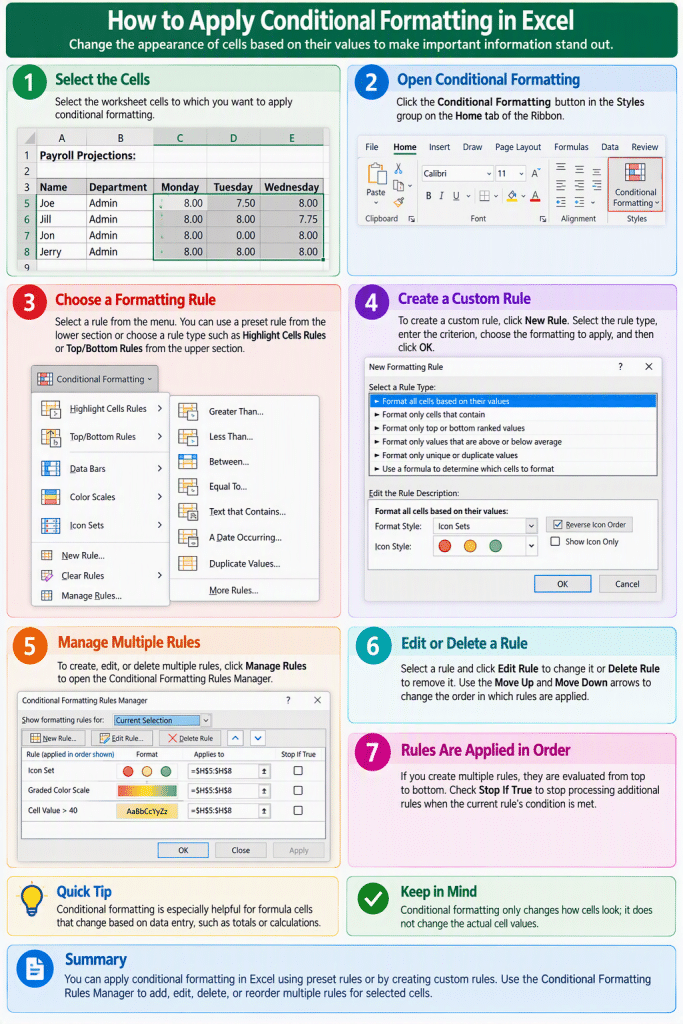
A picture showing how to apply conditional formatting in Excel.

Tagged under: conditional formatting, Conditional Formatting in Excel, conditional formatting rules, custom formatting rules, edit formatting rules, excel, Excel conditional formatting, Excel formatting, Excel how to, Excel tips, Excel training, Excel tutorial, format based on value, format cells, Highlight Cell Rules, Manage Rules, microsoft excel, multiple rules, New Formatting Rule, office 365, Rules Manager, Stop If True, teachucomp, Top Bottom Rules

About Joseph Brownell

Joseph Brownell is founder and Vice President of TeachUcomp, Inc. He is the author of dozens of titles across the TeachUcomp, Inc. product line.
Team Training. Solutions for all team sizes.


Excel Quick Reference Guide. Buy Now.
 

Categories

  • GET SOCIAL

© 2001-2026 Copyright TeachUcomp, Inc. All rights reserved.

TOP
25% Off Everything 6 Days 21 Hours 7 Minutes 49 Seconds      Coupon Code: SAVE25
Shop Now