
 MY CART
How to Create Fixed Assets Accounts in QuickBooks Online
How to Create Fixed Assets Accounts in QuickBooks Online: Video
This video lesson, titled “How to Create Fixed Assets Accounts in QuickBooks Online,” shows you how to create Fixed Assets accounts in QuickBooks Online. This video lesson is from our complete QuickBooks Online tutorial, titled “Mastering QuickBooks Online Made Easy.”
Overview:
Why Create a Fixed Assets Account in QuickBooks Online?
A “Fixed Assets” account in QuickBooks Online tracks assets your business owns that are NOT likely to be converted into cash within a year. A fixed asset is something of significant value that is necessary for the operation of your business, like vehicles, computers, furniture, and some office equipment. Many times, the purchase of a fixed asset also incurs a long-term liability, like when acquiring an auto loan to buy a new vehicle.
Fixed assets are not for immediate sale, but they have a value. Since they are useful for a long time, you don’t completely charge their entire cost to the year in which you purchased them. Instead, you spread their cost over several years, called the “useful life” of the asset. However, because fixed assets wear out or become obsolete, like computers, their value declines constantly from the day you purchase them. When the value of fixed assets declines over a period, the amount of lost value is called depreciation. The total amount of this decline over a time period is called the accumulated depreciation.
A Method for Creating Fixed Assets Accounts that Emphasizes Book Value for Clarity of Reporting in the Balance Sheet:
You will now examine one method for creating fixed asset accounts, noting their original value, and recording their accumulated depreciation. There are many ways to track fixed asset value and depreciation, and this is just one suggested method. This method works well to show the original cost, the accumulated depreciation, and the current book value for a single, major fixed asset on separate lines in the Balance Sheet for clarity of reporting its book value. However, if you are currently tracking fixed assets and asset depreciation in other ways, like tracking their value within fixed asset accounts grouped by depreciation type, like “Vehicles” versus “Computers,” for example, rest assured you can also use other methods.
When referring to the value of a fixed asset at any point in time, you are referring to its “book value.” This is determined by subtracting its accumulated depreciation, which is the total amount of depreciation that has occurred since the asset’s original purchase date, from its original cost.
Some users want the company’s Balance Sheet to show the original cost of an asset on one line with the accumulated depreciation subtracted from the original cost on a second line, and the current, or “book,” value on a third line. The method in this lesson lets you see each asset’s cost and its accumulated depreciation separately in your balance sheet. To do this, create a primary fixed asset account for each asset and then create two subaccounts for each primary fixed asset account- one for its “original cost” and one for its “depreciation.”
Create the Primary Fixed Assets Account:
To create the primary fixed assets account, click the “Settings” button in the QuickBooks Online toolbar and then click the “Chart of accounts” link under the “Your Company” heading in the menu that appears to open the “Chart of accounts” page. Then click the “New account” button in the upper-right corner of the page to open a “New account” pane at the right side of the window.
Type the fixed asset’s account name into the “Account name” field. Optionally, enter an “Account number,” if enabled and if desired. Select the “Fixed Assets” choice from the “Account type” drop-down. Select the correct account detail type for the fixed asset from the “Detail type” drop-down. For this example, choose the “Vehicles” choice.
To make this account a subaccount of an existing, larger fixed assets account, like “Vehicles,” for example, check the “Make this a subaccount” checkbox and select the parent account from the “Parent account” drop-down. You will skip using the “Original cost” and “As of” fields for this account if using this method, as those numbers, if needed, are used by the subaccounts you create to track the original value and depreciation for this specific fixed asset. Optionally, enter an account description into the “Description” field. When finished, click the drop-down arrow on the “Save” button in the lower-right corner of the “New account” pane and select the “Save and new” command to save the primary fixed asset account and immediately create another new account.
Create the Original Cost Subaccount for the Primary Fixed Assets Account:
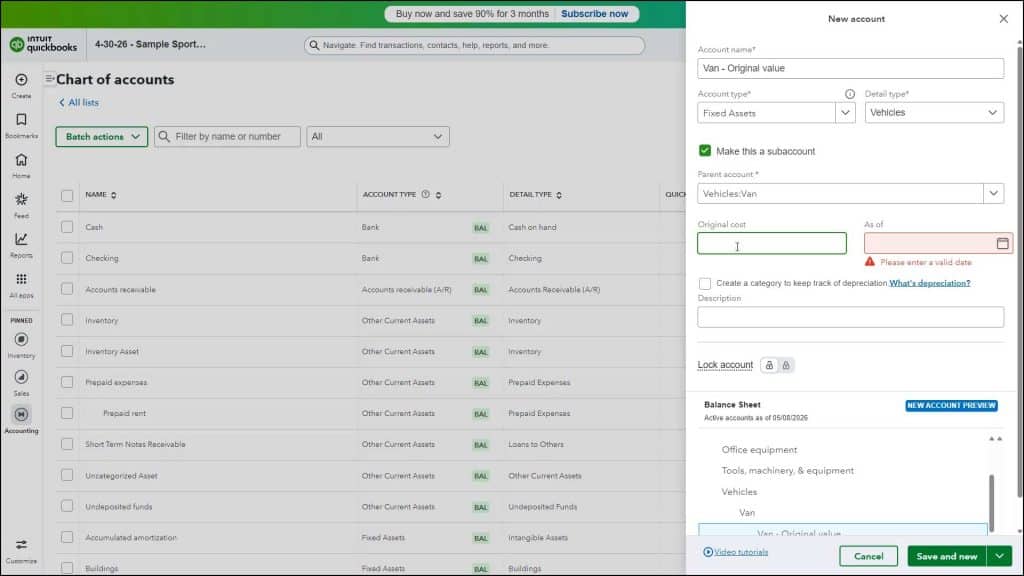
Next, to create the first subaccount for the original cost of this major fixed asset account, type an account name that shows this is the account used to track the original cost of its parent account into the “Account name” field in the “New account” pane. For example, if the parent account is named “Work truck,” you may name this account something like “Work truck- Original value.” Optionally and if enabled, enter an “Account number” and a “Description” for the account into the respective fields in this pane.
Since a subaccount must be the same type of account as its parent account, ensure the “Fixed Assets” choice is still selected from the “Account type” drop-down. Since this account tracks the original cost of its parent account, select the same choice as its parent account from the “Detail type” drop-down. For this example, select “Vehicles.” To then make this account the original cost subaccount for the previous account, check the “Make this a subaccount” checkbox and then select the primary fixed assets account you just created from the “Parent account” drop-down.
If creating the original cost subaccount for a fixed asset account you are buying or just bought, then skip entering the information in the “Original cost” and “As of” fields. This is because the original value of the fixed asset comes from the value of transactions you still need to enter, like the loan you received or checks you wrote to buy the fixed asset.
Alternatively, to record original cost values if creating an original cost subaccount for an existing fixed asset you previously purchased, type the original value of the fixed asset into the “Original cost” field. Then select the date as of which to record the original cost from the “As of” field. To save the original cost subaccount and then create it’s accumulated depreciation subaccount, click the drop-down arrow on the “Save” button in the lower-right corner of the “New account” pane and select the “Save and new” command.
Create the Accumulated Depreciation Subaccount for the Primary Fixed Assets Account:
Next, to create the subaccount for the accumulated depreciation of this major fixed asset account, type an account name that shows this is the account used to track the accumulated depreciation of its parent account into the “Account name” field. For example, if the parent account was named “Work truck,” you may name this something like “Work truck- Accumulated Depreciation.” Optionally and if enabled, enter an “Account number” and a “Description” into the respective fields.
Since a subaccount must be the same type of account as its parent account, select the “Fixed Assets” choice from the “Account type” drop-down. Since this account tracks the accumulated depreciation of its parent account, select the “Accumulated Depreciation” choice from the “Detail type” drop-down. To then make this account an accumulated depreciation subaccount, check the “Make this a subaccount” checkbox and then select its parent fixed assets account from the “Parent account” drop-down.
If creating the accumulated depreciation subaccount for a fixed asset account you are buying or just bought, you skip entering the information in the “Opening balance” and “As of” fields. This is because a new fixed assets account wouldn’t have any depreciation to enter yet.
Alternatively, to record these values if creating an accumulated depreciation subaccount for an existing fixed asset you previously purchased, type the accumulated depreciation of the fixed asset as of the date for which to record the accumulated depreciation into the “Opening balance” field. Then select the date for which to record the accumulated depreciation amount from the “As of” field. To save the account, when finished, click the “Save” button in the lower-right corner of the “New account” pane.