How to Create Pay Schedules in QuickBooks Online
How to Create Pay Schedules in QuickBooks Online: Video
This video lesson, titled “How to Create Pay Schedules in QuickBooks Online,” shows you how to create and assign pay schedules in QuickBooks Online if you subscribe to a QuickBooks Online Payroll service. This video lesson is from our complete QuickBooks Online tutorial, titled “Mastering QuickBooks Online Made Easy.”
Overview:
If you subscribe to a QuickBooks Online Payroll service, you can create pay schedules when you initially create the employees. You can later edit an employee to select a different pay schedule, if needed, or create a new pay schedule.
How to Change an Employee’s Pay Schedule:
To change an employee’s pay schedule or create a new pay schedule, edit the employee’s record for the employee whose pay schedule you want to change. Then click the “Edit” link in the upper-right corner of the “Employment details” section to show the “Employment details” window. To select a different pay schedule that exists, select it from the “Pay schedule” drop-down.
How to Create a New Pay Schedule:
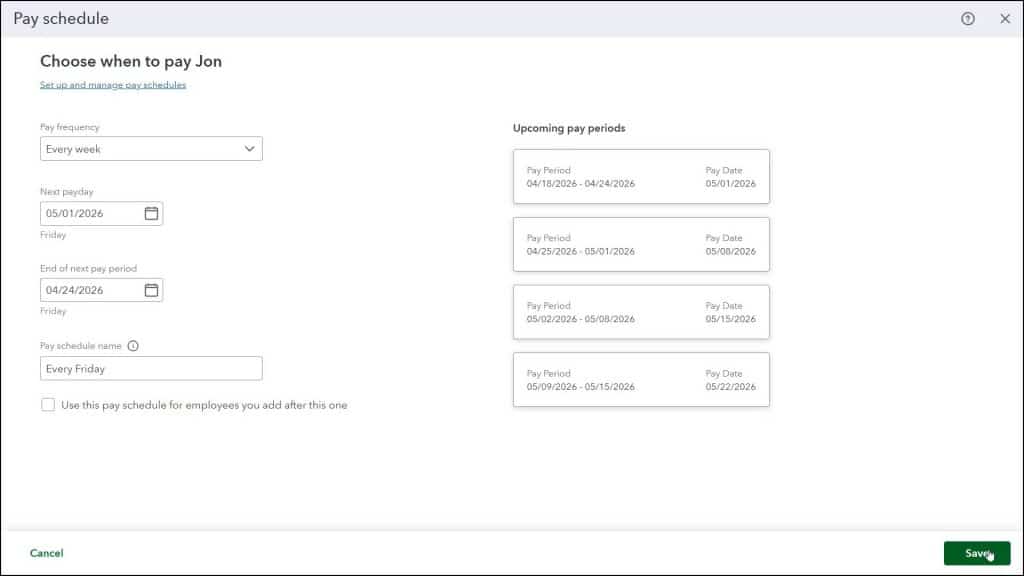
Alternatively, to create a new pay schedule and assign it to the employee, select the “+ Add pay schedule” choice from this drop-down, instead, to open a “Pay schedule” window. To set the pay frequency for the new pay schedule, select a choice from the “Pay frequency” drop-down.
To set the date of the next payday for this new pay schedule, select a date from the “Next payday” calendar date selector. To set the end of the next pay period for this new pay schedule, select a date from the “End of next pay period” calendar date selector. Then type a name for the new pay schedule into the “Pay schedule name” field. To set this pay schedule as the default for new employees you add, check the “Use this pay schedule for employees you add after this one” checkbox.
The “Upcoming pay periods” chart at the right side of the window shows the upcoming pay periods and their associated pay days for this pay schedule, so you can make sure you have the correct dates selected. To then save the new pay schedule, click the “Save” button in the lower-right corner of the “Add a pay schedule” window. Alternatively, to cancel it, click the “Cancel” button.
Either way, you then return to the “Employment details” window and the new pay schedule also appears as the selected choice in the “Pay schedule” drop-down. You may need to change this setting if this is incorrect for this employee. To save the changes to the employee’s record, if needed, click the “Save” button in the lower-right corner of the window, when finished.


