How to Enter a Vendor Credit in QuickBooks Online
How to Enter a Vendor Credit in QuickBooks Online: Video
This video lesson, titled “How to Enter a Vendor Credit in QuickBooks Online,” shows you how to create a vendor credit in QuickBooks Online. This video lesson is from our complete QuickBooks Online tutorial, titled “Mastering QuickBooks Online Made Easy.”
Overview:
Create the Vendor Credit:
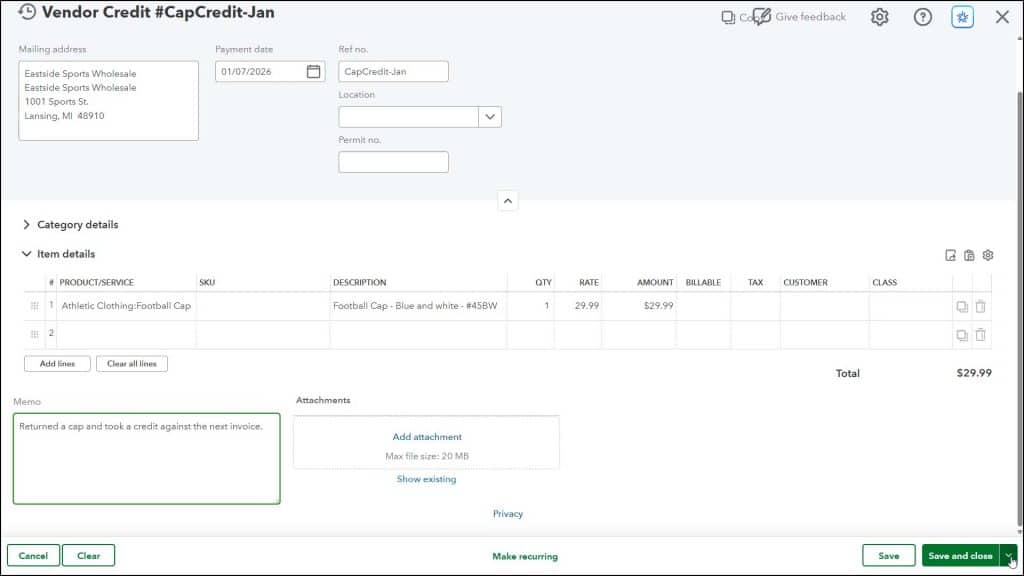
You can enter a vendor credit in QuickBooks Online to return an item to a vendor or enter a credit for overpaying an earlier bill. To create a vendor credit in QuickBooks Online, hover over the “+ Create” button in the Navigation Bar. Then click the “Vendor credit” link under the “Vendors” heading in the drop-down menu to open the “Vendor Credit” window.
Enter the Vendor and Vendor Credit Info:
Select the name of the vendor from the “Vendor” drop-down. The vendor’s mailing address should appear in the “Mailing address” field. Enter the date of the credit into the “Payment date” field. To enter a reference number for the vendor credit, if needed, type it into the “Ref no.” field. Fill out the remaining fields in the upper portion of the vendor credit, as needed.
Correctly Account for the Vendor Credit:
If not returning items or services from your “Products & services” list, then use the “Category details” section to select to which account to apply the vendor credit. You most often select the matching account from the original bill for which you received the vendor credit.
Alternatively, if returning items or services from your “Products & services” list, select the items to return from the “Item details” section, instead and verify the quantities and amounts to credit. To enter a note about the vendor credit, type it into the “Memo” field. To attach a file to the vendor credit, use the “Attachments” field.
Save the Vendor Credit:
In the toolbar at the bottom of the window, you can cancel the vendor credit by clicking the “Cancel” button. To enter a recurring vendor credit, if needed, click the “Make recurring” button. This is not often needed by most businesses. To save the vendor credit and then open a new window or close the window, click or select a choice from the “Save and new / Save and close” drop-down button in the toolbar in the lower-right corner of the window.