How to Enter Bills in QuickBooks Online
How to Enter Bills in QuickBooks Online: Video
This video lesson, titled “How to Enter Bills in QuickBooks Online,” shows you how to manually enter a bill in QuickBooks Online. This video lesson is from our complete QuickBooks Online tutorial, titled “Mastering QuickBooks Online Made Easy.”
Overview:
How to Create a New Bill and Select a Vendor:
To enter received bills into QuickBooks Online, hover over the “+ Create” button in the Navigation Bar. Then click the “Bill” link under the “Vendors” heading in the drop-down menu to open the “Bill” window. Then use the “Choose a vendor” drop-down to select the name of the vendor who sent the bill. To add a new vendor, choose the “+ Add new” command in the drop-down menu to open a new “Vendor” pane at the right side of the window, where you can then enter the new vendor’s details and click the “Save” button to finish.
How to Add a Purchase Order to a Bill:
If you select the name of a vendor with whom you have outstanding purchase orders, the “Add to Bill” pane then appears at the right side of the “Bill” window and shows the vendor’s purchase orders you can add to the bill. To add a purchase order’s details, which then appear in the “Item details” section below, click the “Add” link in the purchase order to add to the bill.
Alternatively, to add all items within the “Add to Bill” pane to the bill, click the “Add all” button at the top of the pane. Alternatively, to not add any items and collapse the “Add to Bill” pane, click the right-pointing arrow button in the pane’s upper-left corner.
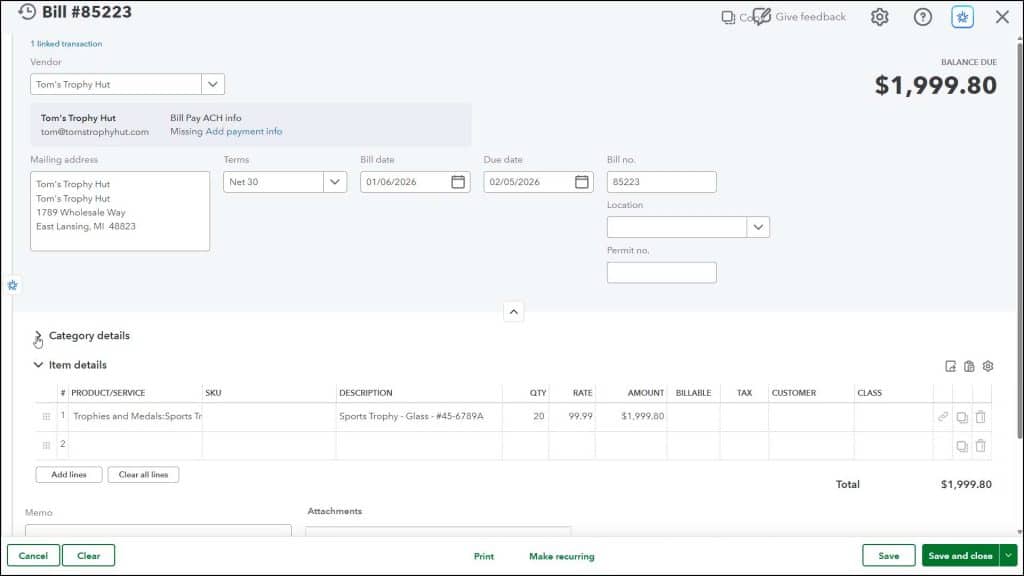
Enter and Verify the Vendor and Bill Information:
The “Mailing address” field shows the vendor’s mailing address from the vendor’s record. If you did not enter one when creating the vendor record, you can type it here. The vendor’s payment terms appear in the “Terms” field, and you can use this drop-down to select the payment terms, if needed. You can also click the “+ Add new” choice in this drop-down menu to open the “Terms” pane to create new payment terms, if needed.
Select or type the date the bill was received from the “Bill date” calendar selector field. The “Due date” field to the right automatically adjusts its value, depending on the “Bill date” you selected and the “Terms” you selected. You can enter a reference number for the bill into the “Bill no.” field. If locations are enabled, you can select one from the “Location” drop-down.
Enter the Bill’s Line Items:
Next are two collapsible and expandable sections, named “Category details” and “Item details.” You can click the black arrow by either heading to expand or collapse each section. When entering bills, you most often enter the bill’s line item details in one section or the other, but not both. The choice depends on whether the bill relates to items in your “Products & services” list or not.
How to Enter Bill Line Items Not Related to Your Company’s Products and Services:
To enter line item amounts for the bill if entering a bill not associated with your products or services, select choices and enter values into the line item rows in the “Category details” section. For example, if entering a telephone bill, you could select the “Telephone Expense” account here and then enter its amount. The “Category details” section contains the “Category,” “Description,” “Amount,” “Billable,” “Tax,” and “Customer/Project” columns. You will also see a “Class” column appear if classes are enabled.
How to Enter Bill Line Items for Your Company’s Products and Services:
Alternatively, to enter bill amounts by selecting products and/or services for bills associated with your “Products & services” list, select choices and enter values into the line item rows in the “Item details” section. For example, if entering a bill for subcontracted services in your “Products & services” list, you can select the subcontracted service item and enter its amounts. The “Item details” section contains the “Product/Service,” optional “SKU,” “Description,” “Qty,” “Rate,” “Amount,” “Billable,” “Tax,” and “Customer/Project” columns. You will also see a “Class” column appear if classes are enabled.
How to Add and Delete Bill Line Items, Add a Memo, or Attach Files:
To delete a line item in either the “Category details” or “Item details” sections, click the trashcan icon at the end of the line to delete. You can also click the “Add lines” and “Clear all lines” buttons below either section to add multiple lines or clear all entries from the lines in each section. To enter a memo to yourself about the bill, type it into the “Memo” field. To attach a file to the bill, use the “Attachments” field.
How to Cancel or Save the Bill:
The toolbar at the bottom of the page contains buttons to manage the bill. To cancel the bill entry, click the “Cancel” button. To clear all data entry from the “Bill” window but leave it open, click the “Clear” button. To save and print the bill, click the “Print” button. To create a recurring bill, click the “Make recurring” button to open the “Recurring Bill” menu, where you can choose how often this bill recurs.
To save the bill, click the “Save” button. To save the bill and then open a new “Bill” window, close the window, or schedule a payment if you enable the bill payment service through QuickBooks Online, click the current choice or select a choice from the “Save and new / Save and close / Save and schedule payment” drop-down button.


