How to Enter Mileage in QuickBooks Online
How to Enter Mileage in QuickBooks Online: Video
This video lesson, titled “How to Enter Mileage in QuickBooks Online,” shows you how to manually add vehicles and record trips to track mileage in QuickBooks Online. This video lesson is from our complete QuickBooks Online tutorial, titled “Mastering QuickBooks Online Made Easy.”
Overview:
QuickBooks Online allows you to track mileage for your company vehicles. Team members that use the QuickBooks Online mobile app can even automatically track mileage for trips they make. However, this feature is currently limited to admin users. Separately, though, you can manually add your vehicles and trips to QuickBooks Online to track mileage in the program for the trips you make with company vehicles.
How to Enter Vehicles and Trips in QuickBooks Online:
To enter your vehicles and track their trips in QuickBooks Online, click the “Mileage” link under the “Expenses & Bills” app in the “All apps” bar to open a “Mileage” page to the right. To manually enter mileage the first time you open this page, click the “Add a trip manually” link in the page. A graph of your mileage appears at the top of the “Mileage” page.
How to Manage Vehicles:
To view and create your vehicles, either click the “Mange vehicles” link below this graph or click the drop-down button in the upper-right corner of the page and select the “Manage vehicles” command to open the “Manage vehicles” pane at the right side of the window.
How to Add a New Vehicle:
To add a vehicle, click the “Add vehicle” button in the lower-right corner of this pane to show an “Add vehicle” pane at the right side of the page. In the “Vehicle info” section of the pane, select the vehicle type from the “Type” drop-down. Type the vehicle’s make and model into the “Vehicle make and model” field. Type the vehicle’s year into the “Vehicle year” field. Choose an option for the “Ownership status” setting to show whether you lease or own it.
Select when you bought the vehicle from the “Date you bought the vehicle” calendar selector field. Select the date you put it into service from the “Date placed in service” calendar selector field. To set the vehicle as the primary vehicle for trips, click the “Set as primary vehicle” toggle switch to set it to the “On” position.
In the “Tax info” section, select the option for how to record mileage for the current tax year. If you select “By business use of vehicle,” then enter the estimated percentage of business miles for the tax year into the “Enter business-use percentage” field. If you select “By recording odometer readings,” then enter the odometer’s starting and ending values into the adjacent fields for the tax year’s start and end dates. Alternatively, if you select “By entering the total miles,” then enter the total miles driven in the year into the adjacent field. To then save the vehicle, click the “Save” button in the lower-right corner of the pane to return to the “Manage vehicles” pane.
How to Edit, Inactivate, and Activate Vehicles:
The “Manage vehicles” pane shows the vehicles you added. To edit a vehicle, click it in the “Manage vehicles” pane to show its details again, edit the vehicle’s information in the “Edit vehicle” pane that appears, and click the “Save” button again to save your changes. To deactivate a vehicle, click the “Vehicle no longer in use” button in its “Edit vehicle” pane. Doing this moves it to a separate “Inactive” list below the vehicle list in the “Manage vehicles” pane. To reactivate it, click it to open its “Edit vehicle” pane and then click the “Activate” button at the bottom of the pane. To close the “Manage vehicles” pane when finished, click the “X” button in its upper-right corner to return to the “Mileage” page.
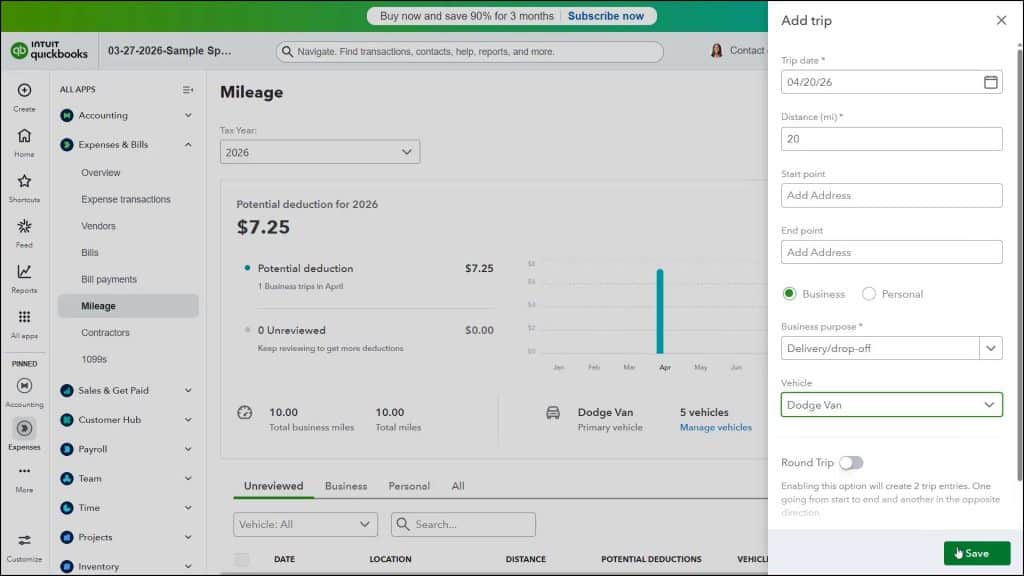
How to Manually Add a Trip:
To manually create a trip in QuickBooks Online, click the “Add Trip” button in the upper-right corner of the “Mileage” page to open the “Add trip” pane at the right side of the window. In this pane, select the trip’s date from the “Trip date” calendar drop-down. Enter the trip’s distance in miles into the “Distance” field. Alternatively, to enter distance by selecting a starting and ending address, type the starting address into the “Start point” field and then select it from the drop-down menu. Then type the ending address into the “End point” field and then select it from the drop-down menu.
Select whether the trip was for business or personal use by clicking the correct option button. To enter a trip description for business trips, type it into the “Business purpose” field or select a choice from the field’s drop-down. Then select the vehicle you used from the “Vehicle” drop-down. To create a round trip, click to toggle the “Round Trip” toggle switch to the “On” position. To save the trip, click the “Save” button in the lower-right corner of the pane. Alternatively, to cancel the trip, click the “X” button in the upper-right corner of the pane.
How to Review and Edit Trips in QuickBooks Online:
Trips you enter appear in the “Mileage” page. Underneath the graph within the page are tabs for “Unreviewed,” “Business,” “Personal,” and “All” that you can click to see the associated types of trips. To edit a trip you entered, click it to open its “Trip Details” pane, make your changes, and then click the “Save” button in the pane. Alternatively, to delete the trip, click the “Delete” button at the bottom of the “Trip Details” pane.
To perform batch actions on trips, check the checkboxes to the left of the trips to select within the desired tab. Then click the desired button in the black toolbar that appears above the list of trips and, if needed, enter any information that is required in the prompt window that opens or click the green “Apply” button at the right end of the toolbar. These buttons are “Mark as business,” “Edit purpose” for business trips, “Mark as personal,” “Change vehicle,” and “Delete.”


