How to Invoice from an Estimate in QuickBooks Online
How to Invoice from an Estimate in QuickBooks Online: Video
This video lesson, titled “How to Invoice from an Estimate in QuickBooks Online,” shows you how to convert an estimate into an invoice in QuickBooks Online and how to perform progress invoicing, if needed. This video lesson is from our complete QuickBooks Online tutorial, titled “Mastering QuickBooks Online Made Easy.”
Overview:
To most easily transfer information from an estimate to an invoice in QuickBooks Online, the estimate’s status should be “Accepted.” It cannot be “Closed.” It must also be saved and cannot have already been fully invoiced. If using QuickBooks Payments with estimates, customers can accept estimates in the forms you send, which changes their status.
How to Manually Change an Estimate’s Status:
Alternatively, to manually change an estimate’s status, open the estimate and then use the drop-down towards the top of the pane that appears at the right side of the window to change its status. To show this pane if you don’t see it, click the “Manage” button in the toolbar of the estimate window. If needed, enter who accepted the estimate into the “Accepted by” field in the fields at the top of the actual estimate form and then enter the date the estimate was accepted into the “Accepted date” field. Then save your changes.
How to Enable Progress Invoicing, if Needed:
Also, if you want to send progress invoices or partial invoices from an estimate in QuickBooks Online, first make sure to enable progress invoicing in the QuickBooks Online company file. To enable progress invoicing in QuickBooks Online, if needed, click the “Settings” button in the QuickBooks Online toolbar and then select the “Account and settings” link under the “Your Company” heading in the drop-down menu to open the “Settings” window. Then click the “Sales” category in the menu at the left side of the window. Then click into the “Progress Invoicing” section to the right to activate it. Then click the “Create multiple partial invoices from a single estimate” toggle switch to set it to the “On” position. Then click the “Save” button at the bottom of the section. Finally, click the “Done” button at the bottom of the window to close it.
Note that if you create a new progress invoicing custom form style of your own, only the “Airy new” custom form style template works with progress invoicing by letting you check the “Show progress on line items” checkbox under the “Show more activity options” settings when customizing the line items section on the “Content” tab when customizing a form style, as shown in a previous lesson.
How to Convert an Estimate to an Invoice:
To invoice from an accepted estimate in QuickBooks Online, click the “Estimates” link under the “Customer Hub” app in the “All apps” bar to open the “Estimates” page. Then find the estimate to convert into an invoice in the “Estimates” list and click its “Convert to invoice” link under its “Action” column.
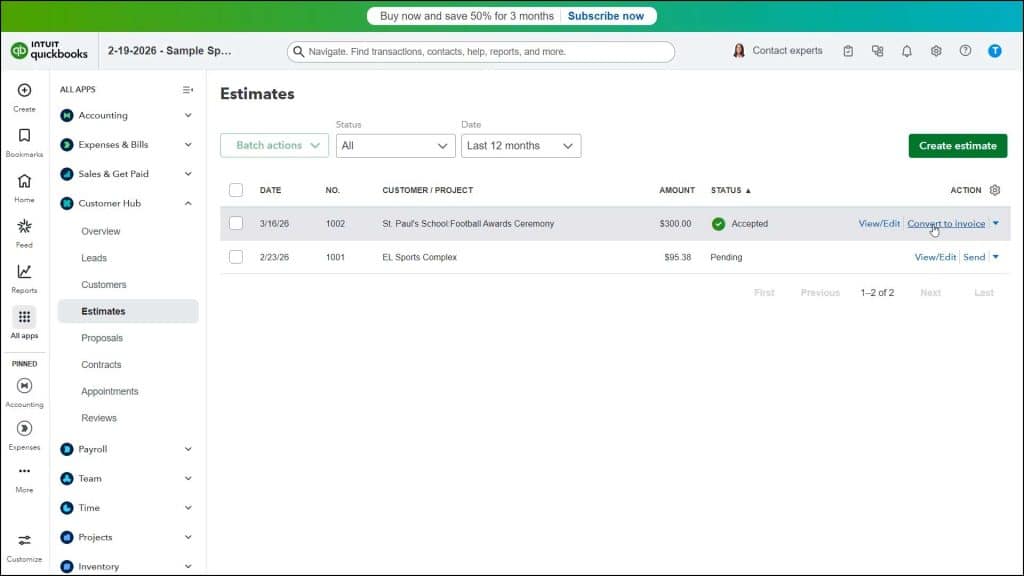
If you have the default full invoicing from estimates enabled in QuickBooks Online, the program then converts the estimate into an invoice and shows it within the window. To see the linked estimate in the new invoice window, click the link for the estimate, which appears below the “Invoice” title in this window to show the estimate number and a “Remove” button in a drop-down menu. If needed, to remove the estimate, click the “Remove” button. After converting the invoice, you can then send it, as usual.
How to Convert an Estimate to Progress Invoices:
Alternatively, if you enabled progress invoicing, a “How much do you want to invoice?” window instead opens after you click the “Convert to invoice” link. In this window, select the option button that corresponds to the quantity of the estimate to invoice. To invoice for the full or remaining line item estimate amounts, select the “Remaining total of all lines” option.
Alternatively, to invoice for a percentage or amount of the total line items from the estimate, select the “Percentage or amount” option button. Then enter the percentage of each line to invoice into the “Percentage” field that appears or enter the total amount to bill into the “Invoice amount” field that appears. However, only enter a value into one of these two fields, as the other recalculates automatically.
Alternatively, to invoice a custom amount for each line item from the estimate, select the “Manual entry for each line” option button. After making your selection, then click the “Create invoice” button in this window.
The new invoice window opens and shows the line item amounts to bill from the estimate. To enter the individual line item amount to invoice if you selected the “Custom amount for each line” option, click into the “Due” column for each line item to bill. Then click the “Percent/Amount” toggle switch to set it to the desired choice. Then enter either the amount or percentage of that line item to bill into the adjacent field.
How to Select a Progress Invoice Custom Form Template, if Needed:
If needed, to select your progress invoice template, click the “Design” section in the “Manage” pane at the right side of the invoice and select the progress invoice custom form template. However, you’ll only need to do this if you didn’t set the progress invoice custom form template as your default invoice template choice. Finally, save and send the invoice, as usual. You later repeat this process of creating progress invoices in the future to invoice for the remaining estimate amounts, as needed.


