How to Manage Custom Form Styles in QuickBooks Online
How to Manage Custom Form Styles in QuickBooks Online: Video
This video lesson, titled “How to Manage Custom Form Styles in QuickBooks Online,” shows you how to manage custom form styles in QuickBooks Online. This video lesson is from our complete QuickBooks Online tutorial, titled “Mastering QuickBooks Online Made Easy.”
Overview:
How to Open the Custom Form Styles Page to Manage Custom Form Styles:
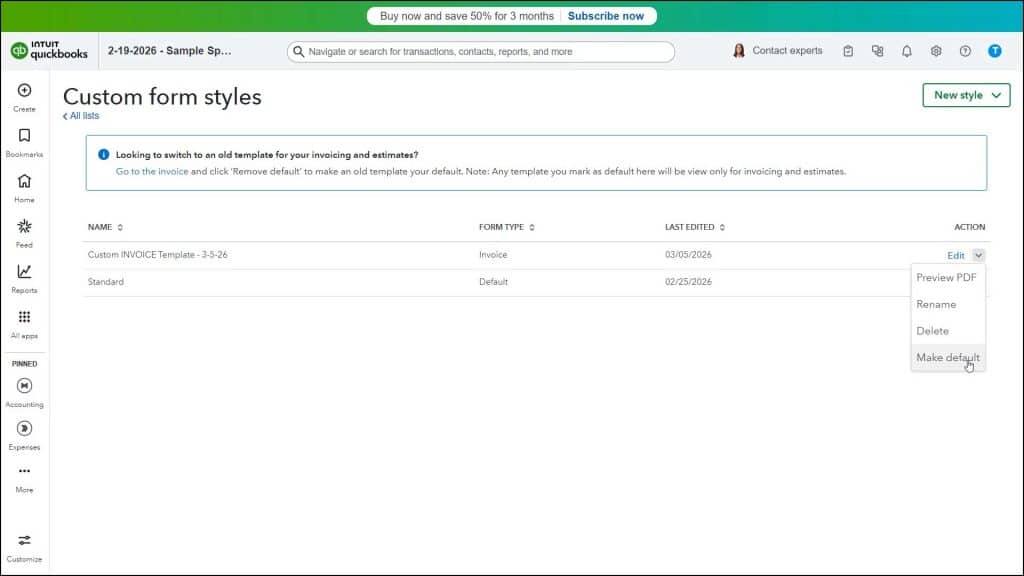
After creating custom form styles in QuickBooks Online, they appear in the list within the “Custom form styles” page. After you create a new custom form style in QuickBooks Online, you can refresh the page to show the new custom form style in the list, if needed. To manage the custom form styles in QuickBooks Online, use the commands available within the “Action” column.
About Form Template Defaults:
The “Custom form styles” list contains a “Standard” form style of the “Default” form type. This means that this form style is the default form style for any sales forms that don’t use the “Modern” form template, like the “Sales Receipt,” for example. It also means it is the default form style applied to invoices or estimates if you disable the “Modern” template and don’t set a different form-specific default custom form style.
How to Disable the Modern Template and Apply a Different Custom Form Style Default:
To disable the “Modern” template default for invoices and estimates in QuickBooks Online, open a new “Invoice” or “Estimate” window and then click the “Remove default” link in the “Modernized template” section in the “Design” section of the “Manage” pane. Note that if you later want to re-enable the “Modern” template, return here and click the “Make default” link that then appears. To then make a different custom form style the default for its form type in QuickBooks Online, open the “Custom form styles” list and then click the drop-down arrow for its “Action” column and select the “Make default” command.
How to Delete Custom Form Styles:
To delete a custom form style in QuickBooks Online, click the drop-down arrow for its “Action” column and then select the “Delete” command. Then click the “Delete” button in the confirmation window that opens to finish deleting it or click the “Cancel” button to keep it. To edit a form style, click the “Edit” link under its “Action” column.
How to Preview and Rename Custom Form Styles:
To preview a form style’s PDF, click the drop-down arrow for its “Action” column and then select the “Preview PDF” command. Doing this opens a PDF preview of the form in a new window. You can close this window after viewing it. To rename a form style, click the drop-down arrow for its “Action” column and then select the “Rename” command. Doing this opens a small window where you can type a new form name into the “Rename your template” field that appears. Then click the “OK” button to finish renaming it or click the “Cancel” button to cancel renaming the form.


