How to Pay Your Sales Tax Agencies in QuickBooks Online
How to Pay Your Sales Tax Agencies in QuickBooks Online: Video
This video lesson, titled “How to Pay Your Sales Tax Agencies in QuickBooks Online,” shows you how to pay sales tax in QuickBooks Online. This video lesson is from our complete QuickBooks Online tutorial, titled “Mastering QuickBooks Online Made Easy.”
Overview:
Open the Sales Tax Returns Page:
To remit sales tax payments to a tax agency if using the automatic sales tax feature in QuickBooks Online, click the “Sales tax returns” link under the “Sales Tax” app in the “All apps” bar to open the “Sales tax returns” page. The “Sales tax returns” page shows a list of sales tax returns for selected sales tax return statuses, selected sales tax periods, and selected sales tax agencies. To filter the list of sales tax returns by status, select a status from the “Status” drop-down. To filter the list of returns by tax period, select a period from the “Tax period” drop-down. To filter the returns by tax agency, use the “Agency” drop-down.
Review the Sales Tax Return to Pay:
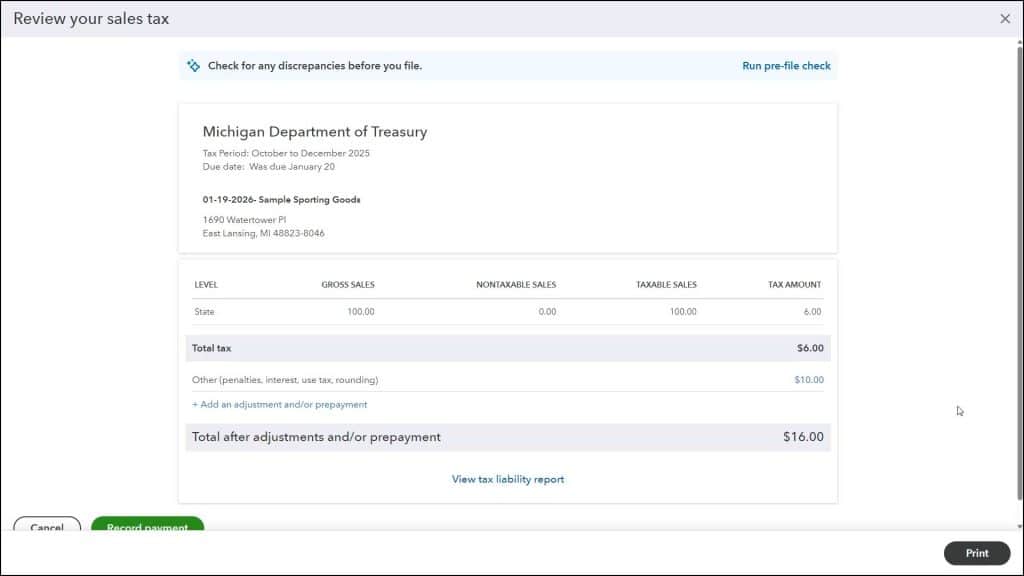
To show the sales tax return information with instructions on how to pay the sales tax return, click the “View summary” link at the right end of the desired sales tax return in this list. In the “Review your sales tax” window that opens, follow the instructions for the sales tax agency to make the payment in real life and then record the payment in QuickBooks.
If Needed, Make Any Sales Tax Adjustments:
To add a sales tax adjustment in this window, click the “+ Add an adjustment and/or prepayment” link to open the “Add an adjustment” pane at the right side of the window. Select the reason for the sales tax adjustment from the “Reason” drop-down. Select the date of the adjustment from the “Adjustment date” calendar drop-down.
Select the account affected by the adjustment from the “Account” drop-down. Then enter the amount of the adjustment into the “Amount” field. You can enter a positive or negative amount, as needed, to reflect if the adjustment increases or decreases the sales tax owed. You can enter a memo, if needed, into the “Memo” field. Then click the “Add” button in the lower-right corner of the pane to add the adjustment. You can repeat this, as needed, to add any additional adjustments you require to the sales tax payment.
If Needed, to Delete an Incorrect Sales Tax Adjustment:
If needed, to delete an incorrectly added sales tax adjustment you made before you pay the sales tax, click its dollar amount entry in the “Review your sales tax” window to open the “View adjustment” window, which shows the sales tax adjustment information. Then click the “Delete” button in the lower-right corner of the window to open a confirmation prompt window. To continue to delete the sales tax adjustment, click the “Delete” button in the prompt. Otherwise, click the “Cancel” button. If needed, then click the “X” button in the upper-right corner of the “View adjustment” window to close it and return to the “Review your sales tax” window.
Record the Sales Tax Payment:
To record the sales tax payment, click the “Record payment” button in the “Review your sales tax” window to open the “Record payment” window. If you haven’t already, follow the instructions shown to pay the sales taxes in real life.
To then record the payment in QuickBooks Online, ensure the amount shown in the “Tax amount” field is correct. Then select the date of the payment from the “Payment date” calendar drop-down. Then select from which bank account to make the payment by selecting a bank account from the “Bank account” drop-down. To add a memo to the payment, type the memo text into the “Memo” field.
To print a check when you record the payment, check the “Print check” checkbox. Then click the “Record payment” button to finish and record the sales tax payment. To view the sales tax return information in the future, if needed, just click the “View summary” link for the sales tax return in the “Sales tax returns” page to reopen it.


