How to Record a Bank Deposit in QuickBooks Online
How to Record a Bank Deposit in QuickBooks Online: Video
This video lesson, titled “How to Make Deposits in QuickBooks Online,” shows you how to manually record a bank deposit in QuickBooks Online. This video lesson is from our complete QuickBooks Online tutorial, titled “Mastering QuickBooks Online Made Easy.”
Overview:
About Receiving Customer Payments into a Payments to Deposit or Undeposited Funds Account
When manually recording a customer payment in QuickBooks Online using the “Receive Payment” window, you choose into which account to deposit the funds received by using the “Deposit to” drop-down. Often, if receiving funds outside of QuickBooks Payments, the amounts are deposited into a “Payments to deposit” or “Undeposited Funds” account.
How to Manually Record a Deposit of Customer Payments to a Bank Account
If needed, to then manually record a deposit of funds from this account into a bank account, like your company’s checking or savings account, hover over the “+ Create” button in the Navigation Bar and then click the “Bank deposit” link under the “Other” heading in the drop-down menu to open the “Bank Deposit” window.
Select the Bank Account into Which to Deposit the Funds and the Deposit Date
Then select the bank account into which to deposit the funds from the “Account” drop-down in the upper-left corner of the window. Enter the date of the bank deposit into the adjacent “Date” field. If you have locations enabled in QuickBooks Online, you can use the “Show payments for this location:” drop-down to show funds received from a specific location within the “Select the payments included in this deposit” section below, if needed. The default drop-down value is the “All Locations” choice.
Select the Customer Payments to Include in the Bank Deposit:
The “Select the payments included in this deposit” list shows all received payments waiting for deposit. This list has the column headings “Received From,” “Date,” “Type,” “Payment Method,” “Memo,” “Ref No.” and “Amount.”
The “Received From” column shows from whom the payment was received. The “Date” column shows the date the payment was received. The “Type” column shows within which transaction window the amount was entered into QuickBooks Online. The “Payment Method” column shows what type of payment it is. The “Memo” column shows any “Memo” field information. The “Ref No.” column shows the payment’s reference number, if applicable. The “Amount” column shows the payment amount.
To select the payments to record in this bank deposit, check the checkboxes to the left of the items in the “Select the payments included in this deposit” list. To mark all items for deposit, click the “Select all” button at the bottom of the list. To clear all marked items, click the “Clear all” button. In the lower-right corner of the list, the “Total” line shows the total amount of funds in the list. The “Selected Payments Total” shows the total amount of checked list items.
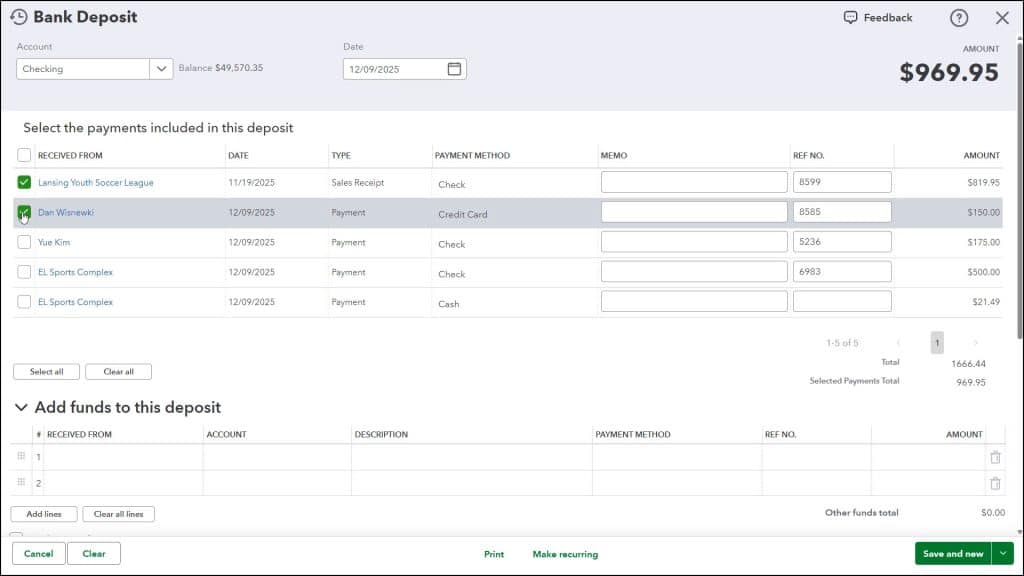
Optionally, Add Any Additional Funds to Record in the Deposit
The “Add funds to this deposit” list lets you add funds not recorded by other transactions in QuickBooks. For example, if a company’s owner wanted to record funds given to the company along with the payments received in a single deposit, they could enter the owner’s contribution here. The columns in this list are “Received From,” “Account,” “Description,” “Payment Method,” “Ref No.” and “Amount.” If classes are enabled, a “Class” column also appears.
When creating a new deposit amount, first select the name of the customer, vendor or employee who provided the funds from the “Received From” column. Then use the “Account” column to choose from which account the funds are coming. For example, if recording an owner’s contribution to the company as part of the total deposit, you would select the “Owner’s Contributions” equity account.
Then enter a description for the amount into the “Description” column. Select the type of payment from the “Payment Method” drop-down. If needed, enter a reference number for the amount into the “Ref No.” column. Then enter the amount to deposit for the line item into the “Amount” column.
You can also use the “Add lines” and “Clear all lines” buttons below this section to add more lines to the list or clear all the information from the lines in the list. Checking the “Track returns for customers” checkbox adds “Billable,” “Tax,” and “Customer” columns to the list to help you track returns for customers. The “Other funds total” for this section appears in the lower-right corner of this list.
Optionally, Enter Any Memos or Attachments
To enter a note about the deposit, type it into the “Memo” field in the lower-left corner of the window. You can also use the “Attachments” field in this area to attach a file to the deposit, if desired.
Optionally, Record Any Cash Back from the Deposit
To keep cash back from this deposit to put into an account like “Petty cash,” use the “Cash back goes to” drop-down to select the account. Then enter a reason for holding the cash back into the “Cash back memo” field. Then enter the amount to hold as cash back into the “Cash back amount” field.
Save and/or Print the Bank Deposit
The buttons in the toolbar at the bottom of this window let you manage the entire deposit. To cancel the deposit, click the “Cancel” button. To clear the deposit window, click the “Clear” button. To save the deposit and print a deposit slip and summary or summary only, click the “Print” button and then select either “Print deposit slip and summary” or “Print deposit summary only,” as desired. Note that the deposit is not saved until you select either one of the commands.
Alternatively, to close the deposit and configure your printer to properly print your deposit slips, click the “Setup and alignment” command in this same menu to close the deposit and open a separate window that lets you configure the printing of the deposit slips. Back in the toolbar of the “Bank Deposit” window, clicking the “Make recurring” button lets you create a recurring deposit, which is rarely needed for most companies.
At the right end of the toolbar is a drop-down button with a “Save and new” or “Save and close” command option. Either click the button to perform the current choice shown or click the drop-down arrow and then select the alternate choice from the pop-up menu. Selecting “Save and new” saves the current deposit and opens a new deposit window. Selecting “Save and close” saves the deposit and closes the window.
After saving a bank deposit, a “More” button then appears in this toolbar that you can click to show a menu of choices from which you can select. In this menu, you can select “Delete,” to delete the deposit, “Transaction journal,” to open a transaction journal for the deposit, or “Audit history” to view the audit history of the deposit.


