Recovery Settings in Windows 11- Instructions
Recovery Settings in Windows 11: Video
This video lesson, titled “Recovery Settings in Windows 11,” shows the recovery settings in Windows 11. This video lesson is from our complete Windows 11 tutorial, titled “Mastering Windows Made Easy v.11.”
Overview of the Recovery Settings in Windows 11:
To access the recovery settings in Windows 11, open the “Settings” app window. Then click the “System” button at the left side of the screen to show your device’s system settings. Then click the “Recovery” category in the right pane of the window to show the recovery settings for Windows 11 in the right pane.
Since recovering your computer is an extreme solution to fix a malfunctioning Windows 11 installation, Windows 11 provides a shortcut to first run some troubleshooters to see if they can fix your issue. To view the troubleshooters, click the “Fix problems without resetting your PC” setting link to view the “Troubleshoot” settings. To return to the “Recovery” settings from this screen, click the “Back” button in the upper-left corner of the “Settings” window.
To reset your PC, if needed, click the “Reset PC” button in the “Reset this PC” setting. When you reset the PC, you can choose to keep or remove personal files, and then let Windows reinstall the operating system from a cloud copy or from media provided from your hardware manufacturer. There are many other options available, too, depending on your selected choices. Select the desired reset options in the “Reset this PC” wizard that appears after clicking the button to finish resetting your PC.
If you just upgraded to Windows 11 and want to go back to a previous version of Windows, click the “Go back” button in the “Go back” setting to return to your previous operating system. You must exercise this option within 10 days of the upgrade. If this button appears “grayed out” then that option is no longer available. If you click the “Go back” button to return to the previous version, follow the onscreen prompts that then appear to complete the downgrade.
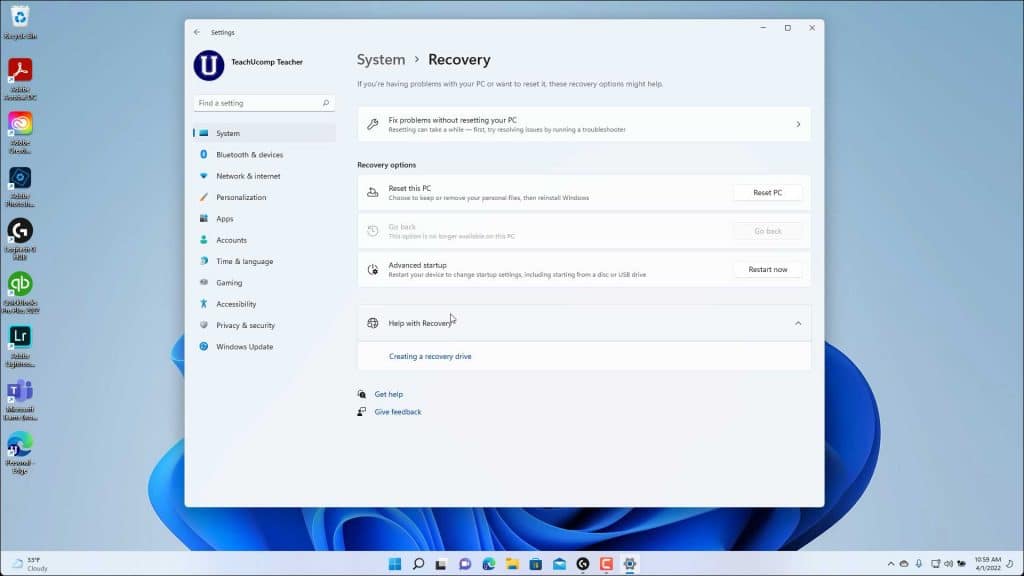
A picture of the Recovery settings in Windows 11.
To change the advanced Windows 11 startup settings, which let you access many of the advanced startup options like Startup Repair, Startup Settings, and System Restore, among others, click the “Restart now” button in the “Advanced startup” setting. Then click the “Restart now” button again to log out of Windows and restart it in its advanced startup state. After Windows 11 reboots, then select your desired options in the advanced startup state that appears to finish. To close the “Settings” app window after examining the “Recovery” settings if you didn’t access any of them, click the “X” button in its upper-right corner.
Instructions on How to Use the Recovery Settings in Windows 11:
- To access the recovery settings in Windows 11, open the “Settings” app window and click the “System” button at the left side of the screen to show the system settings for your device.
- Then click the “Recovery” category in the pane at the right side of the window to show the recovery settings for Windows 11 in the right pane.
- Since recovering your computer is an extreme solution to fix a malfunctioning Windows 11 installation, Windows 11 provides a shortcut for you to first run some troubleshooters to see if they can resolve your issue.
- To view the troubleshooters, click the “Fix problems without resetting your PC” setting link to view the “Troubleshoot” settings.
- To return to the “Recovery” settings from this screen, click the “Back” button in the upper-left corner of the “Settings” window.
- To reset your PC, if needed, click the “Reset PC” button in the “Reset this PC” setting.
- When you reset the PC, you can choose to keep or remove personal files, and then let Windows reinstall the operating system from a cloud copy or from media provided from your hardware manufacturer. There are many other options available, too, depending on your selected choices.
- Select the desired reset options in the “Reset this PC” wizard that appears after clicking the button to finish resetting your PC.
- If you just upgraded to Windows 11 and want to go back to a previous version of Windows, click the “Go back” button in the “Go back” setting to return to your previous operating system. You must exercise this option within 10 days of the upgrade. If this button appears “grayed out” then that option is no longer available.
- If you click the “Go back” button to return to the previous version, follow the onscreen prompts that then appear to complete the downgrade.
- To change the advanced Windows 11 startup settings, which let you access many of the advanced startup options like Startup Repair, Startup Settings, and System Restore, among others, click the “Restart now” button in the “Advanced startup” setting.
- Then click the “Restart now” button again to log out of Windows and restart it in its advanced startup state.
- After Windows 11 reboots, then select your desired options in the advanced startup state that appears to finish.
- To close the “Settings” app window after examining the “Recovery” settings if you didn’t access any of them, click the “X” button in its upper-right corner.