Sales Tax Agencies in QuickBooks Online
How to Add, Edit, and Inactivate Sales Tax Agencies in QuickBooks Online: Video Lesson
This video lesson, titled “How to Add, Edit, and Inactivate Sales Tax Agencies in QuickBooks Online,” shows you how to manage sales tax agencies in QuickBooks Online. This video lesson is from our complete QuickBooks Online tutorial, titled “Mastering QuickBooks Online Made Easy.”
Sales Tax Agencies in QuickBooks Online: Overview
After you initially set up your sales tax in QuickBooks Online, you can then then add, edit, or inactivate your sales tax agencies in QuickBooks Online, if needed.
Checking Your Economic Nexus in QuickBooks Online:
One reason you may need to set up additional sales tax agencies in QuickBooks Online is if you create an economic nexus between your company and the residents of a specific geographic area based on meeting a specified sales volume threshold. Assuming you track all your sales data in QuickBooks Online, you can check for an economic nexus by clicking the “Economic nexus” link under the “Sales Tax” app in the “All apps” bar to open the “Economic nexus” page. This page lists any sales tax agencies you have set up or may need to set up based on your sales volumes recorded in QuickBooks Online.
How to Add, Edit, and Inactivate Additional Sales Tax Agencies in QuickBooks Online:
If you need to add an additional sales tax agency in QuickBooks Online, click the “Sales tax settings” link under the “Sales Tax” app in the “All apps” bar to open a “Sales tax settings” page that lists the existing sales tax agencies.
How to Turn Off Sales Tax in QuickBooks Online:
If needed, to completely turn off sales tax in QuickBooks Online, click the “Turn off sales tax” button towards the upper-right corner of the “Sales tax settings” page. Then click the “Turn off” button in the confirmation window that opens to finish.
To Add a New Sales Tax Agency:
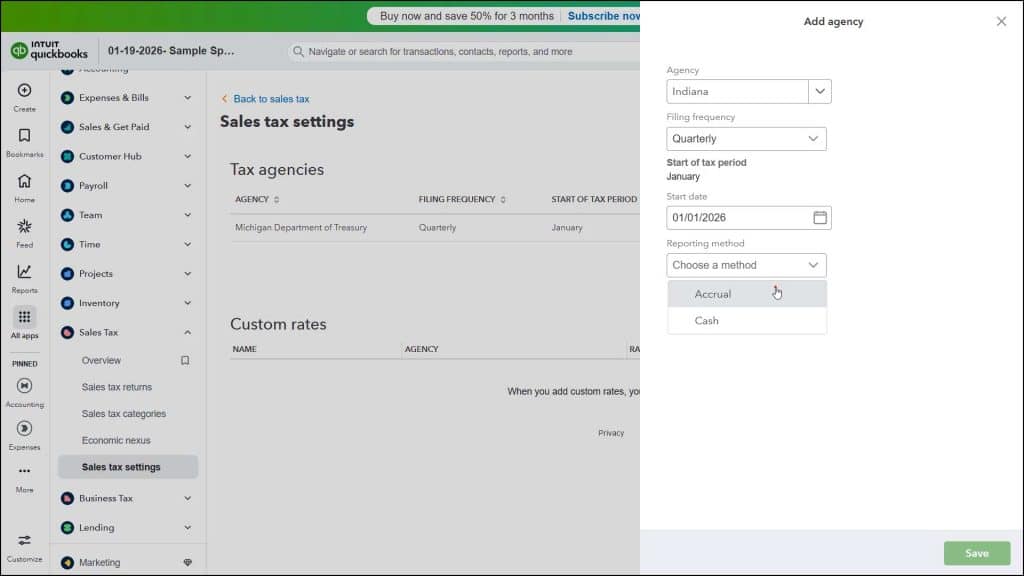
To add a new sales tax agency, click the “Add agency” button above the “Tax agencies” section to open an “Add agency” pane at the right side of the window. Use the “Agency” drop-down to select the name of the sales tax agency. Then use the “Filing frequency” drop-down to choose how often you must file with the selected tax agency. Then select the start date of the sales tax tracking for this agency from the “Start date” calendar drop-down.
To set the reporting method to use for tracking sales tax for that agency, select a choice from the “Reporting method” drop-down. When finished, click the “Save” button at the bottom of this pane to save the agency. Alternatively, to cancel creating the agency, click the “X” button in the upper-right corner of the pane.
To Edit a Sales Tax Agency:
To edit the information for an existing tax agency, click the “Edit” link under the “Action” column for the sales tax agency to edit in the “Tax agencies” section of the “Sales tax settings” page to open its details in a pane at the right side of the screen. Change its “Filing frequency,” “Start date,” and/or “Reporting method,” as needed, and then click the “Save” button at the bottom of the pane to save your changes.
To Inactivate or Reactivate a Sales Tax Agency:
Alternatively, to make the agency inactive, click the “Make inactive” button in the bottom of this pane and then click the “Make inactive” button in the confirmation window that opens to stop collecting tax for the agency, if needed.
Alternatively, you can also inactivate a sales tax agency by clicking the drop-down in the “Action” column of the “Tax agencies” section of the “Sales tax settings” page for the tax agency, selecting the “Make inactive” command from the drop-down menu, and then clicking the “Make inactive” button in the confirmation window that opens. To reactivate an inactive tax agency, if needed, click the “Make active” link under the “Action” column for the sales tax agency to reactivate.


