The Attachments List in QuickBooks Online
How to Use the Attachments List in QuickBooks Online: Video
This video lesson, titled “How to Use the Attachments List in QuickBooks Online,” shows you how to manage file attachments by using the Attachments list in QuickBooks Online. This video lesson is from our complete QuickBooks Online tutorial, titled “Mastering QuickBooks Online Made Easy.”
Overview:
How to Open the Attachments List:
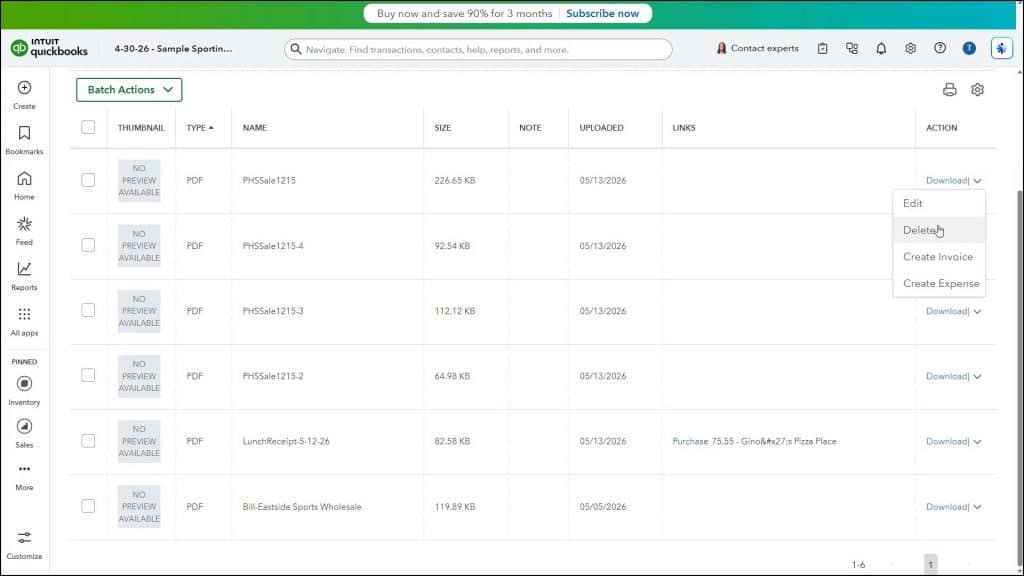
The attachments list in QuickBooks Online shows all the attachments uploaded to your company file. To show the attachments list in QuickBooks Online, click the “Settings” button in the QuickBooks Online toolbar and then click the “Attachments” link under the “Lists” heading in the menu that appears to open the “Attachments” page. The attachments list in this page shows the information for each attachment file and lets you manage them.
How to Add New Attachments in the Attachments List:
To add new attachments, click the “Add attachment” link in the section above the list and then use the dialog box that opens to select the file to attach or click and drag a file onto this same section in the list page.
How to View Linked Transactions:
The attachments list shows the “Thumbnail,” “Type,” “Name,” “Size,” “Note,” “Uploaded,” “Links,” and “Action” columns. The “Links” column contains a link to the transaction associated with the attachment, if available. Clicking the link opens the transaction.
How to Download an Attachment:
The “Action” column contains the “Download,” “Edit,” “Delete,” “Create invoice” and “Create expense” commands. To download an attachment, click the “Download” link under its “Action” column. For images, this opens the image in a separate browser window, where you can then download it using your web browser.
How to Download Multiple Attachments at Once:
Alternatively, to download multiple attachments within a zip file to your computer, check the checkboxes to the left of the names of the attachments in the attachments list to download. Then click the “Batch actions” drop-down button above the attachments list and select the “Export” command from its drop-down menu to download the selected attachments as a zip file to your computer using your browser’s downloading functionality.
How to Edit an Attachment’s Values:
To edit an attachment, click the drop-down under its “Action” column and then select the “Edit” command to open an “Edit Attachment” window. In this window you can change the file name of the attachment or add notes by changing the values in the “File Name” and “Note” fields. Then click the “OK” button in this window to save your changes, if needed.
How to Delete an Attachment:
To delete an attachment, click the drop-down under its “Action” column and then select the “Delete” command. Then click the “OK” button in the confirmation window that opens to finish.
How to Create and Associate an Invoice with an Attachment:
To create an invoice and add the attachment into its “Attachments” field, click the drop-down under the attachment’s “Action” column and then select the “Create invoice” command to open an “Invoice” window. The selected attachment should already appear in the window’s “Attachments” field. Then fill out the remainder of the invoice, as usual, and save it.
How to Create and Associate an Invoice with Multiple Attachments:
Alternatively, to attach multiple attachments to an invoice, check the checkboxes to the left of the attachments to add to the invoice, click the “Batch actions” drop-down button above the attachments list, and then select the “Create invoice” command from the drop-down menu to add multiple, selected attachments to a new invoice. Then fill out the remainder of the invoice, as usual, and save it.
How to Create and Associate an Expense with an Attachment:
To create an expense and add the attachment into its “Attachments” field, click the drop-down under the attachment’s “Action” column and then select the “Create expense” command to open an “Expense” window. The selected attachment should already appear in the window’s “Attachments” field. Then fill out the remainder of the expense, as usual, and save it.
How to Create and Associate an Expense with Multiple Attachments:
Alternatively, to attach multiple attachments to an expense, check the checkboxes to the left of the attachments to add to the expense, click the “Batch actions” drop-down button above the attachments list, and then select the “Create expense” command from the drop-down menu to add multiple, selected attachments to a new expense. Then fill out the remainder of the expense, as usual, and save it.


