The Recurring Transactions List in QuickBooks Online
How to Use the Recurring Transactions List in QuickBooks Online: Video
This video lesson, titled “How to Use the Recurring Transactions List in QuickBooks Online,” shows you how to manage recurring transactions within the Recurring Transactions list in QuickBooks Online. This video lesson is from our complete QuickBooks Online tutorial, titled “Mastering QuickBooks Online Made Easy.”
Overview:
How to Open the Recurring Transactions List:
After saving recurring transactions in QuickBooks Online, you can easily change the saved recurring transactions without affecting any previously created transactions. The changes are only applied to future transactions you create. To view your recurring transactions in QuickBooks Online Plus, click the “Settings” button in the QuickBooks Online toolbar and then click the “Recurring transactions” link under the “Lists” heading to open the “Recurring Transactions” page.
How to Create a New Recurring Transaction in QuickBooks Online:
To create a new recurring transaction in this page, click the “New” button in the upper-right corner of the page to open a “Select Transaction Type” window. Select the type of recurring transaction to create from the “Transaction Type” drop-down in the “Select Transaction Type” window. Then click the “OK” button in the window to open a new recurring transaction window for the selected type of transaction.
Enter the template name and set the pattern of recurrence at the top of the recurring transaction template window that then opens. Enter the information to save as part of the recurring transaction template below that. This information changes, depending on the type of transaction you are creating. To save it, then click the “Save template” button in the toolbar in the lower-right corner of the recurring transaction window.
How to Filter the Recurring Transactions List:
To filter the recurring transactions list, click the “Filter” button in the upper-left corner of the page to show a drop-down menu. Then use the “Template Type” and “Transaction Type” drop-downs in the drop-down menu to apply your desired filters. To apply the filter after entering the desired filtering criteria, click the “Apply” button in this drop-down menu. To clear an individual filter after applying it, click the filter’s name in the list of filters to the right of the “Filter” drop-down. Alternatively, to clear all applied filters, click the “Clear filter / View All” link to the right of the “Filter” drop-down.
How to Print the Recurring Transactions List or Change the Number of Rows Shown per Page:
To print the recurring transactions list, click the “Print list” button in the upper-right corner of the list to open a new page or tab with a printer-friendly view of the list. Your web browser’s “Print” dialog box also opens, letting you easily print the list. You can close this new web page or tab when you are done printing it. To change the number of rows shown per page in the list, click the “Settings” button in the upper-right corner of the list and then select a choice from the “Rows” drop-down that appears.
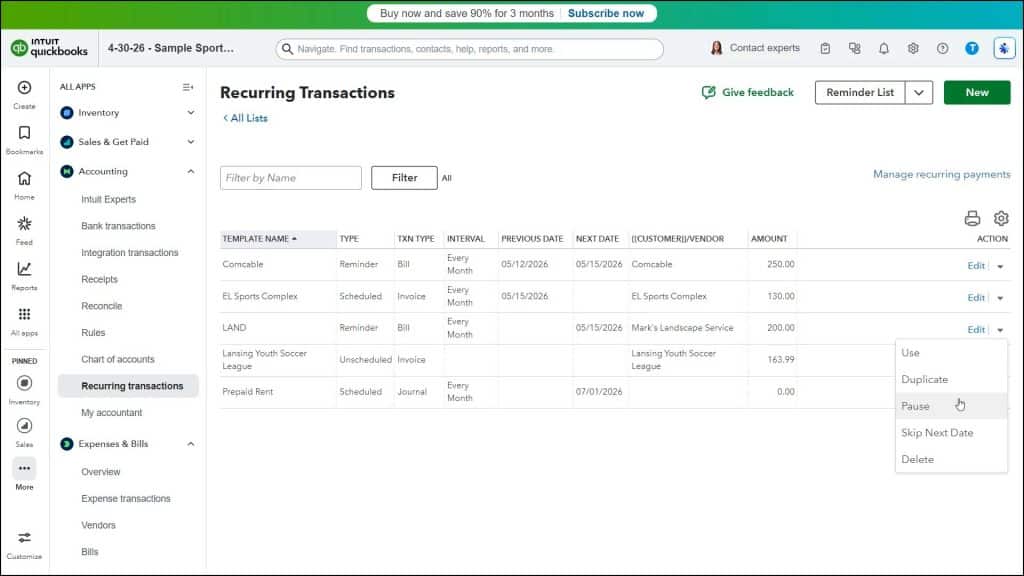
How to Perform Actions on Saved Recurring Transactions:
To perform an action on a saved recurring transaction, look under its “Action” column and then either click a command or click the drop-down arrow and select a command. To edit a recurring transaction, click the “Edit” command under its “Action” column. Then make your changes and save them by clicking the “Save Template” button in the window that opens. Alternatively, to use a saved recurring template to create a new transaction, select the “Use” command from the drop-down under its “Action” column.
To duplicate a saved recurring transaction, select the “Duplicate” command from the drop-down under its “Action” column. Then make your changes, enter a new recurring transaction name in the new window that appears, and click the “Save template” button to save it. To delete a recurring transaction, select the “Delete” command from the drop-down under its “Action” column. Then click the “Yes” button in the confirmation window that opens to confirm its deletion.
To pause a recurring transaction, if available for the type of recurring transaction, select the “Pause” command from the drop-down under its “Action” column. Then click the “Pause” button in the confirmation window that appears. This disables the recurring transaction. To resume a paused recurring transaction, select the “Resume” command from the drop-down under its “Action” column. Then click the “Resume” button in the confirmation window that appears to re-enable it.
To skip the next date for a recurring transaction, if available, select the “Skip Next Date” command from the drop-down under its “Action” column. Then click the “Skip next date” button in the confirmation window that appears to skip the next instance of the recurring transaction.