How to Create a Project in QuickBooks Online
How to Create a Project in QuickBooks Online: Video
This video lesson, titled “How to Create Projects in QuickBooks Online Plus,” shows you how to create a project in QuickBooks Online. This video lesson is from our complete QuickBooks Online tutorial, titled “Mastering QuickBooks Online Made Easy.”
Overview:
What Are Projects in QuickBooks Online Plus or Higher?
Projects in QuickBooks Online Plus or higher provide job costing features to help you track income and expenses for projects you complete for customers. Projects allow you to see this information in a single location to track income and expenses by project and run project reports.
How to Enable Projects in QuickBooks Online Plus or Higher:
To enable projects in your company file’s settings in QuickBooks Online, if needed, click the “Settings” button in the QuickBooks Online toolbar and then select the “Account and settings” command under the “Your Company” heading in the menu that appears to open the “Settings” window. Then click the “Advanced” button in the menu at the left side of the window.
Then click the “Projects” section to the right to activate its settings. Click the “Organize all job-related activity in one place” toggle switch to set it to the “On” position and then click the “Save” button at the bottom of the section to save your change. Then click the “Done” button at the bottom of the “Settings” window to close it.
How to Create a New Project:
To view your projects in QuickBooks Online Plus or higher, click the “Projects” link under the “Projects” app in the “All apps” bar to open the “Projects” page. To create a new project, click the “New project” button in the upper-right corner of the page.
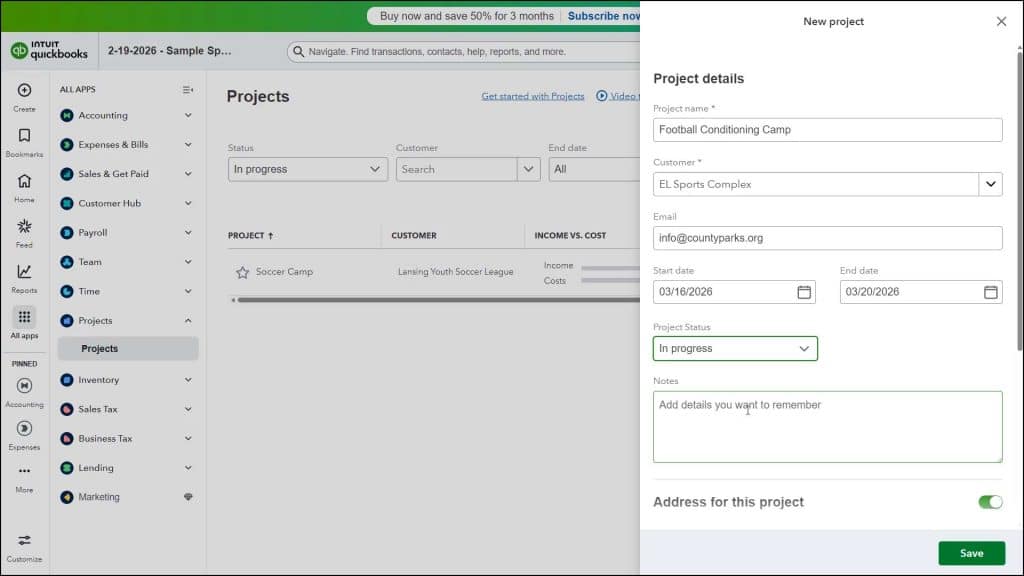
After you create a new project, the “New project” pane appears at the right side of the window. Type a name for the project into the “Project name” field. Select the name of the project’s customer from the “Customer” drop-down, which should then add the customer’s email to the “Email” field, if you entered it. If not, or to use a separate project email, enter the email address in the “Email” field.
Optionally, to set the project’s start date and end date, select choices from the “Start date” and “End date” calendar drop-down fields. To set the status of the project, choose a status from the “Project Status” drop-down. If desired, type any notes or a description of the project into the “Notes” field.
To add project addresses, click the “Address for this project” toggle switch to enable it. Doing this then fills-in the selected customer’s “Billing address” and “Shipping address,” if you entered those when you created the customer. If you didn’t or if you need to change these addresses for the project, enter the addresses, as needed. Then click the “Save” button at the bottom of the pane.
View the Project’s Information in the Project Details Page:
At that point, the details page for the selected project appears. If desired, to return to the main listing of projects, click the “All projects” link in the upper-left corner of the project’s details page. The details page for a project shows the project’s name, customer, and status in the upper-left corner of the page. Below that, on the “Overview” tab, are widgets for income versus cost, profit margin, open invoices, and overdue invoices.
The upper-right corner of the project’s details page contains an “Edit” button and “Add to project” drop-down button. To edit the project’s details, if needed, click the “Edit” button. To add transactions to this project to track its income and expenses, click the “Add to project” drop-down button and select the type of transaction to add. To view associated project information, click the related tab, named “Overview,” “Transactions,” “Time Activity,” “Project Reports,” “Project Details,” and “Attachments,” to then show that information in the project’s details page.
How to View the Projects Page in QuickBooks Online:
If needed, to return to the main “Projects” page, you can also click the “Projects” link under the “Projects” app in the “All apps” bar. This “Projects” page lets you create and manage all your projects, which appear in a projects list in this page.
How to Filter and Search for Projects:
To filter the projects list, select filtering choices from the drop-downs above the list. To find a project, type the value to find into the “Search for project” field to the right of the filtering buttons and then select the name of a matching project from the list that then appears below the field.
How to Sort Projects:
To sort the projects by project name, start date, end date, or status, click the desired column’s heading in the projects list. The column by which you are currently sorting shows an arrow pointing up or down, indicating an ascending or descending sort order is applied to that column’s values. To reverse the current column’s sort order, click its column heading again.
How to Pin Projects and Perform Actions on a Project:
To pin a project to the top of the projects list so it always appears there regardless of sorting, click the star icon to the left of the project name. To unpin a pinned project, click its star icon again. To perform an action on a project, click the “Options” button under its “Action” column. Then select either the “Edit this project,” “Mark as not started,” “Mark as in progress,” “Mark as completed,” “Mark as cancelled,” or “Delete project” command, as needed.
How to Change the Display of the Projects List:
To change the display of the project list, click the “Settings” button in the upper-right corner of the list to show a drop-down menu. To show or hide columns, then check or uncheck the column names under the “Edit Columns” section in the drop-down menu. To show deleted projects in the projects list, check the “Show deleted projects” checkbox under the “Other” heading in the drop-down menu.
How to Print or Export the Projects List:
To print the projects list, click the “Print list” button in the upper-right corner of the list to open a printer-friendly version of the list in a separate browser window or tab and also open your web browser’s “Print” dialog box. Then set the print settings and print it using your web browser’s “Print” dialog box and close the new page or tab that opened. To export the projects list in QuickBooks Online to Excel, click the “Export to Excel” button.
How to Set Employee Cost Rates:
To set the hourly cost rate for employees you created, click the “Manage settings” drop-down at the top of the “Projects” page and then select the “Set cost rate” command to show an “Employee cost rate” window. Your employees then appear in a list within this window and their payroll pay rate information appears, if available. You can edit the pay rate information for any employee’s columns, as needed. To save the changes, when finished, click the “Save” button or the “Save and close” button in the lower-right corner of the window. Alternatively, to cancel your changes, click the “Cancel” button.
How to Convert Sub-customers to Projects:
If transitioning to projects after using sub-customers for projects in QuickBooks Online or if importing jobs from QuickBooks Desktop, note that you can convert an existing sub-customer into a project, if desired. To convert a sub-customer into a project, click the drop-down part of the “New project” button in the upper-right corner of the main “Projects” page. Then select the “Convert from sub-customer” command from the drop-down menu to open a “Convert sub-customers to projects” window.
In this window, check the checkbox next to the name or names of the sub-customers to convert or click the checkbox at the top of the list to select them all. Then select each project’s status from the far-right drop-down. Then click the “Convert” button in the lower-right corner of the window. Then click the “Continue” button in the confirmation window to continue the one-time process of converting them into projects or click the “Cancel” button to cancel the process. Then click the “OK” button in the confirmation window that appears after the conversion finishes.
If you don’t see the project after conversion, use the “Status” filter drop-down button above the projects list to select “All statuses,” as the project may be imported as a “completed” project. Then edit the project, as needed.


